Read and Save These Instructions All Hoods Must Be Installed By A Qualified Installer INSTALLATION INSTRUCTIONS CWLH9 WALL MOUNT HOOD Read All Instructions Thoroughly Before Beginning Installation WARNING TO REDUCE THE RISK OF FIRE, ELECTRIC SHOCK, OR INJURY TO PERSONS, OBSERVE THE FOLLOWING: A. Installation work and electrical wiring must be done by qualified person(s) in accordance with all applicable codes and standards, including fire-rated construction.
“Vent Attract. Ducting Do’s and Don’ts NEVER restrict the duct size. The single blower unit (B100) requires 6” round duct or equivalent (28 square inches), and the dual blower unit (B200) requires 8” round duct or equivalent (50 square inches). When combining ducts together, the square inch area must reflect the total square inch area of the ducts being combined. Using Vent-A-Hood transitions (back page) will ensure proper efficiency. Blower Duct Size 38q.
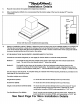
Tattooer Installation Details 1 Read all instructions thoroughly before beginning installation. 2) When installing the COWLS, it is recommended that the bottom edge of the hood be located 27” from the counter top. Duct —_ Cover Shown with duct cover installed (sold separately). | 3 Select an installation method. Method 1 allows the hood and duct cover to be installed together as a single unit. The final duct connection is made at the ceiling as the hood is attached to the wall.
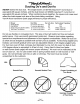
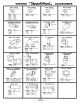
5) “Paratrooper Installation Details Continued Connection Diagrams 30”48” Widths Walt “Side | . Wall Side cant Pe ©, Vent oe Holes . .
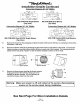
“Ventilator Installation Details Continued install the appropriate UL listed electrical wire clamp through each motor box electrical opening on top of the hood. Pr-install electrical wiring from the service panel to the hood location for each motor box. Consult the connection diagrams {on previous page) for further details on electrical placement. Method 1: Extend wire to the hood. Electrical hook up will occur before the hood is installed on the wall. Method 2: Extend wire to 24” above the counter top.
Installation Details Continued {Continued} FOR BACK VENTING APPLICATIONS ONLY. IF YOU ARE NOT BACK VENTING, PROCEED TO STEP 14. Method 2: Lift the hood up to the wall and hang the hood on the mounting strip, taking care to properly align the duct connection between the hood and the duct in the wall. Secure the hood to the mounting strip by installing the screws (removed from the strip in Step 10) into the pilot holes drilled in Step 12.
VENTING “Pentathlon.