
Installation Instructions

Page 3L122 1210A
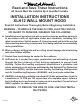
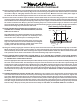
Wall Side
5 ¼”
Electrical
Vent Holes
8” Outlet
Centerline
of Hood
5 ¼”
4 ½”
1 ¾”
Installation Details
1) Read all instructions thoroughly before beginning installation.
2) When installing an XLH12 wall mount hood, it is recommended that the bottom edge of the hood be located no more
than 24” from the cooking surface. Exceeding recommended mounting height may compromise performance.
3) IF THE HOOD IS TO BE “BACK VENTED” (HOODS WITH 10” X 10” SQUARE DUCT COVER ONLY), SKIP STEP 4 AND
PROCEED DIRECTLY TO STEP 5.
Install the 8” duct from the outside of the home to the ceiling over the exhaust outlet of the hood. The end of the duct
should terminate 1” above the ceiling. Consult the connection diagram (below) for further details on exhaust outlet
placement.
Use duct tape to seal all joints. A complete listing of available Vent-A-Hood ducting materials is provided on the back
page of this instruction sheet.
4) FINISHED ROUND DUCT INSTALLATIONS ONLY. IF USING A 10” X 10” SQUARE DUCT COVER, PROCEED DIRECTLY
TO STEP 5.
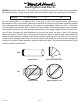
Remove the ceiling mounting plate from the duct collar packaging. Place the ceiling mounting plate on the ceiling
with the notched side 1/16” from the wall (see diagram below). Center the ceiling mounting plate over the location
where the hood will hang. Trace the opening and the four larger screw holes from the plate onto the ceiling. Remove
the ceiling mounting plate and cut the center opening in the ceiling as marked. Place the ceiling mounting plate back
onto the ceiling, aligning the screw holes with the marks on the ceiling. Using appropriate hardware, secure the plate
to the ceiling through the four larger screw holes. Match drill the four smaller holes into the ceiling with a 3/16” drill
bit to a minimum of 3/8” depth. With the notched side toward the wall, place the duct collar under the ceiling mounting
plate taking care to align the pins in the duct collar with the small holes in the ceiling mounting plate. From inside the
duct collar, press the four pins, one at a time, into the ceiling mounting plate.
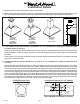
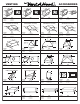
HOOD WITH
OPTIONAL
ROUND DUCT
COLLARS
AND FINISHED
ROUND DUCT
HOOD WITH
OPTIONAL
SQUARE DUCT
COLLARS
AND FINISHED
ROUND DUCT
HOOD WITH
OPTIONAL
10” X 10”
DUCT COVER
Ceiling Mounting Plate Connection Diagram (30”- 36” Widths)
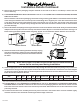
(Top View) 600 CFM B200 Dual Blower (Top View)