36” MaxxAir Portable Evaporative Cooler Owner’s Manual This Manual covers all of the following MaxxAir Portable Evaporative Coolers. EC36D1 – MaxxAir 36” Direct Drive 1 Speed File this owner’s manual in a safe place for future reference. It contains operating procedures – maintenance procedures – trouble shooting guide – replacement parts guide – order form – and contact information.
Warnings and Cautions Read before operating your MaxxAir Portable Evaporative Cooler ELECTRICAL WARNING Do not use a 3 prong to 2 prong adapter on the electrical power cord. Use 12 gauge extension cord only. WARNING Do not remove the grounding lug from the electrical power cord plug. Use only 3 prong, grounded receptacles. WARNING Disconnect the MaxxAir Portable Evaporative Cooler from your electrical power source before performing any service action.
MaxxAir Portable Evaporative Cooler Table of Contents 1.0 Introduction 1.1 Quick Start 1.2 Operate unit for 2 weeks before adding Evap-O-Matic Tablets 2.0 How Evaporative Cooling Works 3.0 Unpacking your new MaxxAir unit 4.0 Set-up your MaxxAir unit 4.1 Connecting the electrical supply 4.2 Connecting the water supply 5.0 Operating procedures 5.1 Filling the units reservoir with water 5.2 Turn-on pump 5.3 Adjust water flow 5.4 Turn-on Fan 6.0 Daily Operating procedures 6.1 Turn-on pump 6.
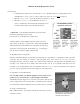
MaxxAir Portable Evaporative Cooler 1.0 Introduction • Your MaxxAir was tested 3 ways. Your unit was tested for 1. Maximum air flow at operating static pressure. Only MaxxAir is tested in operating conditions with 2. Water and 3. Electricity before it is shipped. • MaxxAir is easy to operate – needs only tap water and electricity to operate. • MaxxAir is easy to move – roll your MaxxAir to the area you want to cool.
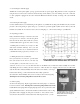
4.1 Connecting the electrical supply All MaxxAir models require regular 3 prongs, ground with 120 volt power supply. Plug electrical cord into receptacle. If using an extension cord be sure it is rated for at least 20 amps for the distance your cord is running. To be safe – make sure no other equipment is plugged into the same circuit. The MaxxAir should run smoothly on 20 amp, 120 volt, and 60 Hz circuit. 4.
open the valve to 1 ¼ turn. Allow water to run for 10 – 15 minutes on new cooling pads to totally saturate them with water. Once your units cooling pads are saturated – then, you are ready to turn on fan and begin to feel the cooling effect from your new MaxxAir. Note: After your cooling pads are broken in (typically takes 1 -2 weeks in operation) it will take less time to saturate pads for start-up. 5.4 Turn-on Fan Once your cooling pads are wet – you may turn on your MaxxAir unit.
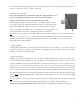
two bolts hold the metal angle retaining bar and the cooling pads in place. Next, remove the angle retaining bar and set to side. Now you are ready to remove your unit’s cooling pads. 7.2 Removing the cooling pads Before your start, make a note of the direction of the angle of the pads flutes (see side of pads). You must put pads back in correct order for your unit to function effectively. (Note: Install steep side 45° angle flute to the back of unit.
7.5 MaxxAir Trouble Shooting Guide Problem Cause Solution 1. Water on the Floor A. Front of unit . . . Too much water. Reduce the water flow with the water control valve located on the front of the unit. Note: Close the valve all the way – then open 1 ¼ turns. (MaxxAir units usually operate at peak performance at 1 ¼ turns). Damage to polyethylene housing. Note: Check for possible cracks in the blue polyethylene. Repair as necessary. Excess water at top or bottom of pads.
Problem (continued) Cause (continued) Solution (continued) 5. Scale build-up on cooling pads. Hard water with excessive mineral content. Use Evapo-O-Matic Tablets or add a Water Stabilizer at the discharge side of the pump. Flush water from unit’s water reservoir more frequently. See section 7.4. 8.0 Storage Remove pads as described above in 7.2 and rinse pads clean with fresh water. Dry cooling pads in sunlight. Drain water reservoir completely and wipe dry. Replace dry cooling pads.
.0 Warranty LIMITED WARRANTY Ventamatic, Ltd. extends this warranty to the original retail purchaser of this fan against defects in materials and workmanship for a period of one (1) year from the date of purchase. There is no warranty for defects caused by abuse. Repairs or replacement parts supplied under this warranty are warranted only for the period of this warranty: that is one year from the date of the original retail purchase of this fan.