PLV16070 Portable Digital TV 7” widescreen LCD Instruction Manual Need More Help? DO NOT RETURN THIS PRODUCT TO THE STORE Please visit online help at http//www.venturer.
Safety Precautions The lightning flash with an arrowhead symbol, within the equilateral triangle, is intended to alert the user to the presence of uninsulated “dangerous voltage” within the product’s enclosure that may be of sufficient magnitude to cause an electric shock. The exclamation point within the equilateral triangle is intended to alert the user to the presence of important operating and maintenance (servicing) instructions in this owner’s manual.
Important Safety Instructions 1. Read these instructions. 2. Keep these instructions. 3. Heed all warnings. 4. Follow all instructions. 5. Do not use this apparatus near water. 6. Clean only with a dry cloth. 7. Do not block any of the ventilation openings. Install in accordance with the manufacturer’s instructions. 8. Do not install near any heat sources such as radiators, heat registers, stoves, or other apparatus (including amplifiers) that produce heat. 9.
ACCESSORIES Remote control with batteries ................................................................................................... x 1 Car power adapter .......................................................................................................................... x 1 AC adapter ............................................................................................................................... x 1 Auxiliary antenna ............................................................
QUICK START GUIDE Turning On the Unit for the first time The first time you turn on the unit, the unit will enter the setup mode. You can easily follow the prompt message on the screen to complete basic TV settings. Make sure the TV antenna has been connected properly to the ANTENNA RF IN Terminal on the side of the TV. 1. Press the / button to select your preferred On-screen menu language. Use the / button to highlight “Go to next step:“ and press the ENTER button to enter next setup screen.
control REFERENCE GUIDE Remote Control 1) SIGNAL MUTE Button Press to turn off the sound. 2) MENU Button Press to display the on-screen menu or switch back to the previous menu screen. 3) CURSOR ( , , , ) Buttons Use to highlight selections on a menu screen and adjust certain settings. ENTER Button Confirm selection on a menu screen. 4) DISPLAY Button Press to display information about the current TV channel. 5) VOL + / VOL - Buttons Press to adjust the volume level.
control REFERENCE GUIDE Unit 6) Direct-connect antenna connecting to the ANTENNA RF IN Terminal 7) HEADPHONE Jack 8) ON / / Charge Switch ON position: Turns TV ON, green indicator will be ON. position: Puts TV in standby mode. Charge position: Recharges the battery, red indicator will be ON. 1) 2) Screen ENTER Button Confirm selection on a menu screen. MENU Button Press to display the on-screen menu or switch back to the previous menu screen.
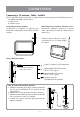
connections Connecting a TV Antenna / Cable / Satellite To view television channels correctly, a signal must be received from one of the following sources: - An indoor or outdoor aerial antenna - A cable system - A satellite system Removing Direct-Connect Antenna Before connecting a different antenna or a coaxial cable, you need to remove the direct-connect antenna first. Using Direct-Connect Antenna To optimize TV reception, try adjusting the orientation and position of the direct-connect antenna.
connection NOTE Optimal indoor reception of over-the-air TV broadcasts is typically achieved using an external fixed antenna. You may find that indoor reception is adequate using the direct-connect antenna. However, for your convenience, we’ve also included an additional antenna with a long cable to give you extra flexibility in antenna placement. In general, you’ll often find that placement of the antenna near windows, or at higher elevations, should improve reception.
power supply Using the AC Adapter The supplied 9V adapter operates on AC 120V ~ 60Hz. AC Power Adapter Cautions: • The AC power adapter included with this unit is for its use only. Do not use it with other equipment. To AC • To prevent electrical shock, match wide blade outlet of plug to wide slot of wall outlet, then fully insert. To DC IN • When the unit is not going to be used for long 9-12V jack time, disconnect the AC power adapter from the AC power outlet.
power supply Cautions: • Use the provided 12V car power adapter only. Use with other car power adapters could damage the unit. • The 12V car power adapter included with this unit are for its use only. Do not use them with other equipment. • In the interest of traffic safety, do not operate this unit while driving a vehicle. • Make sure the unit is securely fastened to prevent it from falling or flying through the air in the event of an accident.
tv setting Picture Menu 1. Press the MENU button. 2. Use the or button to select the options (Picture Mode, Contrast, Brightness, Sharpness, Color, Color Temp or LCD Mode). Adjust them using the or button (Screen will change to your desired setting). 3. Repeat step 2 to adjust other options. 4. To exit the MAIN MENU and return to the normal screen, press the MENU button repeatedly.
tv setting TIME Menu 1. Press the MENU button. 2. Use the or button to select Time, then press the button to enter the Time settings. 3. Use the or button to select the options (Time Zone, DST or Time Format). Adjust them using the or button. 4. Repeat step 3 to adjust other options. 5. To exit the MAIN MENU and return to the normal screen, press the MENU button repeatedly.
tv setting Closed Caption CC Mode : Select closed caption On, Off or CC on Mute. Analog Closed Caption : Select the analog closed caption or turn it off. Digital Closed Caption : Select between different digital closed captions or turn it off. Option : Select as Default to use the default digital caption style of the broadcaster. Select Custom to activate the caption style items and set your desired detailed settings.
tv setting Channel Skip 1. Use the or button to select a channel. (Press the button to select the last channel of the page; press again to go to the next page. Press the button to select the first channel of the page; press again to return to the previous page.) 2. Press the ENTER button to shift between On / Off. (Select ON to skip the selected channel. The channel will not appear when you press the CH / CH button.) Channel Label You can edit a label for each channel. 1.
troubleshooting guide SYMPTOM CAUSE (AND REMEDY) Unit does not work. • Unplug the AC power cord and plug it back in. • Check that the three-way switch is slid to “ON” position. No picture on the TV screen. • Choose different channels on the TV set until the picture appears. No sound. • Make sure the TV sound is not muted. Remote control does not work. • • • • • Can not watch a bilingual TV program in its secondary language.