PLV16100 10” LCD DIGITAL TV INSTRUCTION MANUAL Need More Help? DO NOT RETURN THIS PRODUCT TO THE STORE Please visit online help at http://www.venturer.
SAFETY PRECAUTIONS PLACEMENT INFORMATION • Do not use this unit in places which are extremely hot, cold, dusty or humid. • Do not restrict the air flow of this unit by placing it somewhere with poor air flow, by covering it with a cloth, by placing it on bedding or carpeting. CAUTION : TO REDUCE THE RISK OF ELECTRIC SHOCK, DO NOT REMOVE COVER (OR BACK). NO USERSERVICEABLE PARTS INSIDE. REFER SERVICING TO QUALIFIED SERVICE PERSONNEL.
IMPORTANT SAFETY INSTRUCTIONS 1) 2) 3) 4) 5) 6) 7) 8) 9) 10) 11) 12) 13) 14) Read these instructions. Keep these instructions. Heed all warnings. Follow all instructions. Do not use this apparatus near water. Clean only with dry cloth. Do not block any ventilation openings. Install in accordance with the manufacturer’s instructions. Do not install near any heat sources such as radiators, heat registers, stoves, or other apparatus (Including amplifiers) that produce heat.
QUICK INSTALLATION Before turning on your television set for the first time, be sure to place it on a solid stable surface. To avoid danger do not expose the TV to water, or a heat source (e.g. lamp, candle, radiator). Do not obstruct the ventilation grid at the rear and be sure to leave sufficient gaps around the unit as shown. 1. 2. 3. 4. 5. Connect the TV antenna. Connect the AC/DC adapter. / ON button to turn on the unit. Press the Press the ENTER button.
CONTENTS SAFETY PRECAUTIONS .................................................................................... 1 IMPORTANT SAFETY INSTRUCTIONS ............................................................. 2 QUICK INSTALLATION ...................................................................................... 3 CONTENTS ......................................................................................................... 4 ACCESSORIES ..................................................................
ACCESSORIES Please check and identify the supplied accessories. AC/DC Adapter ........................................................................................................................ x 1 Remote Control (with batteries) .............................................................................................. x 1 GETTING STARTED USING THE REMOTE CONTROL • Point the remote control at the remote sensor located on the unit.
CONTROL REFERENCE GUIDE REMOTE CONTROL 1) MUTE Button Press to turn off the sound. 2) MENU Button Press to display the on-screen menu or switch back to the previous menu screen. 3) CURSOR ( , , , ) Buttons Use to highlight selections on a menu screen and adjust certain settings. ENTER Button Confirm selection on a menu screen. 4) DISPLAY Button Press to display information on the current channel. 5) VOL + / VOL - Button Press to increase/decrease the volume.
CONTROL REFERENCE GUIDE FRONT & BACK VIEWS 1. Left speaker 2. TV ANTENNA terminal Connects a TV antenna or CATV cable. 3. AUDIO IN (Left/Right)/ VIDEO IN jacks 4. Headphones jack 5. DC IN 9V-12V jack 6. Remote sensor Point the remote control here. Standby indicator 7. Color LCD screen 8. Right speaker E 7 9. - VOL + controls Adjusts the volume level and highlights selections (Left & Right) on the TV menu screen. CH buttons Press to confirm selections on the TV menu screen and / to move the TV channels.
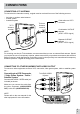
CONNECTIONS CONNECTING A TV ANTENNA To view television channels correctly, a signal must be received from one of the following sources: - An indoor or outdoor aerial antenna - A cable system - A satellite system To TV Antenna terminal Cable without a CATV converter To Home Antenna terminal Combination VHF/UHF antenna (ATSC / NTSC signal) Separate VHF/UHF antenna (ATSC / NTSC signal) NOTE For receiving over-the-air TV broadcasts, we recommend that you use an external fixed antenna.
CONNECTIONS CONNECTING THE AC/DC ADAPTER This AC/DC adapter operates on AC 100V - 120V. 1. Plug the AC/DC adapter cord into the DCIN 9V-12V on the unit. 2. Connect the AC/DC adapter into a wall outlet. To AC wall outlet NOTES • The included AC/DC adapter is for use with To DC this unit only. Do not use them with other IN 9Vequipment. 12V • TO PREVENT ELECTRIC SHOCK, MATCH WIDE BLADE OF PLUG TO WIDE SLOT OF WALL OUTLET, THEN FULLY INSERT.
USING THE TV Connect an antenna or CATV cable or Satellite system to the TV antenna terminal before searching TV channels. Searching for TV channels automatically (Only appears the first time the unit is used) 1. Connect the TV antenna. 2. Connect the AC/DC adapter. 3. Press the / ON button to turn on the unit. 4. Press the ENTER button. 5. Press the or button to select “Air” or “CATV”, then press the ENTER button to start auto scan. 6.
TV SETUP PICTURE SETTINGS 1. Press the MENU button. or button to select the options 2. Use the (Picture Mode / Contrast / Brightness / Sharpness / Tint / Color). or button to make adjustment. The 3. Use screen will change to your selected mode immediately. Press the MENU button to return to the previous menu. 4. Repeat steps 2 and 3 to adjust other options. 5. To exit the TV SETUP MENU and return to the normal screen, press the MENU button on the remote control.
TV SETUP TIMER SETTING 1. Press the MENU button. 2. Use the or button to select TIMER SETTING. or button to select the options 3. Use the (OSD Duration / Sleep Timer / Time Zone / Day Saving Time). 4. Use the or button to make adjustment. Press the MENU button to return to the previous menu. 5. Repeat steps 2 to 4 to adjust other options. 6. To exit the TV SETUP MENU and return to the normal screen, press the MENU button on the remote control.
TV SETUP TV CHANNEL SETTING 1. Press the MENU button. 2. Use the or button to select TV CHANNEL SETTING. or button to select the options 3. Use the (Antenna / Auto Scan / Auto Scan Add CH / Channel Skip / Channel No. / Channel Label). 4. Use the or button to make adjustment. The screen will change to your selected mode immediately. Press the MENU button to return to the previous menu. 5. Repeat steps 2 to 4 to adjust other options. 6.
TROUBLESHOOTING GUIDE SYMPTOM CAUSE (AND REMEDY) No power. • Check that the AC/DC adapter is connected. • The unit is not turned on. The remote does not function. • • • • TV B a d P i c t u r e ( s n o w, multipe images, distortion, blurry) Black and picture. white Remove any obstacles between the remote and the unit. Use the remote near the unit. Point the remote at the remote sensor on the unit. Replace the batteries in the remote with new ones.
LIMITED WARRANTY VENTURER ELECTRONICS (“VENTURER”) makes the following limited warranty. This limited warranty extend to the original consumer purchaser and is limited to non-commercial use of the product. Ninety (90) Day Parts & Labor Warranty VENTURER products purchased in the United States are warranted to be free from defects in materials or workmanship for a period of ninety (90) days from the date of their original retail purchase.