SAFETY PRECAUTIONS PLACEMENT INFORMATION • Do not use this unit in places that are extremely hot, cold, dusty or humid. • Do not restrict the airflow of this unit by placing it somewhere with poor airflow, by covering it with a cloth, by placing it on bedding or carpeting. SAFETY INFORMATION • When connecting or disconnecting the AC power cord, grip the plug and not the cord itself. Pulling the cord may damage it and create a hazard.
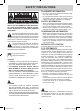
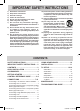
IMPORTANT SAFETY INSTRUCTIONS 1) 2) 3) 4) 5) 6) 7) Read these instructions. Keep these instructions. Heed all warnings. Follow all instructions. Do not use this apparatus near water. Clean only with a dry cloth. Do not block any ventilation openings. Install in accordance with the manufacturer’s instructions. 8) Do not install near any heat sources such as radiators, heat registers, stoves, or other apparatus (Including amplifiers) that produce heat.
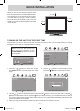
QUICK INSTALLATION When you turn on your television set for the first time, be sure to place it on a solid stable surface. To avoid danger, do not expose the TV to water, or a heat source (e.g. lamp, candle, radiator). Do not obstruct the ventilation grid at the rear and be sure to leave sufficient gaps around the unit as shown. 2 3/8" 2 3/8" 2 3/8" Turning On the Unit for the first time The first time you turn on the unit, the unit will enter the setup mode.
ACCESSORIES Please check and identify the supplied accessories. Remote Control (with batteries) ................................................................................................. x 1 GETTING STARTED USING THE REMOTE CONTROL • Point the remote control at the remote sensor located on the unit. • When there is a strong ambient light source, the performance of the infrared remote sensor may be degraded, causing unreliable operation.
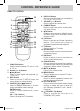
CONTROL REFERENCE GUIDE REMOTE CONTROL 1 6. DISPLAY Button Press to show that input you are watching (TV / AV in / YUV in / PC). 7. VOLUME (- / +) Buttons Press to adjust the volume level. 8. FORMAT Button Press to select the picture format (Auto, 4:3, Wide, Zoom). 9. MTS Button Press to select between MONO sound, STEREO sound and Secondary Audio Program (SAP). 10. CC Button Press to activate the Closed Captioning feature. This function only works on programs broadcasted with captions. 11.
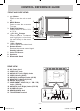
CONTROL REFERENCE GUIDE FRONT AND SIDE VIEWS 1. 2. 3. 4. 5. 6. 7. 8. 9. Button Press to turn the unit on and off. 1 MENU Button Press to enter the on-screen TV menu. 2 FUNCTION Button Press to select TV / AV in / YUV 3 in / PC in. 4 CH / CH Buttons Press to select a TV channel 5 and highlights selections (Up and Down) on the menu 6 screen. - VOL + Buttons Press to adjust the volume level. Remote Sensor Receives the remote control signal.
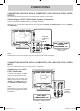
CONNECTIONS CONNECTING A TV ANTENNA / CABLE / SATELLITE To view television channels correctly, a signal must be received from one of the following sources: - An indoor or outdoor aerial antenna - A cable system - A satellite system Connecting a Digital Antenna The tuner in this TV receives ATSC TV signals from an antenna. This digital TV can receive standard (SDTV) and high definition (HDTV) over the air broadcasts.
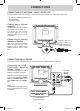
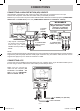
CONNECTIONS CONNECTING DEVICES WITH A COMPOSITE (YELLOW RCA-TYPE) VIDEO OUTPUT To connect A/V devices such as a VCR, video game system or camcorder. Connecting to a VCR / Video Game System / Camcorder Connect the AUDIO / VIDEO cable (not included) as shown. Make sure you connect the cable from the other equipment (AUDIO and VIDEO OUT) to this unit (AUDIO and VIDEO IN). To AUDIO / VIDEO IN jacks (AV IN) VCR / VIDEO GAME SYSTEM / CAMCORDER, etc.
CONNECTIONS CONNECTING A HIGH-DEFINITION (HD) SOURCE High-Definition (HD) Devices with component video output must be connected to the YUV input. Connect the component video cable and audio cable (not included) as shown. Make sure you connect the component video cable and audio cable from the other equipment (COMPONENT VIDEO OUT and AUDIO OUT) to this unit (COMPONENT VIDEO IN and AUDIO IN - YUV IN).
CONNECTIONS CONNECTING AN AUDIO AMPLIFIER This connection allows you to use an audio amplifier and external speakers. Connect the AUDIO cable (not included) as shown. AUDIO AMPLIFIER / EXTERNAL SPEAKERS To AUDIO IN jacks Make sure you connect the cable from the other equipment (AUDIO IN) to this unit (AUDIO OUT). To AUDIO OUT jacks CONNECTING THE AC POWER CORD • Connect the AC power cord into a wall outlet.
INSTALLATION REMOVING THE BASE STAND WARNING: The LCD Display is very fragile, and must be protected at all times when removing the base stand. Be sure that no hard or sharp object, or anything that could scratch or damage the LCD display, comes into contact with it. Do NOT place pressure on the front of the unit at any time because the screen could crack. 1. Disconnect any cables or cords connected to the unit. 2.
TV SETUP Note: Some setting items on the menu screen may not activate depending on what mode the unit is currently in (TV/AV in/YUV in/PC in). PICTURE MENU 1. Press the MENU button. 2. Press the button to enter PICTURE settings. 3. Use the or button to select the options (Picture Mode, Contrast, Brightness, Sharpness, Tint or Color). Adjust them using the or button (Screen will change to your desired setting). 4. Repeat step 3 to adjust other options. 5.
TV SETUP TIME MENU 1. Press the MENU button. 2. Use the or button to select time, then press the button to enter the time settings. 3. Use the or button to select the options (OSD Duration, Sleep Timer, Time Zone or Day Saving Time). Adjust them using the or button. 4. Repeat step 3 to adjust other options. 5. To exit the MAIN MENU and return to the normal screen, press the EXIT or MENU button repeatedly.
TV SETUP PC Set Up (in PC mode only) - Resolution : 1,440 x 900 max - Refresh Frequency : 60Hz max PICTURE H - Pos : Center the image by moving it left or right. V - Pos : Center the image by moving it up or down. Clock : Adjusts the display clock to change width of the image. Phase : Adjusts the image if there is flicker of screen letters, color misalignment, or blurring.
TV SETUP Parental 1. Use the or button to select various Parental settings. Adjust them using the or button, or press the button to go into the detailed settings. 2. Press the MENU button to return to the previous menu. 3. Repeat steps 1 - 2 to adjust other options. 4. To exit the MAIN MENU and return to the normal screen, press the EXIT or MENU button repeatedly. PICTURE AUDIO Rating Enable U.S.
TV SETUP TV MENU (For TV Mode Only) 1. Press the MENU button. 2. Use the or button to select TV, then press the button to enter the TV settings. 3. Use the or button to select the options (Antenna, Auto Scan, Auto Scan Add CH, Channel Skip, Channel No. Channel Label or DTV Signal). Adjust them using the or button, or press the button to go into the detailed settings. 4. Press the MENU button to return to the previous menu. 5. Repeat steps 3 and 4 to adjust other options. 6.
MAINTENANCE CLEANING THE UNIT • Be sure to turn the unit off and disconnect the AC power cord before cleaning the unit. • Wipe the unit with a dry soft cloth. If the surfaces are extremely dirty, wipe clean with a cloth that has been dipped in a weak soap-and-water solution and wrung out thoroughly. Then wipe it with a dry cloth. • Never use alcohol, benzene, paint-thinner, cleaning fluid or other chemicals. Do NOT use compressed air to remove dust.
Unit : INCH 18 4 14 7/8 16 5/8 6 5/8 11 12 ½ 8 5/8 7 10 15/16 E - 18 PLV36199.
VENTURER ELECTRONICS (“VENTURER”) makes the following limited warranty. This limited warranty extend to the original consumer purchaser and is limited to non-commercial use of the product. Ninety (90) Day Parts & Labor Warranty VENTURER products purchased in the United States are warranted to be free from defects in materials or workmanship for a period of ninety (90) days from the date of their original retail purchase.