Digital Picture Frame with 128MB Internal Memory Operating Instructions VPF810DL-CHER VPF1010DL-BRW / VPF1010DL-BLK Need More Help? DO NOT RETURN THIS PRODUCT TO THE STORE Please visit online help at http://www.1800customersupport.
SAFETY PRECAUTIONS The lightning flash with an arrowhead symbol, within the equilateral triangle, is intended to alert the user to the presence of uninsulated "dangerous voltage" within the product's enclosure that may be of sufficient magnitude to cause an electric shock. CAUTION: TO REDUCE THE RISK OF ELECTRIC SHOCK, DO NOT REMOVE COVER (OR BACK). NO USERSERVICEABLE PARTS INSIDE. REFER SERVICING TO QUALIFIED SERVICE PERSONNEL.
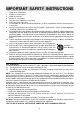
IMPORTANT SAFETY INSTRUCTIONS 1. 2. 3. 4. 5. 6. 7. 8. 9. 10. 11. 12. 13. 14. Read these instructions. Keep these instructions. Heed all warnings. Follow all instructions. Do not use this apparatus near water. Clean only with a dry cloth. Do not block any of the ventilation openings. Install in accordance with the manufacturer’s instructions. Do not install near any heat sources such as radiators, heat registers, stoves, or other apparatus (including amplifiers) that produce heat.
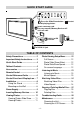
QUICK START GUIDE ENTER EXIT SETUP MENU MODE Press the Slide Show button ( displaying photos. )to start Insert a memory card. For easy removal, Memory Devices will stick out a bit. Switch to ON position. 1 2 To AC outlet To DC IN 9V jack TABLE OF CONTENTS Photo Viewing Setup Menu ......... Full Screen ................................ Photo Slide Show Effect .......... Photo Slide Show Speed .......... On-screen Language ................ Safety Precautions ........................
ACCESSORIES Please check and identify the supplied accessories. • To order accessories visit web site (http://www.1800customersupport.com/V7) AC Power Adapter .................................................................................... x 1 Remote Control ......................................................................................... x 1 REMOTE CONTROL Using the Remote Control • Point the remote control at the REMOTE SENSOR located on the unit.
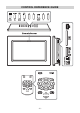
CONTROL REFERENCE GUIDE -6-
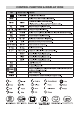
CONTROL FUNCTION & DISPLAY ICON -7-
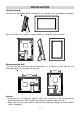
INSTALLATION Using the Stand The unit can be placed either horizontally or vertically to fit the photos on display. You can rotate the stand as shown below to stand the unit vertically. Mounting on the Wall The unit can be mounted either horizontally or vertically on the wall by the mounting holes on the back of the unit. 100mm 155 mm Caution: • Mounting the unit requires special skills that should only be performed by qualified personnel. You should not attempt to do the work yourself.
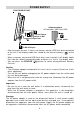
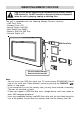
POWER SUPPLY RIGHT SIDE OF UNIT AC power adapter AC between 100V and 120V 3 Turn the Power switch to ON position 1 2 To AC outlet To DC IN 9V jack • After turning on the unit, if there is no memory card or USB flash drive connected to the unit, it will display media files stored on the internal memory ( ) of the unit. • When a memory card or/and USB flash drive is/are inserted, it will display media files from the recently connected media or device in a last-in, first-display order.
INSERTING MEMORY DEVICES Stop the unit before connecting or disconnecting a memory card or USB flash drive. Do NOT connect or disconnect external equipment when the unit is playing, coping or deleting files.
VIEWING PHOTOS Slide Show 1. Press the SOURCE ( ) button to select photo source. 2. Start slide show: press the SLIDE SHOW ( ) button. 3. Stop slide show: press the ENTER or EXIT button. Slide Show with Music background 1. Press the SOURCE ( ) button to select music source. 2. Press the MUSIC button to select music mode. / buttons to highlight a music file, then press the ENTER button 3. Use the to start music playback. 4. Press the SLIDE SHOW ( ) button to enter slide show with the music background. 5.
PHOTO VIEWING SETUP MENU 1. 2. 3. 4. 5. Press the EXIT button to stop photo playback. Press the SETUP MENU button to enter setup menu. Use the / buttons to highlight your selection, then press the ENTER button to confirm. Use the / buttons to select the options, press the ENTER button to confirm the selection. Press the EXIT button to exit the setup menu. Full Screen Slide Show Speed This option allows you to choose how your photos fit on the display.
LISTENING TO MUSIC Listening to Music 1. Press the SOURCE ( ) button to select music source. 2. Press and hold (few seconds) the MUSIC button to select MUSIC mode. Music files appear. Note: Support .mp3 music file. 3. Use the / buttons to highlight a music file, then press the ENTER button to start playback. During music playback: • Press the / buttons to perform fast forward/reverse. • Press the ENTER button to pause playback, press the ENTER button again to resume playback.
WATCHING VIDEO FILES Watching Video Files 1. Press the SOURCE ( )button to select video source. 2. Press and hold (few seconds) the VIDEO button to select VIDEO mode. Video files appear. Note: Support .avi video file. 3. Use the / buttons to highlight a video file you want to play, then press the ENTER button to start playback. During video playback: / buttons to perform fast forward/reverse. • Press the • Press the ENTER button to pause playback, press the ENTER button again to resume playback.
COPYING / DELETING MEDIA FILES Copying Files You can copy media files among the internal memory, memory card or USB device. 1. Press the EXIT button to stop photo, music or video playback. 2. Use the , , , buttons to highlight copy media file. 3. Press the SETUP MENU button to enter setup menu. 4. Press the / buttons to highlight Copy File. 5. Press the ENTER button to display the available device for copying file to (Make sure to connect the other memory card or USD device first.) 6.
TROUBLESHOOTING GUIDE SYMPTOM CAUSE (AND REMEDY) Screen freezes. • Turn off the unit and unplug the AC power adapter , then reinsert the AC power adapter and turn on the unit again. No power. • Ensure that the AC power adapter is connected correctly. Cannot read the memory card. • • • • Ensure the memory card is not damaged. Ensure the media files are under the root directory of the memory card. Ensure the memory card is inserted to the unit correctly. Pull out the memory card and insert it again.