
Operating instructions


Charged Aerosol Detectors
Corona Veo and Corona Veo RS
Operating Instructions Page 47
5.2 Turning on the Power to the Detector
Before powering up the detector, be sure that all preparations for startup have been carried
out (→ section 4, page 33).
To start the detector for the first time, turn on the main power switch on the rear panel of
the detector.
The following sequence of events occurs when the detector is powered up:
• Self-test diagnostics
The detector runs a series of internal tests. During these self-diagnostics, all of the main
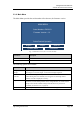
components are checked. When testing is complete and has been successful, the display
will show the start up screen with the current detector firmware version, followed by the
warm-up screen.
• Warm-up phase
In the warm-up state, the detector monitors the internal temperature of the components.
The warm-up time may be longer if the ambient temperature is cool or cold. When the
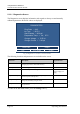
detector has properly warmed up, the display will show the Main Menu.
• Self-test error
If an error is detected during the self test, the detector is not ready for analysis. The status
of the test and an error code appear on the display. Take appropriate remedial action as
described in the 'Troubleshooting' section (→ section 7, page 91).
If the detector continues to fail the self test, write down the error code and contact the
Thermo Fisher Scientific Service for Dionex HPLC products.
For routine operation, leave the main power switch on. Turn the main power switch off
when instructed to do so, for example, before performing a maintenance procedure or
when interrupting operation for longer periods (one week or more). In this case, also
observe the precautions in section 5.8 (→ page 74).