
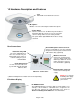
User's Guide Network Camera Observer


Page 10 of 65
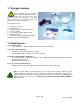
2.3 Mounting the Camera
The Observer can sit on a flat surface, such a shelf or bookcase, be mounted to a wall using the included
bracket, or mounted atop a tripod stand using the standard tripod mount located on the underside of the base.
When using the camera free standing, be sure to secure the cables. Failing to secure the cables could cause
the camera to be pulled off the mounting surface resulting in damage to the camera.
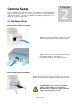
Wall Mounting
The mounting bracket included with your camera provides convenient mounting to vertical surfaces, such as
walls. The camera support platform can be tilted up or down to help point the camera toward your area of
interest. You can also rotate the camera in any direction on the platform.
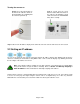
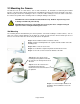
Step 6. Place the camera on the
mounting bracket platform and rotate
the camera to be facing in the desired
direction.
Step 7. Secure the camera to the
mounting bracket using the
thumbscrew located on the bottom of
the platform.
CAUTION: The camera should be mounted indoors only. Outdoor exposure may result
in damage and will void your warranty
CAUTION: Don’t mount the camera with the lens facing into direct sunlight. Prolonged
exposure to direct sunlight will damage the sensor.
Step 1
. Find a suitable location to mount the camera.
Step 2. Using the mounting bracket as a guide, mark the location of the two
mounting holes.
Step 3. Drill a ¼” hole for each screw.
Step 4. Use a hammer to tap the two plastic anchors into the holes.
Step 5. Use the two screws to fasten the bracket to the wall.
Step 8
. Loosen the tilt adjust thumbscrew
and tilt the camera toward the area to be
observed.