
Installation Guide


Check local ordinances and regulations before building your
fence. Before construction, contact your local utility companies
to mark any underground cables and pipelines. In addition, it is
a good idea to discuss plans with any neighbors along your
proposed fence line.
• Determine the number of posts, panels and gates needed to
complete the job based on the total linear footage. Take into
consideration post, panel and gate widths when determining
the total number of each.
• Adjust layout to accommodate as many full panels as possible.
If you must use a partial panel, place it in the farthest rear
corner of the property.
• Locate property boundaries and drive stakes into the ground
at corners and ends of fence line, based on local municipality
regulations.
• Stretch twine or heavy string between stakes and pull tight
to mark layout of fence line.
• Be sure to measure your fence panels and gates prior to
determining the location of the postholes. Place posts in the
following order along string line:
• End/corner posts • Gate posts • Line posts
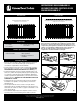
Most yards are relatively level and will allow for a fairly simple
installation. If your yard is steeply pitched or very uneven, be
sure to allow for the required mounting height of the adjacent
panel when setting your posts. You may need to "stair step"
the panels in extreme cases (fig. 1).
A general rule of thumb is to place 1/3 of the post into the ground.
Check local regulations for any special requirements. The fence
will be stronger if the end, corner and gate posts are set at least
6" deeper than the line posts. Using a posthole digger or power
auger, dig the holes 10-12" wide and 6" deeper than needed.
Backfill the holes with 6" of gravel to drain water away from the
bottom of the posts (fig. 2). Keep the height of your fence panels
in mind when digging your postholes.
Step 3Preparation
Installing fences on sloped landscapes
Digging postholes
Items you may need
Design and layout
StepSpacedPic.ai
fig. 1
Step method
Step method
36" to 42"
10" to 12"
Diameter
Level
Fig.4.pdf
fig. 2
fig. 1
68-1/2" from
Post to Post
Corner or End Post
Level
Fig.5.pdf
fig. 3
* One per panel and
one to complete
fence run.
• Fence posts*
• Posthole digger
• Measuring tape
• Clear PVC cement
• Drill
• Screwdriver
• Level
• Chop saw
• String line
• Concrete
• Gravel
• Shims
• Pencil
• Safety glasses
• Gloves
©2015, 2017 Universal Forest Products, Inc. All rights reserved.
68956 U.S. Hwy 131, White Pigeon, MI 49099 616.365.4201 9500_8/17
www.ufpi.com
4x8 SPACED 3" PICKET PANEL INSTALLATION INSTRUCTIONS