
Instructions / Assembly


©2016 Universal Forest Products, Inc. All rights reserved.
68956 U.S. Hwy 131, White Pigeon, MI 49099 616.365.4201 9011_9/16
www.ufpi.com
Assembling the panel
STEP 1
Install first post with concrete (See “Digging postholes” and fig. 1).
STEP 2
Slide the reinforced bottom rail into place at the bottom of the
routed post (fig. 2).
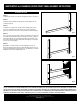
STEP 3
Install the second post into the ground and temporarily secure
into place. Set the bottom rail into the second post and level
(fig. 3). (You will secure the second post with concrete in Step 6).
STEP 4
Place one end of the top rail into first post, allowing one end to be
free. Slide the pickets through the routed holes in the top rail into
the bottom rail. Be sure each picket is properly seated into each
hole in the bottom rail. When all pickets are in place, lock top rail
into the second post (fig 4).
STEP 5
Backfill the second post with concrete and make sure it’s set
before moving down the fence line. This will always allow one post
to be anchored while each panel section is assembled. To continue
building your fence line, repeat Steps 1-6.
West/AlexFig2.ai
fig. 2
WESTCHESTER & ALEXANDRIA SPACED PICKET PANEL ASSEMBLY INSTRUCTIONS
West/AlexFig4.ai
West/AlexFig5.ai
fig.3
fig. 4
THE DIAGRAMS AND INSTRUCTIONS IN THIS BROCHURE ARE FOR ILLUSTRATION PURPOSES ONLY AND ARE NOT MEANT TO REPLACE A LICENSED PROFESSIONAL. ANY CONSTRUCTION
OR USE OF THE PRODUCT MUST BE IN ACCORDANCE WITH ALL LOCAL ZONING AND/OR BUILDING CODES. THE CONSUMER ASSUMES ALL RISKS AND LIABILITY ASSOCIATED WITH THE
CONSTRUCTION OR USE OF THIS PRODUCT. THE CONSUMER OR CONTRACTOR SHOULD TAKE ALL NECESSARY STEPS TO ENSURE THE SAFETY OF EVERYONE INVOLVED IN THE PROJECT,
INCLUDING, BUT NOT LIMITED TO, WEARING THE APPROPRIATE SAFETY EQUIPMENT. EXCEPT AS CONTAINED IN THE WRITTEN LIMITED WARRANTY, THE WARRANTOR DOES NOT
PROVIDE ANY OTHER WARRANTY, EITHER EXPRESS OR IMPLIED, AND SHALL NOT BE LIABLE FOR ANY DAMAGES, INCLUDING CONSEQUENTIAL DAMAGES.