
Instructions / Assembly


4x8 SPACED SCALLOPED 1.5" PICKET PANEL INSTALLATION INSTRUCTIONS
THE DIAGRAMS AND INSTRUCTIONS IN THIS BROCHURE ARE FOR ILLUSTRATION PURPOSES ONLY AND ARE NOT MEANT TO REPLACE A LICENSED PROFESSIONAL. ANY CONSTRUCTION OR
USE OF THE PRODUCT MUST BE IN ACCORDANCE WITH ALL LOCAL ZONING AND/OR BUILDING CODES. THE CONSUMER ASSUMES ALL RISKS AND LIABILITY ASSOCIATED WITH THE
CONSTRUCTION OR USE OF THIS PRODUCT. THE CONSUMER OR CONTRACTOR SHOULD TAKE ALL NECESSARY STEPS TO ENSURE THE SAFETY OF EVERYONE INVOLVED IN THE PROJECT,
INCLUDING, BUT NOT LIMITED TO, WEARING THE APPROPRIATE SAFETY EQUIPMENT. EXCEPT AS CONTAINED IN THE WRITTEN LIMITED WARRANTY, THE WARRANTOR DOES NOT
PROVIDE ANY OTHER WARRANTY, EITHER EXPRESS OR IMPLIED, AND SHALL NOT BE LIABLE FOR ANY DAMAGES, INCLUDING CONSEQUENTIAL DAMAGES.
©2020 UFP Retail Solutions, LLC. All rights reserved. PicketLock is a trademark of UFP Industries, Inc.
68956 U.S. Hwy 131, White Pigeon, MI 49099 616.365.4201 11261_7/20
www.ufpi.com
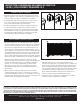
SpacedPicFig6.ai
fig. 6
2
"
Setting and installing posts and panels
Installing brackets to posts
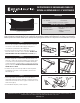
• Prepare the pre-assembled fence panels by sliding the
mounting brackets onto the rails with the open space at the
top. Slide the bracket fully onto the rail.
• While holding the bracket in place, attach one screw into one
of the slotted holes. Place the screw at the end of the slot
closest to the mounting face of the bracket (fig. 4).
• This will temporarily hold the bracket to the panel while you
place the complete panel between the posts. Do this for all
brackets on each fence panel prior to installation. You will be
able to slide the bracket outward to get a perfect fit if your
post opening is slightly wider than the suggested dimension.
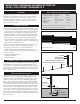
• Starting at a corner, mix concrete in the first hole per the
instructions on the bag. Mix thoroughly and install the post into
the hole and tap the post to the proper depth. Measure to be
sure you can install the finished panel to the post with approxi-
mately a 2" gap from the ground to the bottom of the panel.
You may also need to leave a space from the highest point of
the panel to the top of the post (fig. 5). The spacing allows the
cap to be installed on top of the post without interference with
the top rail.
• Install the next post as described above, paying careful
attention to the spacing between posts. It is important to
determine the height requirement for mounting the next
panels, as you may need to leave more post above the
ground to accommodate its mounting height (especially
if you are installing the fence on an uneven landscape).
• Slide the panel between posts and position to the desired
height. Use wooden blocks or shims to obtain the proper
spacing from the ground. Using the supplied screws
(four per bracket), attach the panel to the posts. Be sure
to center the fence brackets on the post.
• Use a level to ensure the fence is plumb and the posts are
square with the ground. Brace the panel and post to hold the
position as the concrete sets (per the time frame established
in the manufacturer's instructions). Continue setting posts and
installing panels to complete the project. Once posts are set,
finish panel installation by using the provided screws to secure
the fence bracket to the panel.
• Install a post cap on each post using a clear PVC cement
or an exterior adhesive.
fig. 5
fig. 4