
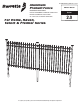
Installation Guide


7
1
1
2
2
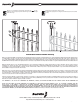
Self closing hinges are included with all gates. Make sure hinges are set in
the proper direction to accommodate either left or right handed gates or
provide an inside or outside swinging gate. The post that will have the gate
hinges screwed to it will be the (thick walled) "heavy-duty gate post".
Make sure the fl ange side of the hinge is the side the gate and post will be
installed onto.
Release tension of hinges with a standard screwdriver prior to installing.
Take a fl athead screwdriver and push in the tension adjuster and turn 1/2 turn.
If the gate is not attached to fence sections on both sides, then it is advised to
install the hinge on the side of the gate with the fence section attached.
Gate Installation
3
3
4
4
Once the concrete has completely set around the gate post(s) (may take
5-7 days), gates may be hung.
Set the hinges on the gate. Line up the top of hinge with top of top gate
rail. Line up bottom of bottom hinge with bottom of bottom gate rail.
Drive two 1
1
⁄
1
⁄
1
4
⁄4⁄
" self-tapping screws through upper hinge into
gate
gate
(use
the inside holes for this step). Repeat for bottom hinge.
Hang gate to post. Make sure the horizontal rails of the gate are at
the same level as the horizontal rails of the fence panels. Do this
by either lifting gate by hand, or by inserting temporary spacer
blocks under the gate to keep gate in place while mounting it to
gate post.
Gate
Gate Post
Opening Direction
Opening Direction