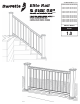
Elite Rail & Stair Rail Assembly and Installation Instructions PLEASE READ OWNER'S MANUAL COMPLETELY BEFORE ASSEMBLING YOUR RAIL. ALL STATED SIZES ARE NOMINAL DIMENSIONS.
Rail Installation Thank you for choosing the Barrette Outdoor Living Railing. Please read the instructions completely before assembling your rail. Retain manual and your dated sales slip for future reference and warranty claims. Before You Begin… Make sure your project meets local building codes before beginning installation.
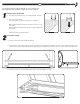
TIP: Precision cuts required to ensure optimum tight installation and fit. Use chopsaw with thin carbide tip blade to ensure smooth cuts. Pay particularly close attention to angle cuts to ensure tight fit. 1 Install Post Sleeves and Base Trim 1.1: Closely follow post install kit instructions (or sleeve existing wood 4x4) - Instructions included in Post Install Kit (sold separately). 1.2: Trim Post sleeve to desired length. (39" is recommended for a 36" finished rail height.
3 Prepare the Bottom Rail 3.1: Install lower rail brackets. Position the provided bracket install template on the top of the installed post base trim. Use template to align the bottom brackets to the center of the post sleeve, making sure "THIS SIDE UP" on bracket faces up. Pre-drill bracket holes with 1/8" drill bit and attach bracket with #10 x 2-1/2" supplied screws. 3.2: Install Center Support Brace A.
5 Prepare the Top Rail 5.1: Plug in top brackets to chassis with "This Side Up" facing up to the top. 5.2: Attach the bracket to the chassis with a supplied #8 x 5/8" self tapping screw in groove in chassis. Repeat on opposite side. (NOTE: For 10' rail kits, chassis will be made of aluminum and should be pre-drilled with 1/8" drill bit.) 5.3: Turn chassis upside down and lay baluster spacer on top of chassis.
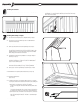
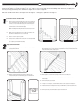
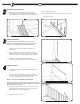
6 7 Installing the balusters 6.1: Slide top rail over the top of the assembled “chassis” fitting snug to posts. 6.2: Through the holes in the top rail baluster spacer made in Step 5.7, screw the provided #10 x 2" screws through the baluster spacer and chassis into the top rail to connect the assembly. Installing Elite Railing on Angles 7.1: Use wood 2x4 as a template prior to cutting Elite railing on angles. 7.2: Place 2x4 on top of posts in which angle cut is needed.
8 Installing the Deck Board in “Over the Top” Format Note: Make sure posts are at same height as rail installation (with a good, tight installation, post and post sleeve to be cut to 35 13/16" high) 8.1: Follow instructions from Steps 2-3-4-5. 8.2: Place deck board (sold separately) over the top rail. Attach with board manufacturer recommended 2" screws into center of rail, through board, ensuring screws engage chassis.
Stair Rail Installation Thank you for choosing the Barrette Outdoor Living Railing. Please read the instructions completely before assembling your rail. Retain manual and your dated sales slip for future reference and warranty claims. Before You Begin… Make sure your project meets local building codes before beginning installation.
TIP: Building codes are specific as to angles, steepness, and dimensions of stair installations. Typical stair angles are usually 32 degrees (7" rise, and 11" run). Check with your local building code official as you plan your stair layout. Pay particularly close attention to angle cuts to ensure a tight fit. Elite stair rail kits work with a stair slope from 26 degrees - 38 degrees; optimal at 32 degrees. 1 Install Post Sleeves and Base Trim 1.1: Trim Post sleeve to desired length.
2 3 (Continued From Previous Page) 2.10: Slide bottom rail over installed brackets, fitting rail snug to posts. Approximately 1/2" from end of post, pre-drill through rail and bracket with 1/8" drill bit. Drive the provided #10 x 1" screw through the top of the bottom rail into bottom bracket. Installing The Balusters TIP: When miter cutting balusters make sure to start cut at top edge of baluster to maximize length and ensure consistent cuts between balusters. 3.
4 (Continued From Previous Page) 4.6: Attach the bracket to the chassis with supplied #8 x 5/8" self tapping screw in groove in chassis. Repeat on opposite side. 4.7: If angle is not 32 degrees cut bracket to desired angle. 4.8: Remove baluster spacer from top rail. 4.9: Turn chassis upside down and lay baluster spacer on top of chassis. Make sure the baluster spacer completely covers the chassis and brackets without extending beyond ends of brackets. 4.
5 6 Installing The Top Rail 5.1: Slide previously cut top rail over the top of the assembled chassis, fitting snug to posts. Installing the Deck Board "Over the Top" Format (Make sure bottom stair post is at same angle as stair rail installation. Bottom stair post height will vary depending on angle of stair installation) 6.1: Follow instructions from step 2. 6.2: Follow instructions from step 3. 6.3: Follow instructions from step 4. 6.4: Follow instructions from step 5. 6.
7 Finishing Touches Add a final touch by attaching post tops to the posts.
Transferable Limited Lifetime Warranty What is covered: Barrette Outdoor Living warrants vinyl and aluminum products to include; vinyl and aluminum fence, vinyl and aluminum railing and plastic lattice against defects or workmanship for as long as you own your home. Barrette Outdoor Living will at its option replace the product in question with new product of the same or equivalent value at no charge.