
Installation Guide


10
2
2
3
3
4
4
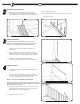
2.10: Slide bottom rail over installed brackets, fi tting rail snug to posts.
Approximately 1/2" from end of post, pre-drill through rail and bracket
with 1/8" drill bit. Drive the provided #10 x 1" screw through the top of the
bottom rail into bottom bracket.
3.1: For 1-1/8" square balusters:
Cut balusters with miter saw, top and bottom, to same angle as the
bottom rail cut.
3.2: For 3/4" round aluminum stair balusters: the top & bottom ends of the
balusters are already cut to a 32 degree angle. For severe angles trim the
bottom of your aluminum stair baluster to appropriate angle. (Top end will
be hidden in top rail)
3.3: Slide balusters over the previously installed baluster plugs.
Each baluster should be straight up, parallel to the posts and fl ush to the
bottom rail.
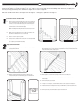
4.1: Measure distance between top of installed posts. As long as posts are
plumb, the distance will equal the distance at the bottom. This will be the
top rail distance.
4.2: To determine chassis length, insert lower bracket into one end of chassis.
Then place chassis on stair treads with the lower bracket against the
lower post. Using the upper bracket as template, mark the chassis where it
needs to be cut to fi t between the posts. Cut chassis to length.
NOTE: Do not cut chassis at an angle
4.3: Clamp top rail and baluster spacer along the sides of the posts, so that the
distance between the post to the fi rst routed hole is equal on both ends
Mark angled line on top rail assembly at intersection.
4.4: Cut top rail and baluster spacer to proper length and angle with miter saw.
4.5: Plug in top stair brackets to chassis.
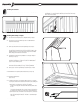
2.11: Re-install bottom baluster spacer
2.12: Install baluster plugs into the holes of the bottom baluster spacer. Push
each plug through the routed hole until you hear a snap, repeat until every
hole is fi lled with a plug.
(Continued From Previous Page)
Installing The Balusters
Prepare The Top Rail
TIP: When miter cutting balusters make sure to
start cut at top edge of baluster to maximize length
and ensure consistent cuts between balusters.
TIP: Ensure proper fi t by cutting a test piece of wood to
the previously determined length and angle to fi t into the
opening between the posts.