
Installation Guide


11
4
4
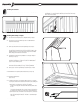
4.6: Attach the bracket to the chassis with supplied #8 x 5/8" self
tapping screw in groove in chassis. Repeat on opposite side.
4.7: If angle is not 32 degrees cut bracket to desired angle.
4.8: Remove baluster spacer from top rail.
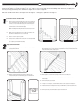
4.9: Turn chassis upside down and lay baluster spacer on top of
chassis.
Make sure the baluster spacer completely covers the chassis
and brackets
without extending beyond ends of brackets.
4.10: Install baluster plugs through spacer cover into the
chassis until you hear a snap.
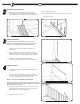
4.11: Carry assembled top rail chassis and plugs over to rail
section and slide baluster plugs into the previously
installed balusters. Align plugs partially into each
baluster. After all are engaged,
fi rmly push down to ensure balusters fully engage the
baluster plugs and the top baluster spacer becomes
tight to the aluminum chassis.
4.12: Using supplied #10 x 2" screws, attach top brackets to
center of post.
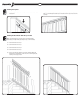
4.13: Pre-drill with a 13/64" drill bit from the top of the
installed chassis down all the way through baluster
spacer cover. Drill holes on both sides of chassis on
the scored lines. Drill fi rst two holes between the fi rst
and second baluster, then, drill the remaining holes
evenly across the length of the chassis.
(Continued From Previous Page)
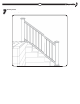
Drill between
fi rst and second
baluster
Drill on scored lines