
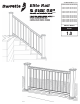
Installation Guide


3
1
1
2
2
TIP: Precision cuts required to ensure optimum tight installation and fi t.
Use chopsaw with thin carbide tip blade to ensure smooth cuts.
Pay particularly close attention to angle cuts to ensure tight fi t.
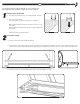
1.1: Closely follow post install kit instructions (or sleeve existing wood 4x4) - Instructions
included in Post Install Kit (sold separately).
1.2: Trim Post sleeve to desired length.
(39" is recommended for a 36" fi nished rail height. 45" is recommended for a
42" fi nished rail height)
(NOTE: If installing railing with a deck board as a top rail and “over the post”, see note
in Step 7 fi rst!)
(NOTE: If installing Elite low voltage lighting, refer to Elite L.V. Lighting installation guide
for post heights.)
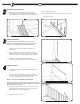
1.3: Slide post sleeve and base trim over wood 4 x 4 or already installed post
install kit (See separate post install kit instructions).
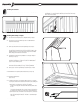
2.1: Measure the distance at the bottom of the post sleeves between already installed posts.
2.2: As long as posts are plumb, top rail length will equal bottom rail.
2.3: Cut top and bottom rails to length. When cutting top rail be sure to begin cut through top of top rail for best fi nish.
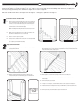
2.4 Place baluster spacer in top of bottom rail, which was cut to proper length in Step 2.3. Align allowing for equal distance of end holes to end of rail. Mark baluster spacer on each
end with a pencil. As long as posts are plumb top rail baluster spacer will equal bottom rail baluster spacer. Cut baluster spacers one at a time. Be sure to cut slowly with a fi ne
tooth blade, positioning the "legs" downward.
2.5: Cut chassis to a length of 4" less than the distance between posts. Be careful when handling the cut chassis.
2.6: For angled installations, see Step 7.
Install Post Sleeves and Base Trim
Cut Your Rails to Length