
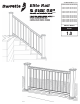
Installation Guide


4
3
3
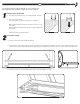
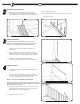
3.1: Install lower rail brackets. Position the provided bracket install template on the top of the installed post base
trim. Use template to align the bottom brackets to the center of the post sleeve, making sure "THIS SIDE UP"
on bracket faces up. Pre-drill bracket holes with 1/8" drill bit and attach bracket with #10 x 2-1/2"
supplied screws.
3.2: Install Center Support Brace
A. For 6' sections one support brace is included
• Measure equal distance from both ends of bottom railing
and install support brace in center of bottom rail with
supplied screws (two #10 x 3/4"). (Pre-drill with 1/8" drill bit.)
B. For 8' and 10' sections two support braces are included
• Measure length of bottom rail and divide by three - then
measure that distance from each end of rail and install
support braces with supplied screws (two #10 x 3/4").
(Pre-drill with 1/8" drill bit.)
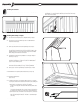
3.3: Install the bottom rail to the previously attached brackets. Slide bottom rail on top of brackets. Approximately 1-3/4" (Not more than 3") from end of post, pre-drill through rail
and bracket with 1/8" drill bit. Drive the provided (#10 x 1") screw through the top of the bottom rail into brackets.
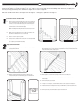
3.4: Place baluster spacer into the top of the bottom rail.
3.5: Install baluster plugs into the holes of the bottom rail baluster spacer. Push each plug
through the routed hole until you hear a snap. Repeat until every hole is fi lled with a
baluster plug.
Prepare the Bottom Rail
4
4
4.1: Slide balusters over the previously installed baluster plugs. Each
baluster should be straight up, perpendicular to the bottom rail, and
parallel to the posts.
Installing the balusters