
Installation Guide


6
6
6
7
7
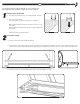
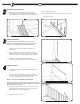
6.1: Slide top rail over the top of the assembled “chassis” fi tting snug to posts.
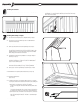
7.1: Use wood 2x4 as a template prior to cutting Elite railing on angles.
7.2: Place 2x4 on top of posts in which angle cut is needed. Mark from
underneath and cut angle.
7.3: Place wood piece between posts to ensure tight fi t.
7.4: Cut the top and bottom rails at same length/angle as wood piece.
7.5: Cut the top and bottom rail brackets (4) at same angle as rail. Do this
by temporarily connecting brackets to chassis. (Chassis provides a safe
handling of bracket so as not to have hands or fi ngers near saw blade
while cutting). Remove brackets from Chassis.
7.6: Install bottom rail brackets using template to locate proper height of
brackets (see Step 3.1).
7.7: Place baluster spacer in the top of the previously cut bottom rail. Align
allowing for equal distance of end holes to end of rail. Mark baluster
spacer on each end with a pencil.
7.8: Cut bottom spacer to marked length and angle, being sure to cut slowly
with a fi ne tooth blade making sure "legs" are facing downward.
7.9: Cut top spacer to same length and angle as bottom spacer, in same
orientation.
7.10: Install bottom rail to previously attached brackets (see Step 7.6).
7.11: Place baluster spacer into bottom rail.
7.12: Install plugs and balusters
(Steps 3.5, 4.1)
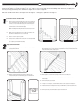
7.13: a.) Attach cut bracket to end of Chassis (with screws) on one end only.
b.) Then, place Chassis and secured bracket into the top rail, making sure
the cut bracket and cut rail are fl ush (see Figure B.)
c.) Next, plug in second bracket to opposite end of Chassis
(do not screw in yet). Note: the bracket will extend beyond the end of
the rail.
d.) Measure distance from end of cut rail to end of extended cut bracket
(as shown in Figure D). Make sure your tape measure runs parallel to
the rail/chassis to allow you to get the most accurate measurement.
e.) Remove bracket (the one that was not screwed in). Then, cut Chassis
down by distance measured in Step 7.13d.
(Note: assembled length of Chassis + Brackets = assembled length
of the rail.)
Go To Step 5 to install Top Rail
6.2: Through the holes in the top rail baluster spacer made in Step 5.7, screw the
provided #10 x 2" screws through the baluster spacer and chassis into the top
rail to connect the assembly.
Installing the balusters
Installing Elite Railing on Angles
B.
D.
D.