
Installation Guide


2
Please read these instructions carefully before installing
your Barrette railing. If you have any questions or issues
installing the railing, please contact us at 1-800-336-2383
for assistance.
Before You Begin…
Check your local zoning laws.
• Local zoning laws and Home Owners Associations may
regulate the location, style and height of your fence or even
require a permit signoff beforehand.
Contact your local utilities companies.
• You must have the utility companies clearly mark your property
for electrical, gas or water lines to avoid puncturing any
unseen underground utilities.
Pay to mark your property line.
• Being proactive will save you time and money from any
disputes from neighbors.
© 2013 Barrette Outdoor Living
7830 Freeway Circle
Middleburg Heights, Ohio 44130
Material Checklist:
Tape Measure
Level
Hacksaw or Chopsaw
Rubber Mallet
Drill
Drill bits
#2 square drive bit
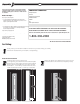
ATTENTION:
Before you assemble the rail:
PLEASE TAKE A COMPLETE INVENTORY OF ALL PARTS USING THE KIT CONTENTS.
DO NOT ATTEMPT TO ASSEMBLE THE RAIL IF PARTS ARE MISSING OR DAMAGED.
Please do not return the product to the store, for assistance or replacement parts call:
1-800-336-2383
1
1
2
2
3
3
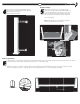
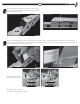
Closely follow post install kit installation instructions (or sleeve existing wood 4x4).
(Instructions included with post install kit, sold separately)
Install base trim over post sleeves fi rst.
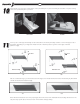
For 36" high rails, place bracket dovetail install template
against the post sleeve against the base trim and rubber
band it in place. For 42" high rails, top bracket dovetail
will install 37
7
⁄
7
⁄
7
8
⁄8⁄
" from the top of base trim and bottom
bracket dovetail will install 1
1
⁄
2
⁄2⁄
" from top of base trim.
With a 1/8" drill bit, pilot drill the holes for the top and
bottom brackets as shown. Remove template (if used).
Bracket Dovetail Installation
For Railing:
TEMPLATE
TEMPLATE
37
7
⁄8"
1
1
⁄2"
36" Rails 42" Rails
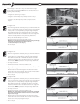
*2 PERSON INSTALLATION RECOMMENDED