
Installation Guide


3
6
6
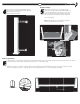
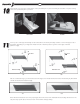
1 support brace is included with 6' railing kits. Measure equal distance from both ends of railing and install support brace in center of
bottom rail. (For 67" rail, install center of support brace 33
1
⁄
2
⁄2⁄
" from ends of rail.)
2 support braces are included with 8' railing kits. Measure length of rail, divide by 3 and measure that distance from the end of our
railing to the center of your fi rst support brace and install support brace. Repeat that step from the opposite side of your rail.
(For 91" rail, divide 91" by 3 (=30
1
⁄
2
⁄2⁄
") install center of both support braces 30
1
⁄
2
⁄2⁄
" from their respective ends.)
4
4
5
5
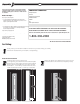
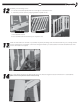
Use 2" screws to attach top bracket dovetails.
Screws must penetrate the steel insert (if using
steel surface mount). Use 1
1
⁄
4
⁄4⁄
" screws to attach
bottom bracket dovetails.
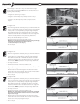
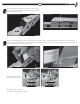
Place bottom rail across post opening leaving
equivalent spacing from the last baluster and post
on each end. Mark 1/2" from end of post to allow
room for bracket width and expansion. Align top
rail with bottom rail and cut both rails with miter
box or hacksaw (See blade manufacturer's specs
for correct blade)
Note:
You will have to cut through an aluminum
insert in the top rail of an 8' section.
1
1
⁄4"
2"
Cut Rails to Length
Install 3" Support Brace
33½"
3" SUPPORT BRACE
33½"
3" SUPPORT BRACE