
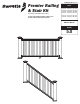
Installation Guide


6
6
6
7
7
4
4
5
5
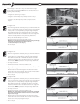
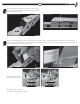
For angles 26-31°
• From the original line created by the post, mark another line
11/16" on the inside of the bottom rail (closer to the baluster
routes). This is accomplished by using the angle template.
This additional removal of material will allow for bracket
clearance when the rail is installed. For this 26-31° angle, the
new line will
NOT
be parallel to the previously drawn line.
• Set chop saw at 32°
• Cut the bottom rail on the new mark at a 32°.
(NOTE: If your cut will result in a baluster route hole being cut through,
repeat Step 3 and add/subtract a baluster route hole, re-center, mark
and proceed to Step 4.)
•
The rail will not match the angle of the stair, but instead
match the inside of the bracket. The outside of the brackets
will be cut to the proper angle in Step 11.
• Go to Step 8.
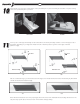
For angles 34-38°
• From the original line created by the post, mark another line
11/16" on the inside of the bottom rail (closer to the baluster
routes). This is accomplished by using the angle template.
This additional removal of material will allow for bracket
clearance when the rail is installed. For this 26-31° angle, the
new line will
NOT
be parallel to the previously drawn line.
• Set chop saw at 32°
• Cut the bottom rail on the new mark at a 32°.
(NOTE: If your cut will result in a baluster route hole being cut through,
repeat Step 3 and add/subtract a baluster route hole, re-center, mark
and proceed to Step 4.)
•
The rail will not match the angle of the stair, but instead
match the inside of the bracket. The outside of the brackets
will be cut to the proper angle in Step 11.
• Go to Step 8.
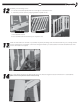
Measure angle – take rail to chop saw and measure angle.
Set saw and record angle. (NOTE: Do not cut here. This is for
acquiring measurements.)
• If angle is 31-33°, then go to Step 5
• If angle is <31°, then skip Step 5 and proceed to Step 6
• If angle is >33°, then skip Step 5 and 6, and proceed to
Step 7
For angles 31-33°
• From the original line created by the post, mark another line
11/16" on the inside of the bottom rail (closer to the baluster
routes). This is accomplished by using the angle template.
This additional removal of material will allow for bracket
clearance when the rail is installed. For this 31-33° angle, the
new line will be parallel to the previously drawn line.
• Chop saw should already be set at 32°
• Cut the bottom rail on the new mark at a 32°.
(NOTE: If your cut will result in a baluster route hole being cut through,
repeat Step 3 and add/subtract a baluster route hole,
re-center, mark and proceed to Step 4.)
• Go to Step 8.