
Installation Guide


8
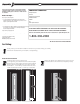
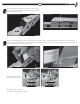
BOTTOM RAIL
TOP RAIL
10
10
Place brackets on bottom rail, securing with 2 screws per bracket (#10 x 1") as shown. Then, place brackets on top rail, securing
with 1 screw per bracket (#10 x 1") as shown.
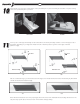
11
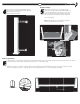
11
Set chop saw to stair angle and carefully cut all four brackets as shown. Be particularly careful to cut from the proper side of
the bracket, depending on your angle. Cut smallest amount of bracket possible to get the correct angle on bracket
(feather to edge).
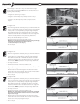
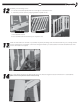
The cuts outlined above give you the results below. The angle cut on the rail matches the inside of the bracket (32°). The bracket
outside cut matches the installation angle.
Once the brackets have been cut to the proper angle, remove the screws from underneath the rails holding the brackets to the
rails (from Step 10). This allows the rails to "fl oat" in the brackets during assembly.
<31
°
>33
°
BOTTOM RAIL
>33
°
TOP RAIL
TOP RAIL
<31
°
TOP RAIL
TOP RAIL
BOTTOM RAIL
BOTTOM RAIL