Vinyl Fence Assembly and Installation Instructions PLEASE READ OWNER'S MANUAL COMPLETELY BEFORE ASSEMBLING YOUR FENCE. ALL STATED SIZES ARE NOMINAL DIMENSIONS. 34106808BOM V1 12/12 Owner's Manual Version 1.0 Privacy Panels Full Privacy Lattice Top Closed Top Open Top Scallop Picket Open Top Straight Picket Open Top Staggered Picket To register your product, please visit: www.barretteoutdoorliving.
Thank you for choosing the Barrette Outdoor Living Fence. Please read the instructions completely before assembling your fence. Retain manual and your dated sales slip for future reference and warranty claims. Before You Begin… Check your local zoning laws. • Local zoning laws and Home Owners Associations may regulate the location, style and height of your fence or even require a permit signoff beforehand.
1 Mark the fence location using string and line stakes. 2 Dig post holes 12" in diameter 36" deep (when frost line is 30" or less). Use the Center to Center measurements of the fence model being installed for the Center to Center Post Distance. If a fence panel is being used that is less than the width of a full panel, or if posts are being used other than 5" in width, measure the width of the panel and add the width of one post, that will be the Center-to-Center post distance of the holes.
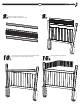
5 7 When present or included, insert aluminum into bottom rail, then insert bottom rail into bottom post route hole of first post only. Panels with 7" rails do not require aluminum inserts. 6 Insert boards into bottom rail ensuring U-Channels are on both ends. 8 Next, attach U-Channels to boards. If assembling Red Cedar panels, you must screw U-Channels to post first and then add boards. For full privacy fences follow Step 8 for assembly.
9a For lattice top fences follow Step 9 for assembly. Add the lattice insert over the top of the lattice (May not be required for certain styles). Place into the middle rail followed by the top rail. 10 a For closed picket top fences follow Step 10 for assembly. Attach middle rail into left side of post route then guide rail over boards. 9b Finally, add the completed assembly into the route holes of the first post. 10 b Insert pickets down through middle rail.
10 c 11b Insert the top rail into post route holes of first post then guide rail over picket tops. Insert pickets down through top and middle rail. Note: Scalloped and Arched panels have pickets/boards that are numbered. Start from left side with the #1 picket/board first. 11a 12 For open top picket fences follow Step 11 for assembly. Attach middle rail into left side of post route only then guide rail over boards. Insert top rail into left post route holes of first post only.
13 Check to ensure the second Post is level, then measure panel plus add dimensions from center of 2nd post to center of next and dig the third post hole accordingly. Repeat steps until completed. Center to Center 14 Apply glue on inside rim of post caps then attach to posts.
Transferable Limited Lifetime Warranty What is covered: Barrette Outdoor Living warrants vinyl and aluminum products to include; vinyl and aluminum fence, vinyl and aluminum railing and plastic lattice against defects or workmanship for as long as you own your home. Barrette Outdoor Living will at its option replace the product in question with new product of the same or equivalent value at no charge.