
Instructions / Assembly
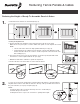

Reducing the Width of Ready-To-Assemble Panels & Gates:
Simply remove boards from panel and cut rails to desired length (make sure rails are 3" wider than the nished panel
size, so that the rails can be inserted into the post routes (Fig. 1). For added security, add rail clips, notches, or screws to
the end of the cut rails.
NOTE:
If cutting one of the vertical boards is necessary to achieve the desired panel width, draw a line the length of the board
and slowly cut using a ne tooth saw.
If reducing the width of a gate, be sure to take into consideration any inserts or channels inside the post uprights, and
cut the rail lengths as required (Fig. 2).
Finish assembling the rest of the fence or gate panel by following the respective installation instructions.
1.
2.
3.
Boards
Post
Rail
U-Channel
Fig. 1
Fig. 2
Gate Insert
Post Upright
Post Upright
Rail
Rail
P-Channel
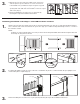
a. Measure area for post route hole. Make route centered on
sides & square to post. Drill holes in corners of area to be
routed. Make sure you drill holes large enough for a jig saw
blade. Cut to line & clean opening. Use a jig saw to cut
opening and clean with a le. Insert rail into route hole of post
and secure (Fig. 5).
b. Finish assembling the rest of the fence or gate panel by
following the respective installation instructions.
3.
Fig. 5
Rail Clips
Rail Clip
Notches
Rail
Rail
1/2" Drill Hole
Post
Post
2 or 2
1
⁄
1
⁄
1
2
⁄2⁄
"
Deck Screw
Custom Notches
Rail Notcher Tool
Top View
Rail
Rail Clips
#73014079
Rail
Screws
Screws
Screws
Screws
Screws
Screws