
Installation Guide

verandadeck.com
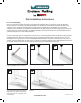
Offset bracket 1/32 in. – 1/16 in. from the
end of the rail. Mark locations of the holes.
With the brackets secured to the rails,
place and glue (PVC adhesive) the supplied
crush blocks to the bottom of the bottom
rail between the posts to support the rail in
a level position.
VER-0065-PKG 2/14
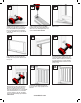
Predrill using a 1/8 in. bit.
Completely lower the rail and mark bracket hole locations. Remove the rail before pre-drilling
the holes.
Secure with supplied #10 x 1 in. screws.
DO NOT OVER TIGHTEN.
1
4
2
5
3
Rail Installation Instructions
Prior to installing railing:
Please consult local zoning laws in regards to load requirements and bottom space requirements for rails. All supporting
structures must be in accordance with applicable building codes. Neighborhood associations and/or historic districts may
regulate size, type, placement and ability of railing. Apply for permits if required by local authorities and codes. Ensure
compliance prior to installation. Local building code requirements will always supersede any and all suggested procedures and
measurements in the following installation. The following installation instructions are intended as a general guideline based on
common building practices used in railing installation.
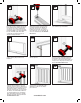
If using cove molding, slide cove molding down over post prior to securing any railings. Measure the distance between properly
installed, plumb posts. Transfer the measurement to the top rail, making sure that the distance from the end of the rail to the
rst baluster slot is equal on both ends of the rail. (NOTE: The minimum distance from post to rst baluster slot is 2 -1/8 in. for
clearance from the brackets.) Place the rails together so that the top and bottom baluster slots are aligned. Mark the bottom rail
for the inside distance between the posts. Cut the top and bottom rails to t tightly between the posts.