External Hard Drive NAS User Guide English 1
Contents Introduction 6 Controls, Connectors and Indicators 6 Front Panel Area 6 Rear Panel Area 7 About the Hard Disk 8 Locating NAS Drive on Your Desk 8 Which Interface: USB or Ethernet? Connecting NAS drive Using USB 8 10 Storing and Transferring Data via USB 10 Disconnecting NAS drive from a PC or Mac Host 11 Connecting NAS Drive Using Ethernet 12 About NAS Drive User Accounts 12 Connecting the NAS Drive to Your LAN 13 Web-Based Administration Tool 15 Administration Login 16
NAS Drive Operation Using Ethernet Sharing files using Windows 22 23 Run Dialogue 23 Browse Network Neighborhood 23 Search Dialogue 24 Browse My Computer 24 Sharing files using Mac OS X 24 Attaching USB Devices 24 Attaching a Printer 25 Attaching a USB Storage Device 26 NAS Administration Reference Users and Groups 27 29 User Management 29 Group Management 30 File and Print 31 File Server 31 Windows Setting 31 FTP Server Setting 31 NFS Server Setting 32 Guest Access Setting
Turn Off Server 34 Information 34 Disk Usage 34 Error Notification 35 Monitoring Services 35 Check Interval 35 E-mail Notification 35 Pop-Up Notification 35 Network Service 35 DHCP Server 36 Bonjour 36 Maintenance 36 Disk Utility 37 Format 37 Scan 37 Unmount 37 Detail 38 Firmware Upgrade 38 Save Configuration 38 Restore Configuration 38 Factory Reset 39 Log File 39 Samba Log 39 FTP Log 39 DHCP Server Log 39 4
System Log 39 Administration Log 40 Account Information 40 Logout 40 Technical Support 41 Limited Warranty Terms 41 Rights 42 FCC Compliance 42 WEEE Notice 43 CE Declaration 43 ROHS Compliance 44 5
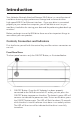
Introduction Your Verbatim Network Attached Storage (NAS) drive is a versatile external hard drive featuring high-performance storage and a choice of either high-speed USB 2.0 or Ethernet interface. Once your drive is connected properly to your network or computer, you will be able to use it as you would any hard drive for storing your data and for performing data back-up functions. Before you begin to use the NAS drive there are a few important things to learn about your new product.
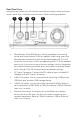
Rear Panel Area Along the rear panel you will find the interface connectors and a recessed micro-switch that is used for reset functions. Refer to the figure below. 1 2 3 4 5 1. Reset Button. If the NAS drive is having a problem connecting to the local area network (LAN) or appears to be hung, press the Reset button momentarily with the end of a paper clip. This will cause the unit to reset, similar to rebooting your PC.
About the Hard Disk The NAS drive internal hard disk comes pre-formatted in three partitions. The largest partition is pre-formatted in the FAT32 format and is available for your data storage through either a USB or Ethernet connection. The other two partitions are in Linux EXT2 format and are used by the NAS drive’s internal software for supporting the various networking features of the product. Note: Capacity dependent on model. Your operating system may report capacity as fewer gigabytes.
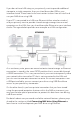
If you do not have LAN setup, or you primarily want to provide additional storage to a single computer, then you should consider USB as your interface choice. Please refer to the next section to learn how to install and use your NAS drive using USB. If your PC is connected to a LAN over Ethernet (either wired or wireless), and you primarily want to provide shared storage amongst two or more computers on the LAN, then you should consider Ethernet as your interface choice.
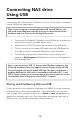
Connecting NAS drive Using USB Connecting your NAS drive to a USB host, such as a PC or Mac, is extremely simple. Follow the steps below. Note: If your computer is running Windows 98 Second Edition, you will need some additional software that you can download from the Verbatim web site. Refer to the Getting Help section. 1. Connect the included AC Adapter to the NAS drive, and then to a wall outlet using the included power cord. 2. Next press the ON/OFF button on the front of the NAS drive. 3.
Disconnecting NAS drive from a PC or Mac Host While connected using the USB-B interface, your NAS drive is hotswappable. It can be connected and disconnected without restarting your computer. To disconnect your drive at any time, perform the following steps. You can also disconnect your hard drive at any time while your computer is powered off. Note: Please be careful to follow the correct procedure when disconnecting your unit.
Connecting NAS Drive Using Ethernet Installing the NAS drive using Ethernet requires that you have an available Ethernet port on a router or switch. Before attempting to establish a connection to the network it would be useful first to review some background information about how the NAS drive handles data over the network. Basic to this understanding are the fundamental concepts of user accounts and shared folders.
Here are other initial properties of these pre-defined groups, accounts, and shares: • The group @guest-share contains two members, which are user “admin” and user “guest-share”. • Only user “admin” can access the share “public”. • The folder “guest-share” is a private folder for user “guest-share”. This means only user “guest-share” can access this folder. • The folder “admin” is a private folder for user “admin”. This means only user “admin” can access this folder.
4. Connect the included Ethernet cable from the Ethernet port on the NAS drive to an Ethernet switch (100 Base-T), a wired or wireless router, or a wireless access point. 5. Connect the included AC Adapter to the NAS drive, and then to a wall outlet. 6. Press the ON/OFF button on the front of the NAS drive. The green LED will come on to indicate that the unit is now powered on. 7. Wait for the NAS drive to boot up and to auto-configure its connection on the network.
drive will negotiate an address within the Bonjour range of 169.254.x.x. If you want to determine the specific address within this range, you can use the network “ping” function to “ping sohonas” or “ping sohonas. local”. ii. If the NAS drive has been previously accessed in order to disable Bonjour and you are now connecting to a network with no DHCP server present, then a different auto-negotiation takes place. In this case the NAS drive will automatically launch its internal DHCP server.
Administration Login In most cases you need only to enter the default hostname (i.e., “//sohonas” for Windows, or “//sohonas.local” for Bonjour) in your browser’s address window to access the administration tool. If for some reason the default hostname was not assigned to the NAS drive’s IP address during autoconfiguration, then you can alternatively enter the NAS drive’s IP address into the browser’s address window.
Basic Settings for Initial Setup Now, from within the administration tool perform the following steps to define the basic settings. For more advanced features note that a full description of all settings is provided later under “NAS Administration Reference”. 1. Click on Quick Setup to expand the selection group.
5. The next screen allows you to define a new Hostname for the NAS drive. If you want to keep the current Hostname, simply press Next to advance to the next screen. 6. The next screen allows you to select between automatic and static addresses for the NAS drive’s IP Address and Domain Name System (DNS) address. It is recommended that your network equipment be enabled to provide DHCP service, and that both settings on this screen remain at the factory settings.
Fill in the initial screen with a User Name and Password. It is recommended that these fields match the User Name and Password that this user normally enters when logging into Windows or to Mac OS X. The User Name must be lower-case and may be a maximum of 20 alphanumeric characters, without spaces. The User Name must begin with an alphabetic character.
10. The next screen allows you to assign this user to an existing group. As described above, the initial factory setting provides for the default group named “@guest-share”. When done with this form, press Next to continue. 11. The final screen for adding a user allows you to assign access privileges to currently defined shares. Of course, if you checked “Create Private Folder” in step (9), then read/write access has automatically been provided to this user’s private folder.
13. The next screen allows you to assign any of the current users to your new group. When done with this form, press Next to continue. 14. The next screen allows you to assign share access privileges for the new group. Each of the existing shares may be setup for no access, read-only access, or full read/write access. When done with this form, press Complete. Add New Shared Folder 15. The final procedure for Quick Setup allows you to optionally setup a new share.
new share. Access is defined separately for Server Message Block (SMB) / Common Internet File System (CIFS) access than it is for Network File System (NFS) access. Use the first of the two screens, titled “Windows, FTP Access” to assign access under SMB/CIFS. You can assign read-write access for all users and groups by checking the box marked “Allow for all”. Alternatively, you can assign no access, read-only access, or read-write access privileges individually for each user and group.
• • • • • Drag and drop files to NAS drive Copy and paste data to NAS drive Make and delete folders Share files and folders Back-up your data How you access the drive will depend on your computer’s operating system. A brief overview for accessing files for both Windows and Mac OS X is provided next. You should consult your computer’s documentation for more detailed explanations of file sharing using your specific operating system.
Search Dialogue Select Start in the system tray and select Search. Use the Search dialogue to search for Computers. For the computer name to search for enter “sohonas” and then press Search Now to find the connected NAS drive. Double-click the NAS drive entry to connect and view its shared folders. Browse My Computer Open My Computer and double-click on My Network Places. Browse to Workgroup to find the NAS drive share folders.
device, such as a flash disk. This section describes how to install and use these USB devices while the NAS drive is connected to your LAN. This USB-A port operates at USB Full-Speed. Attaching a Printer Once your USB printer is attached and installed to the connected NAS drive, you can send print jobs to this printer from any user account. Follow these steps to attach and install your USB printer: 1. Attach the USB cable from your USB printer to the USB-A connector on the rear panel of the NAS drive. 2.
Now your printer is ready to accept print jobs like any other printer on your system. Attaching a USB Storage Device If you elect not to use the USB-A port for printing, then it is available to you to attach another USB storage device, like a flash disk. Once your storage device is attached and installed to the connected NAS drive, you can drag and drop files to it like any other storage device.
NAS Administration Reference The web-browser-based administration tool provides full access to all configuration settings for the product when used as a NAS device.
Basic Quick Setup p Wizard Add User Add Group Add Share Control Panel Users and Groups p User Management Group Management File and Print File Server Share Management Print Server System y Network Settings Time Settings Turn Off Server Information Disk Usage Error Notification Network Service DHCP Server Bonjour Maintenance Disk Utility Firmware Upgrade Save Configuration Restore Configuration Factory Reset Log g File Samba Log FTP Log DHCP Server Log System Log Administration Log Personal Information Personal
Because the Basic / Quick Setup functions (Wizard, Add User, Add Group, and Add Share) have been described previously under “Basic Settings for Initial Setup”, we begin this reference section with a description of the Control Panel group of functions. Users and Groups This group of settings provides an alternate way to create a new user account or new group, and also provides a method to modify properties of existing user accounts or groups.
Note that if you are using the User Management dialogue to create a new user, there may be other properties that you want to set for this user. For example, after creating a new user through Control Panel / User Management, share access for that user can be set by leaving User Management and going to File and Print / Share Management. This dialogue is explained later in this reference section. Group Management As explained earlier, a group is a collection of user accounts.
Group Management and going to File and Print / Share Management. This dialogue is explained later in this reference section. File and Print This group of settings allows for naming the Windows Workgroup, enabling certain server protocols (such as FTP, NFS, and print server), as well as providing full control over the creation and management of folders (shares) on the drive. File Server Enter the main screen of File Server Setting by selecting Control Panel / File and Print / File Server.
Network Address Translation (NAT) router to map a public IP address to the NAS drive’s private IP address on the LAN. NFS Server Setting You can enable or disable NFS server support. If you have only Windows PCs on your home network and have no pressing reason to use NFS support to share files, then you can normally leave this box unchecked in order to free up system resources for other servers. NFS and Samba perform similar functions for file sharing.
If you want to delete an existing share, first highlight that share name in the Existing Shares box, and then press the Delete Share button. Once you have highlighted an existing share, or have created and saved a new share, you will want to assign access privileges for that share. Access is defined separately for SMB/CIFS access than it is for NFS access. To assign SMB/CIFS access privileges for current share, press the Windows, FTP Access button. To assign NFS access privileges, press the NFS Access button.
Next are IP Address settings. You will normally leave these in the factory default condition, which selects “Obtain IP Address automatically” and “Obtain DNS Server Address automatically”. With this selections enabled, the NAS drive will act as a DHCP client and attempt to retrieve its IP Address from the DHCP server active on your LAN. Under some LAN environments you will need to enter fixed addresses in the form provided.
Error Notification The NAS drive features a range of features to monitor product status and to report errors. To enable and setup these features, select the screen at Control Panel / System / Error Notification. These settings are grouped into four sections, as described below. After completing this form, press Save to save your changes.
DHCP server, and the Bonjour protocol. DHCP Server Enter the main screen for DHCP Server by entering Control Panel / Network Service / DHCP Server. Most LAN environments will already have a Dynamic Host Configuration Protocol (DHCP) service running to automatically issue IP addresses for attached devices. For example, your home router equipment will likely provide this service. In the rare case that your equipment does not provide this service, the NAS drive can run its built-in DHCP Server.
Disk Utility Enter this screen by selecting Control Panel / Maintenance / Disk Utility. You will be presented with a table that lists the status of all detected storage devices. The first device listed (“/dev/hda/”) will be the main data partition of the NAS hard drive. If you have another storage device attached to the USB-A port, its status will be displayed on the next row of the table.
Detail Press the Detail button in order to view a detailed status report for your device. Also, in case you have made a recent change to a storage device, you can press the Refresh button at the bottom of the table to refresh the table with the most current status. Finally, the field at the bottom of the Disk Utility screen allows you to set an automatic spin-down time for the hard drive. By spinning down the drive when not in use, you can conserve power and extend the life of the drive.
that file to restore all device settings in a single step. Enter this screen by selecting Control Panel / Maintenance / Restore Configuration, and then browse to the saved configuration file and press the Restore button. Factory Reset You can return all of the NAS drive’s settings to their factory default state by selecting Control Panel / Maintenance / Factory Reset, and pressing the Factory Reset button on this screen.
Administration Log To view the log of events that have been recorded by the administration monitor, select Control Panel / Log File / Administration Log. Account Information The Personal Info tab provides access to certain information about the user currently logged into the web-based administration tool. Usually this will be the admin user. To view this screen select Personal Info / Personal Information / Account.
Technical Support If you are experiencing difficulty installing or using your Verbatim product, please visit the main Verbatim Technical Support website at www.verbatim. com or www.verbatim-europe.com. From this page you can access our library of user documentation, read answers to frequently asked questions, and download available software updates.
does not apply to normal wear or to damage resulting from abnormal use, misuse, abuse, neglect or accident, or to any incompatibility or poor performance due to the specific computer software or hardware used. VERBATIM WILL NOT BE LIABLE FOR DATA LOSS OR ANY INCIDENTAL, CONSEQUENTIAL OR SPECIAL DAMAGES, HOWEVER CAUSED, FOR BREACH OF WARRANTIES OR OTHERWISE. This warranty gives you specific legal rights and you may also have other rights which vary from state to state or country to country.
that to which the receiver is connected. • Consult the dealer or an experienced radio/TV technician for help. WEEE Notice The Directive on Waste Electrical and Electronic Equipment (WEEE), which entered into force as European law on 13th February 2003, resulted in a major change in the treatment of electrical equipment at end-of-life. The WEEE logo (shown at the left) on the product or on its box indicates that this product must not be disposed of or dumped with your other household waste.
IEC 61000-4-5: 1995 + A1: 2000 IEC 61000-4-6: 1996 + A1: 2000 IEC 61000-4-8: 1993 + A1: 2000 IEC 61000-4-11: 1994 + A1: 2000 RoHS Compliance This product is in compliance with Directive 2002/95/EC of the European Parliament and of the Council of 27 January 2003, on the restriction of the use of certain hazardous substances in electrical and electronic equipment (RoHS) and its amendments 44