2-Disk RAID USB and eSATA External Hard Drive User Guide English 1
Contents Introduction 3 Drive Contents: IMPORTANT Notice 3 Nero BACKITUP 2 Software 3 Controls, Connectors and Indicators 4 Front Panel Area Rear Panel Area 4 5 About the Hard Drives 6 Locating the Drive on your desk 6 Connecting to your computer 6 Configuring the RAID Mode 7 Disconnecting your Hard Drive 11 For Windows Users 11 For Mac OS Users 11 Technical Support 12 Limited Warranty Terms 12 WEEE Notice 13 FCC Compliance 13 CE Declaration 14 ROHS Compliance 15 2
Introduction Your Verbatim external 2-disk RAID product comes with two separate hard drives inside. “RAID” is short for “Redundant Array of Independent Disks” and is a standard method of combining two or more hard disk drives to achieve higher levels of performance, reliability, and capacity. Before you begin to use the drive there are a few important things to learn about your new product.
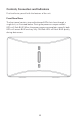
Controls, Connectors and Indicators First familiarize yourself with the features of the unit. Front Panel Area The front panel contains two multicoloured LEDs that show through a single lens, as illustrated below. During the power-on sequence both LEDs will flash BLUE. When the power-sequence completes normally both LEDs will remain BLUE and stay fully ON. Both LEDs will flash BLUE quickly during data access.
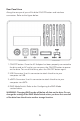
Rear Panel Area Along the rear panel you will find the ON/OFF button and interface connectors. Refer to the figure below. 1. ON/OFF button. Once the AC Adapter has been properly connected to the drive and an AC outlet, you can press the ON/OFF button to power on the drive. To turn off the drive, press the ON/OFF button again. 2. USB Connector. Use this connector to attach the drive to your computer via USB. 3. eSATA Connector. Use this connector to attach the drive to your computer via eSATA 4.
About the Hard Drives The product comes pre-formatted in FAT32 format. This format allows for operation with either Windows or Mac OS. Note: Capacity dependent on model. 1 MB = 1,000,000 bytes/ 1 GB = 1,000,000,000 bytes/1 TB = 1,000,000,000,000 bytes. Some capacity used for pre-loaded software, formatting and other functions, and thus is not available for data storage. As a result, and due to differing calculation methods, your operating systems may report as fewer megabytes / gigabytes / terabytes.
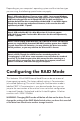
Depending on your computer’s operating system and the interface type you are using, the following special notes may apply: Note 1: USB under Windows. If you are using a USB 1.1 port on your Windows computer, the following cautionary note may appear on your display: Hi-Speed USB Device plugged into non-Hi-Speed USB hub. This does not indicate a problem because the drive is compatible with both USB 1.1 and USB 2.0 ports. Simply close the message and proceed.
RAID 0 (Also called Striping) distributes data across both disks in a way which can improve throughput, while retaining full capacity. However, in case of possible failure of either disk, all data will be lost and the array will no longer mount to your computer. Available capacity is the combined capacity of both drives. If either disk fails in RAID 0 then the LED of the failed drive will change to RED.
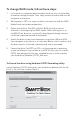
To change RAID mode, follow these steps: 1. If you have any important data stored on the drive, first save the data to another storage location. Then safely remove the drive and turn off the power to the drive. 2. While power is OFF, use a pen or other instrument to slide the RAID Mode Switch to the desired position. 3. Power up the drive. The LEDs will flash BLUE while the internal firmware is reconfiguring the RAID mode.
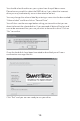
You should select the drive on your system from the pull down menu. Please be very careful to select the RAID drive, if you select the incorrect drive you may inadvertently cause information to be lost. You may change the volume label by entering a name into the box marked “Volume Label” and then click on “Format Drive” You will then see the message below asking you to confirm that you are about to format the selected drive. If you proceed all data will be lost and cannot be recovered.
Disconnecting Your Hard Drive Your external hard drive is hot-swappable. It can be connected and disconnected without restarting your computer. To disconnect your drive at any time, perform the following steps. You can also disconnect your hard drive at any time while your computer is powered off. Note: Please be careful to follow the correct procedure when disconnecting your unit. Simply unplugging the unit without first following the instructions below may result in damage to your unit and/or loss of data.
Technical Support If you are experiencing difficulty installing or using your Verbatim product, please visit the main Verbatim Technical Support website at www.verbatim-europe.com. From this page you can access our library of user documentation, read answers to frequently asked questions, and download available software updates.
used. VERBATIM WILL NOT BE LIABLE FOR DATA LOSS OR ANY INCIDENTAL, CONSEQUENTIAL OR SPECIAL DAMAGES, HOWEVER CAUSED, FOR BREACH OF WARRANTIES OR OTHERWISE.
Increase the separation between the equipment and receiver. Connect the equipment into an outlet on a circuit different from that to which the receiver is connected. Consult the dealer or an experienced radio/TV technician for help.
RoHS Compliance This product is in compliance with Directive 2002/95/EC of the European Parliament and of the Council of 27 January 2003, on the restriction of the use of certain hazardous substances in electrical and electronic equipment (RoHS) and its amendments.