
User guide


8
LAN
P
ort -
P
a
g
e
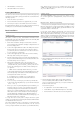
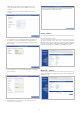
DHCP Client: Selecting DHCP Client will cause the device to obtain an
IP address from the local DHCP server.
S
tatic IP: Selecting Static IP requires you to assign the IP information for
the device manually.
MTU: The de
f
ault MTU (maximum transmission unit) is 1500 bytes. I
f
your network supports Jumbo Frames you can speci
f
y larger
f
rame
sizes (in the range o
f
3000-9000) by
fi
rst selecting Enable in the MTU
Settings
d
ia
l
ogue.
EXT Port - Page
The Local Area Network settings
f
or the device’s EXT Port can be
confi gured on the EXT Port page
.
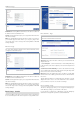
DHCP C
l
ient: Se
l
ecting DHCP C
l
ient wi
ll
cause t
h
e
d
evice to o
b
tain an
IP address
f
rom the local DHCP server.
S
tatic IP: Selecting Static IP requires you to assign the IP in
f
ormation
f
or
t
h
e
d
evice manua
ll
y.
MTU
: The default MTU (maximum transmission unit) is 1500 bytes. If
your network supports Jumbo Frames you can specify larger frame
sizes (in the ran
g
e of 3000-9000) b
y
fi rst selectin
g
Enable in the MTU
Settings dialogue.
Basic Setu
p
- Section
The Time and Date o
f
the device’s internal clock can be set manually or
be set automaticall
y
from the client com
p
uter or usin
g
an NTP Server
.
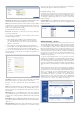
D
ate and Time - Pa
ge
Time Zone: Choose the Time Zone of where you are located from the
drop-down menu.
S
et
f
rom Computer:
T
o set the internal clock o
f
the PowerBay NAS array
to the same time as the client computer, select Set from Computer and
h
it Save
.
S
et t
h
e Date an
d
Time Manua
ll
y: To set t
h
e
d
ate an
d
time manua
ll
y,
select Set Manuall
y
, and fi ll in the date and time usin
g
the dro
p
-down
menus. Press Save to save the new settin
g
s
.
NTP Server: Tic
k
t
h
e Ena
bl
e NTP Server c
h
ec
kb
ox to ena
bl
e NTP.
Network Time Protocol (NTP) synchronizes the device with an Internet
tim
e
se
rv
e
r.
T
ype the URL o
f
the NTP Server in the NTP Server checkbox or use the
drop-down menu to choose one o
f
the de
f
ault time servers listed
f
or
your convenience. Press Save to save t
h
e new settings.
D
evice Settings - Page
T
he device settin
g
s
p
a
g
e allows
y
ou to confi
g
ure the Work
g
rou
p
or
Active Directory settings o
f
your network on the device.
I
f
your network is con
fi
gured as a Workgroup, click the Workgroup
radio button. Confi
g
ure the
p
arameters as described below: