
User manual


8
To set up other user accounts and to configure other basic system settings, you
should continue setup using the web-based administration tool described in the
next section.
Once the PowerBay NAS array is connected to your network and has been config-
ured for your network environment, it can be accessed from any computer within
the same subnet on your LAN. Furthermore, more advanced users may choose to
configure name servers (such as WIN servers or DNS servers) in order to access the
PowerBay NAS array from a different subnet.
Software Setup
The included CD-ROM contains copies of the User Guide, as well as two software
applications: 1) MagicalFinder, and 2) Acronis backup software.
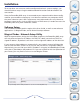
Magical Finder - Network Setup Utility
When first powered on, during the initial boot sequence, the PowerBay NAS array
will wait to be assigned an IP address via DHCP. If it does not receive a DHCP as-
signed IP address, by default it will have a self-assigned IP address of 192.168.0.32.
If your router assigns addresses automatically, your router’s manual will describe
how to view the DHCP Lease List so you can see your drive’s assigned IP address.
Alternatively, you can find your drive’s IP address using the included Magical Finder
utility that is provided on the product CD. If you are unfamiliar with the operation of
your router, you may find it easier to use the Magical Finder.
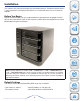
Installation
1. Open the Magical Finder Utility and allow it to search for the PowerBay NAS array.
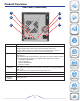
Product
Overview
Installation
Web
Configuration
Knowledge
Base