
User manual

46
Knowledge Base
3) Log into the Linux PC as root.
4) Create a mount point, such as /mnt/nas by entering the mount command from
your client computer. For example,
mount –t nfs <IP address of the PowerBay NAS array>:/shares/powerbay/powerbay/mnt/nas
Now the folder Powerbay will be mounted to the directory /mnt/nas in the Linux
system. Linux users with access privileges can now access files in this directory.
USB Print Server Installation
The PowerBay NAS array features a built-in USB print server, giving users the ability
to share a printer on their local network. Connect a USB printer to the USB port on
the back of the PowerBay NAS array. It is important to ensure that the printer manu-
facturer’s drivers have been installed on any client computer you want to print from.
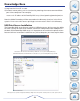
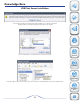
1. Go to Start > Run and enter the following command to access your PowerBay NAS array:
\\xxx.xxx.xxx.xxx (where xxx.xxx.xxx.xxx is the IP address of your PowerBay NAS array). Click OK.
2. Next you’ll see a printer already listed named ‘lp’. Right click on the printer called ‘lp’ and choose the option ‘Connect’.
Product
Overview
Installation
Web
Configuration
Knowledge
Base