
Installation Guide


7
February 19, 2019 Please contact 1-866-843-8453 for further assistance.
Pressure Sensitive (dry-to-touch) Applications: Lay tiles from the
center of the room in a pyramid fashion while
working towards the walls
as shown in Figure 3. The dry, tacky adhesive makes it possible to work
on top of the material without compromising the installation.
Wet-Set Applications: The room layout must be set-up so that all ooring
can be installed while working off of freshly installed tiles. This will keep
tiles from shifting, minimize adhesive displacement, and prevent wet
adhesive from oozing up and getting onto the surface of the tiles. This
can be accomplished by creating work zones outlined with parallel chalk
lines. Create work zones that are no wider than the installer’s comfortable
arm reach and in multiples of the tile width. Measure and snap chalk line
parallel to the established base line. Spread adhesive within the work
zone, and begin installing tiles using the row-by-row method, as shown in
Figure B under “LVT Resilient Plank Installation” (next section).
TIP: Do not apply more adhesive than can be worked within
the recommended working time. Always follow the adhesive
manufacturer’s recommendations.
IMPORTANT: All LVT ooring must be rolled with a minimum 100lb
roller after installation. Use a hand roller in areas that cannot be reached
with a 100lb roller.
PLANK INSTALLATION
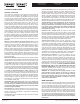
STEP 1: SQUARE THE ROOM
To square the layout of the room, nd the center of one end of the room.
Locate the same point at the other end-
wall. Snap a chalk line between these
points to mark the center line on the
oor. Then, measure along this center
line to nd the middle of the room. At the
center point, mark off a line across the
room at precise right angles to the rst
line. This can be accomplished using the
3-4-5 triangle method. Starting from the
center point, make a mark measuring
4 feet vertically and 3 feet horizontally.
Connect the marks with a diagonal line
to complete the triangle. If the diagonal line does not measure exactly
5 feet, then the center crossing lines are not at a true right angle. (See
Figure A)
TIP: For large rooms, multiples of the above dimensions may be
used to obtain greater accuracy. (6-8-10, 9-12-15, and so on.)
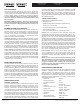
STEP 2: INSTALL THE PLANKS
After snapping the center starting chalk
lines, spread the appropriate adhesive
on the center lines, leaving portions of
the lines at center and near each wall
uncovered. Start laying the planks from
the right angle formed by the center
lines. Lay the material from the center of
the room, working towards the walls as
shown. It is imperative that the rst row is
placed precisely and accurately against
the reference line as you install. Make
sure each plank is ush against the chalk
line and tight against the adjoining plank.
The ends of the planks should align
perfectly. Lay row-by-row or in pyramid
fashion (See Figures B & C).
TIP: Pay special attention to the edges of the planks. Do not slide the
planks through the adhesive as you install.
IMPORTANT: All LVT ooring must be rolled with a minimum 100lb
roller after installation. Use a hand roller in areas that cannot be reached.
Note: Bond issues resulting from the use of non-recommended
adhesives are not warranted. All warranties and guarantees
pertaining to the suitability and performance of any product
not recommended rests with the material manufacturer or the
installation contractor. The condition of the suboor and bond
issues resulting from the use of non-recommended, improper,
or
incorrectly
prepared
adhesives, sealers, embossing levelers,
patches, concrete, gypsum-based products and other such items,
are the sole responsibility of the installer and/or manufacturer of
the particular sub- ooring product.
CARE & MAINTENANCE
LVT DRYBACK GENERAL CARE & MAINTENANCE
LVT dryback ooring is manufactured with a high-performance, UV-
cured urethane and ceramic bead coating, which provides improved
maintenance characteristics and options for the end-user in commercial
environments. All oor coverings require some care to look their best, and
many problems can be prevented before they occur. The area of usage,
type of trafc, and frequency of trafc on the oor will determine the type
and frequency of maintenance needed. Proper care and maintenance
are an essential part of keeping your LVT ooring attractive and safe.
These guidelines will help to maintain the appearance of and extend the
life of your LVT ooring.
FLOOR-CARE BEST PRACTICES
• Sweep or vacuum daily; use only vacuums without beater bars.
• Protect the oor from tracked-in dirt and grit particles by using walk-off
mats at all outside entrances.
• Avoid the use of rubber-backed mats, as certain rubber compounds can
permanently stain vinyl.
• In order to prevent indentations and scratches, provide glass, plastic,
felt, or other non-staining cups with at under-surfaces not less than 2"
wide for the legs of heavy furniture or appliances. Equip swiveled-type
ofce chairs and other rolling furniture with broad-surface, non-staining
casters at least 2” in diameter. Remove small diameter buttons from
the legs of straight chairs and replace with metal or felt glides that have
bearing surfaces no less than 1" in diameter.
• Always use the proper equipment to protect the ooring from damage
that could be caused by the moving of heavy xtures or appliances.
• Never use anything coarser than 3M-equivalent red cleaning pads
or brushes on LVT resilient ooring (see Maintenance Procedures
section).
• The use of aggressive strippers, such as mop-on/mop-off, no-scrub and
no-rinse strippers, may affect the adhesive bond.
• Protect your oor against burns. Burns from the glowing end of
cigarettes, matches, or other extremely hot items can damage LVT
oors.
• Do not ood oor or subject to frequent standing water.
• Only use premium cleaning products that are designed for Luxury Vinyl
Tile (LVT) oors with urethane coatings.
• All LVT oors have good resistance to stains and are not affected by most
common spills. However, any spill should be cleaned up immediately.
The longer the spilled materials are left on the oor, the greater the risk
of permanently staining the oor. For information regarding the proper
method or solution to use on a specic stain, contact Customer Service.
• Avoid exposure to direct sunlight for prolonged periods. The use of
drapes or blinds is recommended during peak sunlight hours. Prolonged
exposure to direct sunlight can result in discoloration, and excessive
temperatures might cause tiles or planks to expand.
Figure A
3’
5’
4’
Figure B
Row by Row
Figure C
Pyramid
Product Description
Dryback LVT/LVP
Installation Method
Glue Down