ChargeLogic Microsoft Dynamics NAV Using PIN Pads and Swipe Device Hardware with ChargeLogic Date: January 19, 2015 http://www.chargelogic.
Contents Entering Account Information at the POS ...................................................................... 3 Ordering VeriFone MX Devices ........................................................................................ 3 Programming Encrypted VeriFone MX Devices ............................................................. 4 ChargeLogic System Setups for Hardware ..................................................................... 6 Non-OPOS MSR ........................................
Entering Account Information at the POS Account information can be entered using only the keyboard or a non-OPOS wedge-style swipe device, so long as you do not need to take PIN-secured debit cards and can configure the swipe device to use Track 2 data. In these scenarios, only the ChargeLogic Basic EFT granule is required. If you have an OPOS swipe device or a hardware PIN pad, you must purchase the ChargeLogic Basic and Advanced granules.
cables”). The yellow cables are a combination of the connecting cable and the power supply. They require a special connection to the terminal, generally only found on POS machines. More details about power supplies and MX800 series connecting cables can be found in the Knowledge Base article, “VeriFone PIN Pad Power and Cabling Options.
a. On the PIN pad main menu, select File Transfer, Download (Serial Port option). Select USB port and Full Mode for download type. If the PIN pad begins a partial download automatically, simply Abort and then select the correct options. On the Computer 13. Run the ddl.exe under a command line. It is located under C:\Program Files (x86)\ChargeLogic Controls\Verifone Mx on a 64-bit Windows 7 PC. 14. Run the following command under the tgz file location: ddl –p3 app\ChargeLogic_USB_files.
3. Press the Send button on the popup window. A window will appear with file download progress. 4. After the file is sent, the window will go away. On the PIN Pad 1. There will be a SUCCESS message once the full installation is complete (this may take an additional minute or so). 2. Reboot the device by returning to the Home screen, and then selecting the reboot button. To load the ChargeLogic (form agent) application: On the Computer Select the appropriate file (dl-USB_FA3.0.0W_130521.tgz).
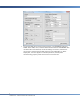
Terminal Setup 1. 2. 3. 4. If the end user is using Windows 7 or Windows 8, they will need the Microsoft Visual C++ 2008 Redistributable Package (x86) installed on the terminal prior to the ChargeLogic installer (this is the prerequisite for one of ChargeLogic’s libraries). They will also need to either turn off User Account Control (not recommended in a POS environment) – or –modify the Active Payments file. To modify the Active Payments file: a. Run Notepad as the Administrator. b.
In Object Designer, open the Client Add-in table and add the following control in a new line: Control Add-in Name ChargeLogic.TimerControl Public Key Token e8ecf5008582ad7a Version Description ChargeLogic Timer Control Troubleshooting VeriFone MX PIN Pads Even if you have purchased the PIN pads through ChargeLogic, you may need some assistance with troubleshooting. Below are common scenarios with resolutions: The tamper sensor on the PIN pad has been triggered.
To test if the PIN pad is communicating properly, run OPOSDEMO and select FORM. Select OPEN, Claim, and then check Device Enabled. If OPOSDEMO does not allow Claim to be selected, one of the settings is incorrect; recheck if the correct port is selected, that the PIN pad is set up for USB cable, etc. Select Display Test, if an item appears on the PIN pad screen, the PIN pad is communicating properly. Select Clear Screen to clear the item.
The touch screen is not working. o Navigate the screen menu by using the buttons and select Calibrate to enable the touchscreen functionality. You may have to restart the PIN pad. Nothing happens when the USB icon is selected. o A USB cord is not being used. The computer does not recognize the PIN pad when plugged into a USB port. o Install the 32-bit VeriFone USB drivers from https://www.chargelogic.com/system/4.00.04/installvfi.
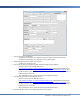
Download the ChargeLogic msi file from https://www.chargelogic.com/system/4.00.04/ChargeLogic.msi or off the Partner Portal at https://www.chargelogic.com/partners/software/hardware. This will install the files. After logging into NAV, the PIN pad still displays the ChargeLogic splash screen instead of “Welcome to StoreName / Register Closed.” o Check that the Hardware tab on the Terminal Setup has the appropriate VeriFone MX device selected in the OPOS PIN Pad Profile field.