
User guide


11
CHARGELOGIC – USING PIN PADS AND SWIPE DEVICES
o Download the ChargeLogic msi file from
https://www.chargelogic.com/system/4.00.04/ChargeLogic.msi or off the Partner Portal at
https://www.chargelogic.com/partners/software/hardware. This will install the files.
After logging into NAV, the PIN pad still displays the ChargeLogic splash screen instead of
“Welcome to StoreName / Register Closed.”
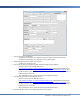
o Check that the Hardware tab on the Terminal Setup has the appropriate VeriFone MX
device selected in the OPOS PIN Pad Profile field.
o Check that there is a check mark in the Track 2 Capable field on the Capabilities tab.
The EFT Local Setup controls are disabled.
o If the device is connected, click the Setup menu button and select the Install ChargeLogic
Components item.
Where do I define the hardware profiles?
o ChargeLogic Payments comes pre-populated with hardware profiles and they do not
need to be created.
o If you still want to create or modify the hardware profiles:
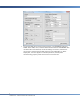
Go to Administration – Application Setup – Sales & Marketing – EFT – Hardware.
Select the Profiles page.
I purchased a MX860 or a MX880 and there are no pre-configured setups for these.
o Use the profile for MX850 for the 860 or the MX870 for the MX880
My terminal/computer is using Windows 7 or 8.
o Either turn off User Account Control (not recommended in a POS environment) – or –
o Modify the ActivePayments file:
Run Notepad as Administrator.
Using Notepad, edit C:\Windows\activepayments.ini
In the [Logging] section, change the EventLog property from
EventLog=vfievent.log to a value that includes a fully qualified path to a file that
the limited user has write permission (e.g., EventLog=C:\Temp\vfievent.log).
Make sure that the POS user has write access to the specified path and that the
path does not exist in a directory that is protected by User Account Control (e.g.,
C:\Program Files).
How do I activate the pin pad for a transaction?
o To activate the pin pad from a Sales Order or a Customer Card, select Credit Card –
Authorize to open a transaction card (this is on the ribbon or Action menu in RTC; in
Classic, it may be the Sales or Function button – Credit Card – Authorize). The End User
will enter the amount to authorize, but no credit card number, and then select Collect
Data and Submit (on the Function button in Classic). This will activate the pin pad and the
End User can proceed from there in the same method as they would authorizing by
keying in a number.
o If the credit card data is not populated, check that the Hardware tab on the Transaction
card is expanded.