
User guide


5
CHARGELOGIC – USING PIN PADS AND SWIPE DEVICES
a. On the PIN pad main menu, select File Transfer, Download (Serial Port option). Select USB
port and Full Mode for download type. If the PIN pad begins a partial download
automatically, simply Abort and then select the correct options.
On the Computer
13. Run the ddl.exe under a command line. It is located under C:\Program Files (x86)\ChargeLogic
Controls\Verifone Mx on a 64-bit Windows 7 PC.
14. Run the following command under the tgz file location: ddl –p3 app\ChargeLogic_USB_files.tgz
(Example: C:\Program Files (x86)\ChargeLogic\ChargeLogic Controls\Verifone Mx>ddl –p3
app\ChargeLogic_USB_files.tgz). Press Enter.
On the PIN Pad
15. After the download, the unit will decompress and process the file. Restart the unit and wait until
you see the ChargeLogic logo.
VeriFone MX900 Series Pin Pads
In order to use a USB cable with the VeriFone MX900 series pin pads, a Downloader utility must be
installed and the operating system must be upgraded. Once the upgrade is performed, the form agent
can be downloaded.
To install the Downloader Utility:
1. Right click on the Mx800Downloader_2.6.4_Setup file.
2. Select Run as Administrator. A Setup Wizard will run to install the Downloader.
To determine if an upgrade is necessary:
1. Boot up the pin pad into configuration mode. If the pin pad does not boot up into configuration
mode, hold down the 1-5-9 keys together for a second and then release.
2. On the password screen, enter “166832” for the password. If this password does not work, try
“166831,” “6547649,” or “9467456.”
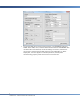
3. Select the Information tab, and then select Basic System.
4. Scroll down to the Build (second line from the bottom). The un-upgraded build is release-
20120625. If there is extra data after that (such as “SC-3.0.3-B”), then the upgrade hotfix has been
applied.
To perform an operating system upgrade:
On the PIN Pad
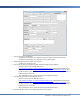
1. From the configuration mode home screen, select the Transfer tab, and then select the Serial/USB
tab.
2. Touch the value COM2 and use the selector to change this value to COM5 (USB) and apply these
settings.
3. Touch the GO button.
On the Computer
1. Select the appropriate file (dl.v2-0625or0625SC1or0625SC2to0625SC3.0.3-B-20140108-
PROD.tgz). Right click this file and select “Download to Mx device (serial).”
2. Select COM9 (this is the default port to which the USB driver installs. You can verify this COM port
using Windows’ Device Manager in the Control Panel).