
User guide


7
CHARGELOGIC – USING PIN PADS AND SWIPE DEVICES
Terminal Setup
1. If the end user is using Windows 7 or Windows 8, they will need the Microsoft Visual C++ 2008
Redistributable Package (x86) installed on the terminal prior to the ChargeLogic installer (this is
the prerequisite for one of ChargeLogic’s libraries). They will also need to either turn off User
Account Control (not recommended in a POS environment) – or –modify the Active Payments file.
To modify the Active Payments file:
a. Run Notepad as the Administrator.
b. Using Notepad, edit C:\Windows\activepayments.ini.
c. In the [Logging] section, change the EventLog property from EventLog=vfievent.log to a
value that includes a fully qualified path to a file that the limited user has write permission
(e.g., EventLog=C:\Temp\vfievent.log).
i. Make sure that the POS user has write access to the specified path and that the
path does not exist in a directory that is protected by User Account Control (e.g.,
C:\Program Files).
2. Download the ChargeLogic msi file from
https://www.chargelogic.com/system/4.00.04/ChargeLogic.msi or at
https://www.chargelogic.com/partners/software/hardware . This will install the ChargeLogic
Controls.
3. If using a 32-bit machine, install the VeriFone USB drivers from
https://www.chargelogic.com/system/4.00.04/installvfi.msi or at
https://www.chargelogic.com/partners/software/hardware before plugging in the PIN pad. If you
are using a 64-bit machine, plug in the PIN pad first and then download the driver off the Partner
Portal at https://www.chargelogic.com/partners/software/hardware. Save it to your computer.
Save and exit all other open programs. Select the PIN pad on the device manager and point it
toward the driver’s location.
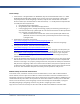
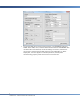
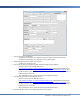
4. Click on the Hardware tab and select the VeriFone PIN pad model that you are using in the OPOS
PIN Pad Profile. Click on the Capabilities tab and place a check mark in the Track 2 Capable field.
Each time a user logs in on a properly configured terminal, the system will attempt to initialize the
PIN pad. If the ChargeLogic OPOS CCO controls cannot be found, the system will prompt the user
to install them now. ChargeLogic contains an automated installer that will launch with the consent
of the user. After installation completes successfully, the PIN pad will be ready for use.
Additional Setup for the Role-Tailored Client
In the Classic client, automation controls, such as the OPOS drivers, can be used to initiate workflow
events. However, the RTC requires client add-ins as well as automation controls for workflow events. In
ChargeLogic versions prior to 4.00.04, lines must be created in the client add-in tables; in 4.00.04, they are
created automatically. Files need to be copied into the client add-in folder in versions prior to NAV 2013.
The file can be located here (if the ChargeLogic Controls have already been downloaded): C:\Program
Files (x86)\ChargeLogic\ ChargeLogic Controls. Copy the file “ChargeLogic Timer Control.”
Copy the timer control file manually into the Client add-ins folder of the 2009 SP1 or R2 RTC folder.