
User guide


8
CHARGELOGIC – USING PIN PADS AND SWIPE DEVICES
In Object Designer, open the Client Add-in table and add the following control in a new line:
Control Add-in Name Public Key Token Version Description
ChargeLogic.TimerControl e8ecf5008582ad7a ChargeLogic Timer Control
Troubleshooting VeriFone MX PIN Pads
Even if you have purchased the PIN pads through ChargeLogic, you may need some assistance with
troubleshooting. Below are common scenarios with resolutions:
The tamper sensor on the PIN pad has been triggered.
o PIN pad will display “Tamper Detected and Cleared” on power-on.
o PIN pad will not go into PIN entry mode when the tamper sensor has been triggered.
o The PIN pad must be sent for repair.
The ChargeLogic logo does not appear when the PIN pad boots up, but there is no error
message.
o The PIN pad must be programmed with the ChargeLogic application.
o Configure the communications settings. Click the Setup menu button and select the
Upload Terminal Software item.
On programmed PIN pads, instead of the ChargeLogic logo, an error message saying that the PIN
pad cannot locate a port appears.
o Install the 32-bit VeriFone USB drivers from
https://www.chargelogic.com/system/4.00.04/installvfi.msi or download the 64-bit driver
off the Partner Portal at https://www.chargelogic.com/partners/software/hardware. Save
the 64-bit driver to your computer. Select the PIN pad on the device manager and point it
toward the driver’s location.
o After installing the driver, power off the PIN pad and power back on.
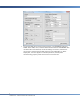
o If a different port must be selected, use the OPOS Demo. Navigate to C:\Program Files
(x86)\ChargeLogic\ChargeLogic Controls\Verifone MX and run OPOSDEMO as
Administrator.
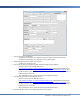
Select File, Editor. Select the port used by the PIN pad as indicated by in the
Device Manager in the Control Panel.