This file provided by Switch to Infinity Data Corp for your processing needs! Infinity offers great rates, excellent customer support and a wide range of payment processing solutions. http://www.infinitydata.
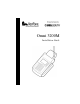
Omni 3200M Installation Guide
IMPORTANT NOTICE Lithium Battery Caution. The Random Access Memory (RAM) in the Omni 3200M terminal is protected by a lithium battery. Do not, under any circumstances, attempt to replace this battery. Failure to comply may invalidate the product warranty. No Warranty. Although VeriFone has attempted to ensure the accuracy and completeness of its contents, this manual may contain errors or omissions. Limited Liability.
Table of Contents Introduction . . . . . . . . . . . . . . . . . . . . . . . . . . . . . . . . . . . . .1 Installing the Omni 3200M . . . . . . . . . . . . . . . . . . . . . . . . . 2 Step 1: Select an Indoor Location for the Terminal . . . . 2 Step 2: Unpack the Shipping Carton . . . . . . . . . . . . . . . . 3 Step 3: Examine Terminal Features . . . . . . . . . . . . . . . . . 5 Step 4: Connect the Antenna to the Antenna Base . . . . . 9 Step 5: Connect the Terminal to a Telephone Line (Optional) . . .
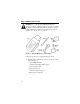
Omni 3200M Installation Guide Introduction The Omni 3200M wireless payment terminal frees you to pursue business opportunities almost anywhere they lead. Its intelligent and reliable design delivers unmatched value for merchants and transaction processors alike (see Figure 1).
Omni 3200M Installation Guide The BellSouth Intelligent Wireless Network also offers connections with complementary networks and several host connectivity options. Each Omni 3200M terminal is assigned a unique code before it is distributed to end users. This code, called the MAN, automatically identifies your terminal to the BellSouth Intelligent Wireless Network when you process transactions.
Omni 3200M Installation Guide • Choose a location that is free and clear of any obstruction that could cause radio interference, such as metal blinds or a large metal partition. • To perform some periodic maintenance functions, such as upgrading the terminal software, you will need to be able to move the terminal within reach of a modular telephone company jack. • Keep the terminal out of direct sunlight and away from any type of object or appliance that radiates heat.
Omni 3200M Installation Guide Warning: Do not use an Omni 3200M terminal that is damaged, or that has a damaged antenna. Do not try to operate the wireless terminal without the antenna. Replace a damaged antenna immediately with the correct replacement part from VeriFone (see “Accessories” on page 34). Figure 2 Omni 3200M Product Components Follow these four steps to unpack the shipping carton: 1.
Omni 3200M Installation Guide 2. Remove any protective plastic wrapping from the terminal or other components and arrange them on a table or countertop. 3. Remove the clear protective strip from the display lens. 4. Save the shipping carton and packing material for repacking or moving the terminal in the future. Step 3: Examine Terminal Features Before you continue the installation, please take a moment to note the important features of the Omni 3200M, as shown in Figure 3 below.
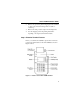
Omni 3200M Installation Guide General Features With the Omni 3200M terminal lying on a flat surface and facing toward you, please note the following features: • In the center of the terminal, a display screen with a nonremovable, clear protective lens.
Omni 3200M Installation Guide • A thermal printer, integrated into the upper part of the terminal. In the top left corner of the terminal is a small, green “power-on” and “no paper” indicator light, and a paper feed button. An icon, shown to the right, indicates the location and function of the paper feed button. • A rounded base for the antenna assembly, built in to the back of the terminal, and located to the right of the paper roll holder.
Omni 3200M Installation Guide Telephone Line Ports • On the left side of the back panel are two RJ11-type modular jacks for optionally connecting the wireless terminal to a telephone line: The first port is identified by a telephoneshaped “Telset” icon (shown to the right). You use the Telset port to connect the Omni 3200M to a telephone base unit. The second telephone line port is identified by a jack-shaped “Telco” icon (shown to the right).
Omni 3200M Installation Guide Step 4: Connect the Antenna to the Antenna Base Follow these steps to connect the antenna to the antenna base located on the back panel of the terminal (see Figure 6): 1. Holding the middle part of the antenna with the rubber whip pointing upward, position the bottom of the antenna onto the threaded connector post of the antenna base. Carefully insert the “male” connector pin that is inside the antenna into the gold-colored “female” receptacle in the center of the post.
Omni 3200M Installation Guide Note: Do not remove the rubber sleeve that is attached to the antenna. Do not place any kind of obstruction near the antenna or place any object on the antenna itself, as this may prevent the radio module from operating properly. Step 5: Connect the Terminal to a Telephone Line (Optional) The Omni 3200M terminal performs normal transactions over the BellSouth Intelligent Wireless Network.
Omni 3200M Installation Guide Set Up a Direct Connection To set up a direct telephone line connection from the Omni 3200M to a telephone company wall jack (see Figure 7): 1. Insert the connector on one end of the telephone line cord into the Telco port on the back panel of the terminal. (The Telco port is identified by the icon shown to the right.) 2. Insert the connector on the other end of the telephone line cord into a RJ11-type telephone company wall jack.
Omni 3200M Installation Guide 1. Insert the connector on one end of the telephone line cord into the Telset port on the back panel of the terminal. (The Telset port is identified by the icon shown to the right.) 2. Insert the connector on the other end of the telephone line cord into the empty RJ11-type modular jack located on the telephone base unit.
Omni 3200M Installation Guide Step 6: Connect Optional Device(s) The Omni 3200M supports the complete line of VeriFone peripheral devices designed for use with electronic Point-ofSale terminals. Using the two RJ45-type serial ports on the back panel of the terminal, you can connect up to two optional devices. Optional devices include PIN pads, check readers, smart card reader/writers, and bar code wands.
Omni 3200M Installation Guide Figure 9 PINpad 101/102/1000 Connection Figure 10 PINpad 201/301/2000 Connection Connect a CR 600 Check Reader Warning: Check readers may require a separate power source. Before you connect a check reader, or a similar device, to the Omni 3200M terminal, be sure the device is not connected to a power source. If necessary, disconnect the power pack cable from the device.
Omni 3200M Installation Guide To connect a CR 600 check reader (see Figure 11): 1. If the cable is not already connected to the check reader, insert the small modular plug on one end of the cable into the modular jack on the check reader. 2. Insert the larger RJ45-type connector on the other end of the cable into the “RS232” serial port on the back panel of the Omni 3200M terminal.
Omni 3200M Installation Guide 2. Insert the larger RJ45-type plug on the other end of the interface cable into the “Bar Code/PIN Pad” serial port on the back panel of the terminal. Figure 12 SC 4xx, SC 5xx, and PINpad 501 Connection Connect a Bar Code Wand To connect a bar code wand, insert the RJ45-type plug on the end of the cable into the “Bar Code/PIN Pad” serial port on the back panel of the terminal (see Figure 13).
Omni 3200M Installation Guide Step 7: Connect the Terminal Power Pack Having installed any optional peripheral(s), you can now connect the Omni 3200M to a power source: 1. Insert the round connector that is on the end of one of the two power pack cables into the power port on the back panel of the terminal (see Figure 14). The power port is identified by the “electrical power” icon, shown to the right.
Omni 3200M Installation Guide Note: You may also wish to install a power surge arrestor at the AC power outlet to which the terminal is connected to prevent possible damage caused by local lightning strikes and other electrical surges. Figure 14 Omni 3200M Power Pack Connection When you connect the power, the Omni 3200M display screen, and the green LED at the top left corner of the terminal, light up. The LED should now be flashing off and on, indicating that there is no paper in the printer.
Omni 3200M Installation Guide Step 8: Install a Paper Roll in the Printer A fast, quiet thermal printer is built in to the Omni 3200M. Because the printer receives power directly from the terminal, there are no additional cables to connect (see Figure 15). Before you can process transactions that require a receipt or record, you must install a roll of paper in the printer. This procedure is described below. The Omni 3200M printer uses single-ply, thermal-sensitive roll paper that is 58 millimeters (2.
Omni 3200M Installation Guide Caution: Because impact, friction, temperature, humidity, light, and oil affect the coloring and storage characteristics of thermal paper, handle this type of paper carefully. Never load a roll of paper that has folds, wrinkles, tears, or holes at edges or in the printing area. For best results, cut the leading edge of the paper with scissors, instead of tearing it, before feeding it into the printer.
Omni 3200M Installation Guide 5. If necessary, hold down the paper feed button until about 5 centimeters (2 inches) of paper emerge from the slot below the serrated metal tear strip. 6. Insert the orange plastic spindle into the hole in the paper roll you are holding. Then, place the spindle and roll into the paper roll cradle so the ends of the spindle rest securely in the two slots. 7.
Omni 3200M Installation Guide 2. While pressing and holding down the paper feed button, insert the power connector back into the power port, twisting the connector to the left to lock it into position. The printer test starts, and then stops, automatically after a few seconds. When you see the test printout, you can release the paper feed button. The test printout, which shows printer information and repeating character strings, is about 38 centimeters (15 inches) long. 3.
Omni 3200M Installation Guide Cleaning the Printer Every few months, check and thoroughly clean the integrated thermal printer: 1. Be sure the terminal is connected to a power source. 2. Remove the paper roll cover. 3. Lift out the paper roll and spindle from the paper roll cradle, if necessary. Carefully cut the paper that is still inserted in the feed mechanism from the roll. 4. Press the paper feed button to eject the remaining paper from the feed mechanism.
Omni 3200M Installation Guide Display Does Not Show Correct or Readable Information 1. Check all cable connections. Verify that the antenna is tightened “hand tight” and check the telephone line connection (optional for the Omni 3200M). 2. Check the electrical outlet or power connection. The power pack connector may be loose (not in its “locked” position) or the power source may not be supplying power. 3.
Omni 3200M Installation Guide Printer Does Not Work 1. Check all terminal power connections. The integrated printer receives its power directly from the Omni 3200M terminal. The green LED indicator light in the upper left corner of the terminal should be on. 2. If the green LED indicator is blinking off and on, the printer is out of paper. Remove the paper roll cover and install a new roll of printer paper. 3.
Omni 3200M Installation Guide Terminal Transactions Do Not Work There are several possible reasons why the terminal may not be operating properly or processing transactions. To check each possible cause follow the three steps described below: Step 1: Check the card reader: 1. Perform transactions with several cards to ensure the problem is not a defective card. 2. Make sure you are swiping cards properly.
Omni 3200M Installation Guide Step 3: If your application requires an optional telephone line connection, check your telephone line and also the telephone line of the party the terminal is attempting to dial up: 1. If the problem appears to be with the telephone line, first check with the party you are trying to call to see if their dial-up phone system is operational. If they are not experiencing difficulties with their line, contact your local telephone company to have your line checked. 2.
Omni 3200M Installation Guide PIN Pad Does Not Work 1. Check all PIN pad cable connections. 2. Try a different magnetic stripe card to ensure that the problem is not a defective card. 3. If the problem persists, contact your VeriFone distributor or service provider. Optional Telephone Connection Does Not Work Properly 1. Check the telephone line cord and all telephone connections. 2. If you are using a pass-through connection, check the line using another telephone base unit.
Omni 3200M Installation Guide Returning a Terminal for Service Note: Unless otherwise instructed in this Installation Guide, do not, under any circumstances, attempt any service, adjustments, or repairs on this product. Instead, contact your local VeriFone distributor or service provider for assistance. To return a terminal for service, follow these steps: 1.
Omni 3200M Installation Guide 2. Contact your VeriFone distributor or service provider and give them the information described in Step 1 above. 3. Describe the problem(s) and provide the shipping address where the repaired or replacement unit will be returned. 4. Be sure to keep records of the following items: • VeriFone Serial Number, Product ID, and the MAN and MSN numbers that are assigned to the Omni 3200M terminal you are returning for service or repair.
Omni 3200M Installation Guide Specifications Power • AC power pack requirements: 120 V, 60 Hz, 0.6 A • DC power pack requirements: 100–250 V~, 50–60 Hz, 1.2 A • Terminal power requirements: 22 V AC, ~1.2 A or 25.5 V DC, ~1.2A Environmental • Operating temperature: 0° to 40° C (32° to 104° F) • Storage temperature: – 18° to + 66° C (0° to 150° F) • Relative humidity: 15% to 95%; no condensation Dimensions • Height: 75 mm (2.95 inches) • Width: 148 mm (5.8 inches) • Depth: 294 mm (11.
Omni 3200M Installation Guide Product Certifications FCC Compliance Manufacturer: VeriFone, a division of Hewlett-Packard Company Model: Omni 3200M FCC Part 15 This equipment has been tested and found to comply with the limits for a Class B digital device, pursuant to Part 15 of the FCC Rules.These limits are designed to provide reasonable protection against harmful interference in a residential installation.
Omni 3200M Installation Guide To be certain of the number of devices that may be connected to the line, as determined by the total RENs, contact the telephone company to determine the maximum REN for the calling area. An FCC-compliant telephone line cord and modular plug is provided with this equipment. This equipment is designed to be connected to the telephone network or premises wiring using a compatible modular jack which is FCC Part 68 compliant.
Omni 3200M Installation Guide Accessories How to Order The VeriFone Online Store, on the World Wide Web at www.store.verifone.com, provides easy access and secure ordering for Omni 3200M accessories, as well as current information about other VeriFone products. To place accessories orders by telephone, call the VeriFone Customer Development Center at 1-800-233-0522. Accessories you can order for the Omni 3200M, including documentation, are listed below.
Omni 3200M Installation Guide Telephone Line Cord 00124-03 2.1-meter (7-foot) telephone line cord with modular RJ11-type connectors AC Power Pack 07096-01G Input: 120 V AC, 60 Hz, 0.6 A Output: 22 V, ~2.0 A DC Power Pack 07096-03 Input: 100–250 V~, 50–60 Hz, 1.2 A Output: DC +25.5 V, 1.57 A Thermal Printer Paper CRM0039 High-grade thermal printer paper, 58-mm (2.25-inch) width; single roll CRM0039-01 High-grade thermal printer paper, 58-mm (2.
4988 Great America Parkway Santa Clara, CA 95054-1200 USA TEL: 408-496-0444 FAX: 408-919-1405 NET: www.verifone.hp.com 10 Woodbridge Center Drive Woodbridge, NJ 07095 USA TEL: 1-800-726-3210 FAX: 732-602-5736 NET: www.bellsouthwd.com/pos Omni 3200M Installation Guide VeriFone Part Number 19595, Rev. B © 2000 VeriFone, a division of Hewlett-Packard Company. All rights reserved. Printed on recycled paper.