
Specifications


FILE AUTHENTICATION
VeriShield File Signing Tool
VX 520 R
EFERENCE GUIDE 97
Please note also how the command-line mode switches described in Table 15 are
used in this example:
filesign -L -f file.out -s file.p7s -c vxsign.crt -k vxsign.key
• The -L switch indicates to store the application file in the flash file system
instead of the target group’s (default) RAM file system. (The target group for
the download must be selected from terminal manager when the download is
performed.)
• The -f switch indicates that the application file “file.out” must be signed
by the VeriShield File Signing Tool.
Executable files, such as *.out and *.lib files, must always be signed if
they are to run on the terminal following a download. Depending on the
application’s logical security requirements, other types of files, such as data
files and font files, may also need to be signed and authenticated on
download.
• The -s switch is followed by the name of the signature file to be generated,
file.p7s.
• The -c switch is followed by the name of the signer certificate to be used for
file authentication with the development terminal, “vxsign.crt.”
• The -k switch is followed by the name of the signer private key file,
vxsign.key. A signer private key is a required input to the file signing
process for development terminals and for deployment terminals.
VeriShield File
Signing Tool
Graphical Interface
Mode
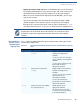
When you execute the VeriShield File Signing Tool, the VeriShield File Signing
Tool dialog box opens.
The VeriShield File Signing Tool dialog box has four entry fields, each of which is
followed by a “next” [...] selection button. There is one check box, and the OK and
Cancel buttons.
• Press ALT+C or click the [...] button to the right of the Certificate field to locate
and select the certificate file (*.crt) to be used to sign the file.
• Press ALT+K or click the [...] button to the right of the Key field to locate and
select the signer private key file (*.key).
• Press ALT+F or click the [...] button to the right of the File to be signed field to
locate and select the application file (*.out, *.lib, or other) to sign. If
necessary, the filename can also be modified.
To store the file in flash memory upon download to the terminal, check the
Stored in Flash check box. This adds the F: prefix to the target file name.
• Press ALT+S or click the [...] button to the right of the Signature file field to
enter a filename for the signature file to be generated. The filename extension
must always be *.p7s. You can also choose another directory on the host PC
to store the generated signature file.