MANUAL VERIFONE VX680 POINT TRANSACTION SYSTEMS OY Vanha Nurmijärventie 62 FI-01670 VANTAA | tel: +358 (0)9 477 4330 | fax: +358 (0)9 436 2490 www.point.
Page 2 (34) INDEX: 1. BEFORE USE ............................................................................................................... 4 1.1 Important .............................................................................................................................. 4 1.2 PA-DSS –Standard ........................................................................................................... 5 1.3 Terminal structure ..................................................................
Page 3 (34) 4.1.1 Chip card transactions ...............................................................................................16 4.1.2 Swipe card transactions ............................................................................................16 4.1.3 Contactless card transactions .................................................................................17 4.1.4 Reversal ................................................................................................................
Page 4 (34) 1. BEFORE USE 1.1 Important NOTE! If these instructions are not followed and the terminal is damaged it will void the warranty! • • • • • • • • • • • • Protect the power cord and modem. If they are damaged they are not to be used anymore. The terminal is not waterproof or dustproof, and is intended for indoor use only. The warranty of the terminal will void if it is exposed to water or dust. Do not use the terminal next to water or moist areas. Do not use below 0°C degrees.
Page 5 (34) 1.2 PA-DSS –Standard The purpose of the PA-DSS –standard is to help software suppliers develop, according to the PCIDSS requirements, payment solutions which do not save forbidden card information such as the CVV2 or the PIN-code. Companies must use solutions for card payment processing that are approved according to the PCI-DSS –standard. For the latest version of the Point PA-DSS Implementation Guide, go to http://www.point.
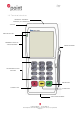
Page 6 (34) 1.3 Terminal structure INTERNAL THERMAL PRINTER (AT THE BACK) STYLUS INDICATOR LED TERMINAL DISPLAY / TOUCHSCREEN SWIPE READER TELEPHONE-STYLE KEYPAD ENTER KEY CANCEL KEY CLEAR KEY CHIP CARD READER POINT TRANSACTION SYSTEMS OY Vanha Nurmijärventie 62 FI-01670 VANTAA | tel: +358 (0)9 477 4330 | fax: +358 (0)9 436 2490 www.point.
Page 7 (34) 1.4 Technical data Processor: Memory: Display: Swipe card reader: Chip card reader: SAM-card readers: Keypad: Peripheral Ports: Connection: Printer: Security: Battery: Physical: 400 MHz ARM11, 32-bit RISC processor 192 MB (128 MB Flash, 64 MB SDRAM) standard, can exceed up to 500 MB.
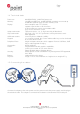
Page 8 (34) 1.6 Battery The battery is attached by placing it on its slot and pressing it downwards. To remove the battery, press the locking tab and pull the battery from its slot. When the power cord is not connected to the terminal, it shows the state of the battery on the top right corner of the screen. The text BAT and the bars on top of it indicate how much is left of the battery. During normal use, the battery should be loaded when its indicator shows 1 bar or less.
Page 9 (34) 1.7 SIM-card Terminals which use GPRS-connection have a SIM-card. Before inserting the SIM-card inside the terminal, disable the PIN-code query. The SIM-card operator’s APN information is inserted to the GPRS APN menu in the terminal. The APN information is set to INTERNET by default, change this if needed. The SIM-card is placed beneath the battery so that the chip is facing down and the folded corner points downwards. 1.
Page 10 (34) 1.10 Using the menus To see the terminal’s various settings and functions, press the desired menu icon from the screen. To scroll inside the menu’s press the arrow keys from the screen, or numbers 1 and 3 from the keypad. To select a particular function or setting, press its text field from the screen. A function is selected by pressing the enter key from the screen or from the keypad. To view the previous display, press the cancel key from the screen or from the keypad.
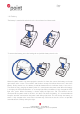
Page 11 (34) 1.13 Switching the paper • • • • • • Pull the printer covers eject button upwards, so that it opens. Remove the previous paper roll from the printer tray. Place the new paper roll so that the paper moves from the bottom of the roll towards the front edge. Leave a small amount of paper to extend outside the printer door. Close the printer cover. The terminal informs ”PAPER INSERTED PRESS ANY KEY”. Press any key to continue. 1 2 3 1.
Page 12 (34) 2. SETTINGS 2.1 Terminal settings To get to the terminals setting menu, select the Settings icon from the screen and press Enter. Some of the listed settings are explained in later sections. The sections are marked in brackets. From the Settings menu choose EDIT. BATCH TIME (2.3) CASHIER NUMBER (2.4) TCP/IP PARAMETERS LANGUAGE EXTRA AMOUNT (5.4) CASH RECEIPT (5.1) POWER OPTIONS (2.7) AUTH. MANDATORY (5.6) TIME SETTINGS (2.5) VAT (5.5) PREAUTHORIZATION (5.7) SOUND (2.9) CONTRAST (2.
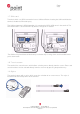
Page 13 (34) 2.5 Time and date settings Select TIME SETTINGS from the EDIT menu. Choose ADJUST CLOCK. Select the information you want to change, type in the new value and press Enter. 2.6 Fixed IP-address If the terminal uses WLAN-connection, fixed IP-addresses must be defined to the terminal. Select TCP/IP PARAMETERS from the EDIT menu and choose FIXED IP.
Page 14 (34) 2.10 GPRS APN NOTE! To change the GPRS APN information you need the terminal’s daily password. To get the password go to Point reporting or contact Point’s customer service. Press the SETTINGS icon and input the daily password. Press enter and choose EDIT Choose GPRS APN and input your operator’s APN information. 2.11 WIFI settings NOTE! To change the WIFI information you need the terminal’s daily password. To get the password go to Point reporting or contact Point’s customer service.
Page 15 (34) 3. DOWNLOADS 3.1 Downloading applications NOTE! The terminal should be kept still and connected to the power cord during the entire download. It is not adviced to download the terminal e.g. in a moving vehicle. This might disrupt the download. Send the batch from the terminal before downloading. To send the batch, select the Reports icon from the screen, press Enter and choose SEND BATCH. Select the Settings icon from the screen and press Enter. Choose APP.
Page 16 (34) 4. DAILY USE 4.1 Transactions 4.1.1 Chip card transactions ENTER AMOUNT: Type the precise amount, including the cents, and press Enter. PLEASE INSERT OR SWIPE CARD: Insert the card into the chip reader, located at the front of the terminal, with the chip side facing up. CREDIT / DEBIT: Customer selects the payment method. ENTER PIN: Customer types the PIN-code and presses Enter. NOTE! You can pass the PIN-code by pressing Enter. In this case the responsibility of the transaction is yours.
Page 17 (34) 4.1.3 Contactless card transactions ENTER AMOUNT: Type the precise amount, and press Enter. INSERT/SWIPE OR PRESENT CARD: Place the card on top of the display. CREDIT / DEBIT: Choose the payment method The terminal prints out the merchant’s receipt and asks to print the customer’s receipt. Press Enter if you wish to print out the customer’s receipt. Otherwise, press Cancel. Contactless cards have a floor limit for contactless transactions that is defined by the card company.
Page 18 (34) The terminal prints out the merchant’s receipt and asks to print the customer’s receipt. Press Enter if you wish to print out the customer’s receipt. Otherwise, press Cancel. 4.1.6 Manual entry Select the Menu icon from the screen and choose MANUAL ENTRY CARD NUMBER: Type the card number and press Enter EXPIRY DATE: Type the card’s expiry date and press Enter CREDIT / DEBIT: Choose the payment method. ENTER AMOUNT: Type the complete amount and press Enter .
Page 19 (34) CREDIT / DEBIT: Choose the payment method. The terminal prints out the merchant’s receipt and asks to print the customer’s receipt. Press Enter if you wish to print out the customer’s receipt. Otherwise, press Cancel. If the PIN-code was entered, the customer does not need to sign the receipt. The terminal will remind you to check the customer’s ID, if the transaction exceeds 50,00€ (depending on the card used).
Page 20 (34) centralized management possible for companies. Point reporting gathers transactions from terminals into different groups determined by the customer. The transactions are sent from the service to the customer’s bank every day. The banks payments appear in the company’s account with the Point reporting group names. A group-specific reference can be determined for the bank payments. This makes it easier for financial management programs to target specific payments.
Page 21 (34) 4.3.3 Send Batch The terminal automatically sends the batch, if you have installed a sending time to the settings. You can also send the batch manually, for example if the automatic batch sending has not succeeded. NOTE! The automatic batch sending does not work, if the terminal is turned off. Select the Reports menu from the screen and press Enter. Choose SEND BATCH. The terminal prints out the report and connects to Point reporting.
Page 22 (34) 4.3.5 Report explanations This is an example of the report and the information in it. SENT TO TCS: The total sum and amount of transactions that are sent to Point reporting as online transactions NOT SENT TO TCS: The total sum and amount of transactions that have not been sent to Point reporting as online transactions. YHTEENSÄ: The total sum and amount of all the transactions in the terminal’s memory. BATCH SENDING OK: the batch sending is ok.
Page 23 (34) 4.4 Authorization notifications When a transaction is declined at the authorization centre a declining code is printed on the receipt. This code tells you the reason why it has been declined. The transaction is declined by a notification given by the bank or the credit card company.
Page 24 (34) 202 203 204 205 206 207 208 209 210 300 306 307 400 900-999 902 903 904 905 906 907 908 909 910 911 912 913 914 915 916 917 918 919 920 921 922 923 930 Suspected card counterfeit Cashier, contact the recipient Limited card Cashier, contact recipients’ security department Exceeds PIN-code attempts Special situation Extinct card Stolen card Suspected abuse Successful Unsuccessful unsuccessful, form fault Declined.
Page 25 (34) 5. SPECIAL FUNCTIONS 5.1 Cash receipt Cash receipt is used when a customer pays with cash and a receipt is wanted from the terminal. Cash receipts are also seen on batch reports. Cash receipt is activated from the Settings menu (2.1). Making a cash receipt sale: Select the Menu icon from the screen Choose CASH RECEIPT Select CASH RECEIPT SALE ENTER AMOUNT: Enter the complete amount and press Enter. VAT RATE %: Select the VAT percent.
Page 26 (34) Press the Menu icon from the screen Choose CASH WITHDRAW ENTER AMOUNT: Enter the complete number and press Enter. PLEASE INSERT OR SWIPE CARD: Insert the chip card to the reader or swipe the card CREDIT / DEBIT: Choose the payment method ENTER PIN: Customer types the PIN-code and presses Enter, if the card is a chip card. The terminal prints out the merchant’s receipt and asks to print the customer’s receipt. Press Enter if you wish to print out the customer’s receipt. Otherwise, press Cancel.
Page 27 (34) 5.6 Mandatory authorization Mandatory authorization is activated from the Settings menu (2.1). When the mandatory authorization is activated, the terminal automatically authenticates all transactions regardless of the amount or the card type. 5.7 Preauthorization Preauthorization is activated from the Settings menu (2.1). With the preauthorization function, the merchant can check the card’s functionality. This is useful for example in car rentals or hotels.
Page 28 (34) The terminal prints out the merchant’s receipt and asks to print the customer’s receipt. Press Enter if you wish to print out the customer’s receipt. Otherwise, press Cancel. 5.9 Multiuser version The multiuser version allows several users to take transactions with one terminal so that the batches can be sent to various bank accounts. In order to update your terminal to this version, please contact Point. Printing the user list Press Settings, enter and choose Print. Select Users.
Page 29 (34) c) Remove VAT group a) Add VAT group VAT group: Type the groups number (0-99) and press Enter. VAT%: Type the VAT percent and press Enter. The display shows the group number and VAT percent. Accept this group by pressing enter; cancel by the cancel-key. Add next VAT: If you wish to add a new group, press enter. Otherwise press cancel. b) Edit VAT group VAT group: Type the group number and press Enter. VAT: Type a new VAT percent and press Enter.
Page 30 (34) VAT group: Change the VAT group if needed and press enter. Price: Change the price if needed and press enter. The display shows the product name, VAT group and the price. Accept this by pressing enter; cancel by the cancel-key. Edit next product: If you wish to edit another product, press enter. Otherwise, press cancel. c) Remove product NOTE! You cannot remove a product that is included in unsent transactions, or if you have not sent the batch.
Page 31 (34) The terminal prints out the receipts. NOTE! If the transaction has been made with a payment card, the reversal must also be done to the card transaction. Product reports Report printing: Press Reports, enter and choose product report. Choose daily report. The terminal prints out a report that lists the sold products, the amount of products, the total amount of sold products and the different VAT groups of the sales.
Page 32 (34) selection. It cannot be used. The terminal also might not have the AID and BIN-tables. Send the batch from the terminal (instructions 4.4.3). SERVICE NOT ALLOWED FOR THIS CARD PRODUCT = The card in use is not included in the terminals card selection. It cannot be used. NOT ALLOWED = The card in use does not permit to make the wanted transaction. For example manual entry with a Visa Electron is not allowed.
Page 33 (34) POWER IS OFF = Switch on the terminal by pressing the Enter-button for a while. The battery might also be empty and require charging. POINT TRANSACTION SYSTEMS OY Vanha Nurmijärventie 62 FI-01670 VANTAA | tel: +358 (0)9 477 4330 | fax: +358 (0)9 436 2490 www.point.
Page 34 (34) 6.4 Service NOTE! Do not, under any circumstances, try to fix the terminal by yourself. The terminal should be always delivered to the maintenance service. If you suspect that the terminal is damaged or broken, do the following: • • • • • Pack the terminal firmly, so that it will not be damaged during the delivery. Attach a description of the problem and your contact information with the terminal. Attach also a notification if there are transactions in the terminal.