CWST1
GENERAL PRECAUTIONS • Do NOT dismantle. • Do NOT place near flammable or combustible items. • Do NOT alter power cord. • Unplug from electrical outlet during lightning storms or when unused for long periods of time. • Unplug from electrical outlet before cleaning or changing bulbs. • For indoor use only. Main Parts & Controls A. Lens Cover B. On/Off Switch C. Wall Mount Bracket D. Carrying Handle E. Built-in Stand F.
IMPORTANT SAFETY INSTRUCTIONS Thank you for purchasing the Verilux® ClearWave® Deluxe Phototherapy Skincare System. Please read the following safety information before using. IMPORTANT: • Verilux® does not make any medical claims. This product is not intended to treat or prevent any illness. • It is recommended that you consult a medical professional before using the ClearWave®.
IMPORTANT SAFETY INSTRUCTIONS THIS PRODUCT MUST BE GROUNDED. This product is equipped with a cord having an equipment–grounding conductor and a grounding plug. The plug must be plugged into anappropriate outlet that is properly installed and grounded in accordance with all local codes and ordinances. DANGER Improper connection of the equipment–grounding conductor can result in a risk of electric shock.
INSTRUCTIONS FOR USE To use the ClearWave® Deluxe Phototherapy Skincare System: 1. Plug into properly grounded outlet. 5. Turn your face occasionally to ensure overall exposure. 2. Turn the unit on using the on/off switch. Allow a few minutes at the start of each session for bulbs to achieve full illumination. 6. Based on research, a 15 minute session daily for 8–12 weeks should produce the desired results. 3. Gently wash the affected parts of the skin with a neutral PH soap and dry the skin. 7.
INSTRUCTIONS FOR USE Hanging the ClearWave® Place the screw included into the wall leaving approximately 3mm between the screw head and the wall. Be sure to use an the included anchor if mounting into sheet rock or other soft material. Insert the screw head into the hole located in the upper part of unit. (Figure 2). Figure 2 Standing the ClearWave® on a Table Top Unfold the stand on back of lamp (Figure 3) and place the ClearWave® on a stable, flat surface.
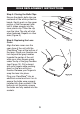
BULB REPLACEMENT INSTRUCTIONS Step 1: Opening the Lens Cover Place the ClearWave® on its back on a large flat surface. Press down gently on the center of the lens cover. (See Figure 5). This releases the locking tabs located under the grey handles. Open the lens cover by grasping the grey handles with your hands. Remove the lens and gently place it next to the unit with the logo face up. Step 2: Opening the Bulb Clips Locate the clear plastic clips across each fluorescent tube (Figure 6).
BULB REPLACEMENT INSTRUCTIONS Step 3: Removing Bulbs Gently lift the fluorescent tube up and out of the clip holder. Grasp the tube by the white plastic base with the Verilux® logo and remove the tube from the socket by pulling the tube towards the black cushion pads. (See Figure 8). Repeat removal of the second bulb. Step 4: Installing New Bulbs Ensure the ClearWave® is on its back on a large flat surface. Hold the fluorescent tubes by the white plastic base, not the glass.
BULB REPLACEMENT INSTRUCTIONS Step 5: Closing the Bulb Clips Ensure the plastic bulb clips are centered on the white protective bands. Gently push on the upper portion of the fluorescent tube until it slides snuggly into the clear plastic clip. Close the clip over the tube. The clip will click when fastened. Repeat on other side. (Figure 9). Step 6: Replacing the Lens Cover Align the lens cover over the open face of the unit with the ClearWave® logo at the bottom of the lamp.
CARE & CLEANING Your ClearWave® Deluxe Phototherapy Skincare System is made from high quality materials that will last for many years with minimum care. You may want to periodically clean the inside of the lens and outside parts, using a mild non-abrasive cleaner and soft cloth. When cleaning, make sure you have turned off and unplugged the unit, and allowed sufficient time for the unit to cool.