VP02
IMPORTANT SAFETY INSTRUCTIONS CAUTION: • TO REDUCE THE RISK OF ELECTRIC SHOCK, DO NOT DISMANTLE. THERE ARE NO SERVICEABLE PARTS INSIDE. • TO REDUCE THE RISK OF FIRE OR ELECTRIC SHOCK, DO NOT EXPOSE THIS UNIT TO RAIN OR MOISTURE. The exclamation point within an equilateral triangle alerts the user to the presence of important operating and maintenance instructions in this owner’s guide.
IMPORTANT SAFETY INSTRUCTIONS 1. Read these instructions – before using this lamp. 2. Keep these instructions – for future reference. 3. Heed all warnings. 4. Follow all instructions. 5. Do not use this lamp in damp/humid or wet locations. 6. For indoor use only. 7. Clean only with dry cloth. 8. Do not block any ventilation openings. 9. Do not place near any heat sources such as radiators, heat registers, stoves, or other apparatus (including amplifiers) that produce heat. 10.
GENERAL PRECAUTIONS • Do not use with power supply voltage other than 120V AC • Avoid placing the lamp in areas that are dusty, humid/moist, lack ventilation, or are subject to constant vibration. • Not for use with light dimmers, timers, motion detectors, voltage transformers, or extension cords. • Do NOT use lubricating agent in bulb assembly. • The light bulb may become loose during transit. To reinstall the light bulb, see the bulb installation instructions on page 8.
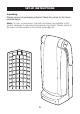
SET-UP INSTRUCTIONS Unpacking Please remove all packaging material. Check the carton for the items pictured below: Note: For your convenience, the bulb has been pre-installed in the socket. However it may have loosened during transit.
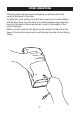
SET-UP INSTRUCTIONS Attaching the Parabolic Grid Diffuser 1. Remove protective packing from bulb. 2. Remove grid diffuser from protective plastic bag. 3. Insert plastic pegs at bottom of grid diffuser into openings near bulb socket and snap tab into place. TAB 4. Plug lamp into a standard 110-120V outlet, simply open the lamp to switch it on and begin enjoying the benefits of Verilux® Natural Spectrum® light! Note: please allow a few minutes for the bulb to warm up to full illumination.
CORD INSERTION The lamp cord may be stored completely or partially within the cavity at the back of the lamp. To insert the cord, simply close the lamp, place it on a level surface with its face down, turn the cord in a vertical position and insert the cord into the back of the lamp until all or part of the length of the cord is inserted. When it is fully inserted, the plug may be locked into the slot at the base of the insertion opening to avoid having the cord fall out during transit.
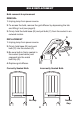
BULB REPLACEMENT Bulb removal & replacement REMOVAL 1. Unplug lamp from power source. 2. To access the bulb, remove the grid diffuser by depressing the tab and lifting it out (see page 6) 3. Firmly hold the bulb base (B) and pull bulb (C) from the socket in an outward motion. D REPLACEMENT 1. Unplug lamp from power source. 2. Firmly hold base (B) and push bulb (C) into the socket (A). 3. Be sure bulb is firmly seated in the socket (see below) and snapped into the metal bulb clip (D). B C A 4.
TROUBLESHOOTING Before requesting service on your Verilux® lamp please read the following: • Make sure all power connectors, cords, and plugs are inserted fully and securely. • Be sure the bulb is securely seated in the socket. (See page 8) • Make sure there is power to the wall outlet or try another outlet – not connected to a dimmer. CARE & CLEANING Your Verilux® lamp is made from high quality materials that will last for many years with a minimum of care.
Please visit our web site at: www.Verilux.com 340 Mad River Park, Waitsfield, VT 05673 1-888-544-4865 VP02-MAN-Rev2 Printed in Taiwan for: Verilux, Inc. © Copyright 2007 Verilux, Inc. All rights reserved.