
Instructions


Veris Technologies
Pub. #OM MSP03-1
14
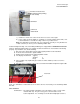
Turn on Veris instrument. The first screen to appear contains the software version number and
shows how much logging time is available.
The computer is informing you of how much of its internal memory is available. Check available
memory to be sure you have enough to contain the data from field you are about to map.
Options: Press any key and proceed to menu options.
Press 1 to bring up the data acquisition menu (see below for more details) (setup options are only for
pH data acquisition, and are covered in pH Module manual)
Select the type of data you want to collect from the above menu.
Regardless of the type of data selected in the previous menu, the computer will show the name of the
map file it is creating, in case you want to record it along with any other information about the field.
Press any key to begin new map file (after starting the file, press the 4 key to stop the file).
Pressing any key brings you one of the following Data Acquisition screens below:
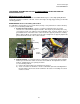
E.C. only (option 1):
E.C. and pH (option 3):
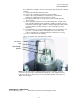
The display is showing the pH values from the pH electrodes, conductivity of the top 1’ (30 cm) and
top 3’ (90 cm) of the soil, and whether you have GPS or DGPS (differentially corrected) signal. At
any time during the mapping process, you can press the 4 key to stop the file. If you create more
than one file from the same field, you can bring the files into a spreadsheet program and combine
them prior to mapping.
DGPS indicator:
NONE, _GPS,
DGPS
Shallow and
Deep EC
readings
pH readings from each
electrode if equipped
with pH module
Status of pH
sampling
mechanism
Speed in
MPH