CDM-8940VW_EN_M_050106 2005.1.7 5:50 PM Page 1 AUDIOVOX CDM8940 Digital CDMA2000 1X EV-DO Handheld Portable Telephone Welcome to the world of EVDO!! Developed by top engineers and equipped with Qualcomm MSM6500, CDM8940 supports full EVDO. With CDM8940, you now have the highest speed and the largest bandwidth that supports the most up-to-date data applications and services.
CDM-8940VW_EN_M_050106 2005.1.7 5:50 PM Page 2 TABLE OF CONTENTS CHAPTER 1 BEFORE USING YOUR PHONE .........7 Inside the Package .................................................8 Handset Description ..............................................9 Function Keys.......................................................10 Display Indicators.................................................11 Using the Battery..................................................13 Installing the Battery ..........................
CDM-8940VW_EN_M_050106 2005.1.7 5:50 PM Page 4 TABLE OF CONTENTS Scratchpad ..........................................................28 Send My Phone # ...............................................29 My Phone #.........................................................29 Voice Privacy.......................................................29 Location...............................................................30 Phone Info...........................................................
CDM-8940VW_EN_M_050106 2005.1.7 5:50 PM Page 6 TABLE OF CONTENTS Camera Camera Camera Camera (Take Flix)..............................................107 (Pix Gallery) ..........................................109 (Flix Gallery)..........................................110 (Help).....................................................111 CHAPTER 6 VOICE MAIL AND TXT, PIX, FLIX MESSAGES ...........................................113 When a New Message Arrives..........................
CDM-8940VW_EN_M_050106 2005.1.7 5:50 PM Page 8 Chapter 1 BEFORE USING YOUR PHONE Please read and fully understand this manual before using your phone. This chapter addresses your phone, its keys and display icons, and covers the charging and proper use of the battery.
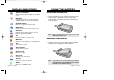
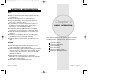
CDM-8940VW_EN_M_050106 2005.1.7 5:50 PM Page 10 INSIDE THE PACKAGE HANDSET DESCRIPTION This package should include all items pictured below. If any are missing or different, immediately contact the retailer where you purchased the phone. This phone is a tri-mode CDMA2000 1X digital phone with Camera capabilities. The CDM8940 weighs 3.89 oz. and the dimensions are 1.82” x 3.56” x 0.92”.
CDM-8940VW_EN_M_050106 2005.1.7 5:50 PM Page 12 FUNCTION KEYS DISPLAY INDICATORS SEND KEY: Press to make or receive a call. Press and hold to turn on Voice Recognition mode. Signal Strength END KEY: Press to turn the phone on, to terminate a call or to return to the initial page. Press and hold to turn off the phone. Roaming NAVIGATION KEY: In Idle Mode -Press up to access the Short Cut Key, down to access the Messaging Menu, right to access Get It Now and left to access Mobile Web.
CDM-8940VW_EN_M_050106 2005.1.7 5:50 PM Page 14 DISPLAY INDICATORS Alarm to Schedule Appears when either an plan or an alarm is set. Dormant Indicates the phone is in disconnection condition while on “Server Connection”. USING THE BATTERY INSTALLING THE BATTERY 1. 1 Place the battery on the back of the handset and slide into place. 2 Push the battery down until it locks into place. 3 Battery lock latch automatically locks into place. Speaker Phone Phone is in speaker phone mode.
CDM-8940VW_EN_M_050106 2005.1.7 5:50 PM Page 16 CHARGING THE BATTERY CHARGING THE BATTERY POWER CONNECTION BATTERY STANDBY TIMES 1. Plug the AC charger into a standard outlet. The operating time is subject to your handset usage and configuration. CDMA Charging is in progress NOTE: STD 1000 mAh Up to 270 hours EXT 1350 mAh Up to 360 hours Charging is completed 1. The times in the following tables are for a new battery. Usage and Standby times may decrease over time. 2.
CDM-8940VW_EN_M_050106 2005.1.7 5:50 PM Page 18 BATTERY INFORMATION Do’s l Only use the battery and charger approved by the manufacturer. l Only use the battery for its original purpose. l Try to keep batteries in a temperature between 41OF (5OC ) and 95OF (35OC). l If the battery is stored in temperatures above or below the recommended range, give it time to warm up or cool down before using. l Completely drain the battery before recharging. It may take one to four days to completely drain.
CDM-8940VW_EN_M_050106 2005.1.7 5:50 PM Page 20 USING THE PHONE TURNING THE PHONE ON 1. Press and hold until your “Power On” logo appears and the melody begins to play. ● If “Password” appears on the display, enter your 4-digit password to unlock your phone. ● The default password is the last 4 digits of your phone number. TURNING THE PHONE OFF 1. Press and hold appears. NOTE: until “Power Off” animation 1.
CDM-8940VW_EN_M_050106 2005.1.7 5:50 PM Page 22 MENU SUMMARY MENU SUMMARY PHONE BOOK RECENT CALLS u u 1 : Find 2 : Add New 3 : Group 4 : Speed Dial 5 : Msg.
CDM-8940VW_EN_M_050106 2005.1.
CDM-8940VW_EN_M_050106 2005.1.7 5:50 PM Page 26 BASIC FUNCTIONS BASIC FUNCTIONS PAUSE FEATURE ANSWERING A CALL You can dial or save a phone number with pauses for use in the automated systems where you need to enter a credit card number, a social security number, or other numbers. This feature will be convenient when you are linked to an ARS (Advanced Record System). 1. To answer a call, press any key except or .To enable a call, press . 1. To insert a pause, enter a phone number then press [MENU].
CDM-8940VW_EN_M_050106 2005.1.7 5:50 PM Page 28 BASIC FUNCTIONS BASIC FUNCTIONS CALL WAITING FUNCTION LOCK Notifies you of an incoming call when you’re on a call by sounding a beep and displaying the caller’s phone number on the screen. Locks your phone and prevents unauthorized use. Phone can only be used after inputting the password. 1. To lock the phone, press and hold . 1. To answer another call while on the phone press . This places the first call on hold. 2.
CDM-8940VW_EN_M_050106 2005.1.7 5:50 PM Page 30 FUNCTIONS DURING A CALL FUNCTIONS DURING A CALL To display menu options during a call, press [MENU]. These menu items are available while you are on a call. SEND MY PHONE # Automatically transmits your phone number to a pager during a call without manually entering the number. MESSAGING Enables you to send a message (SMS) during a call. 1. Press [MENU] 1. To transmit your phone number during a call, press [MENU] . .
CDM-8940VW_EN_M_050106 2005.1.7 5:50 PM Page 32 FUNCTIONS DURING A CALL MAKING AN EMERGENCY CALL LOCATION Enables the network to locate your current location through Global Positioning System (GPS). This 911 feature automatically places your phone in the Emergency Call Mode when you dial the preprogrammed emergency number, 911. This feature is functional even in the lock mode and in an out od service area. 1. Press 911 IN LOCK MODE [MENU] . 2.
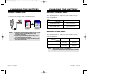
CDM-8940VW_EN_M_050106 2005.1.7 5:50 PM Page 34 USING THE MINI SD CARD INSTALLING THE MINI SD CARD 1. Open the card hole cover, and insert the mini SD like the arrow indicates. USING THE MINI SD CARD REMOVABLE MEMORY STORAGE FUNCTIONALITY The following grid shows what types of files can be transferred to the removable memory card. RINGTONES Memory Usage NOTE: Please keep mini-SD slot closed at all times whether mini-SD card is inserted or not to prevent possible damages.
CDM-8940VW_EN_M_050106 2005.1.
CDM-8940VW_EN_M_050106 2005.1.7 5:50 PM Page 38 TEXT INPUT METHODS STORING PHONE NUMBERS The phone book stores up to 300 entries. 1. Enter phone # then press [SAVE]. 2. Choose “New Contact” or “Existing Contact”. To select, press [OK]. 3. If “New Contact” is selected, the phone number will appear above a list of icons. The name of the icon is displayed below the list. Press the Navigation Key right or left to choose the type of number you’re adding, as indicated by the icon. Press [OK] to select.
CDM-8940VW_EN_M_050106 2005.1.7 5:50 PM Page 40 TEXT INPUT METHODS T9TM PREDICTIVE TEXT MODE [T9TMABC] To choose T9TM mode from the Editor screen press [Abc], then choose [T9Word]. This mode predicts the words you are entering using a built-in dictionary. With T9TM predictive text input, you press each key only once for each letter. The chart below outlines how to use T9TM mode. KEY Mode Next Space Shift 1. Press each key once for each letter of the word you are writing.
CDM-8940VW_EN_M_050106 2005.1.7 5:50 PM Page 42 SPEED DIALING TEXT INPUT METHODS NUMERIC MODE [NUM] SPEED DIAL Numeric mode allows you to add a number to your entry/message. To select numeric mode from the Editor screen press [Abc], then select [NUM]. Dials a number simply by pressing and holding its Speed Dial location number. For a 2-digit location number, press the first number then press and hold the second number. To store a number in Speed Dial: SYMBOL MODE [SYM] 1.
CDM-8940VW_EN_M_050106 2005.1.7 5:50 PM Page 44 PHONE BOOK PHONE BOOK Stores up to 300 entries, each of which can be assigned to a group. Entries can be retrieved by name, phone number or group. 5. To call the selected number, press FIND Adds a new entry to the phone book. Please refer to page 36 for alternate ways to add an entry to the phone book. Retrieves an entry by name or number, and calls the number by simply pressing . On Standby Screen, you may press [CONTACTS] as well.
CDM-8940VW_EN_M_050106 2005.1.7 5:50 PM Page 46 PHONE BOOK PHONE BOOK GROUP ERASE GROUP Allows you to classify phone entries into groups. Existing groups include Personal, Business, Etc. and All. 1. Press [MENU] . Select an existing group name. ADD NEW GROUP 2. Press [ERASE] to delete it. “Erase this group?” will be displayed. 1. To add a new group, press [MENU] A maximum of seven groups is allowed. 2. Press . [MENU] then select “Add Group”. 3. Input a new group name. 4.
CDM-8940VW_EN_M_050106 2005.1.7 5:50 PM Page 48 PHONE BOOK PHONE BOOK CHANGE MSG. GROUP NAME SEND PIX MSG. 1. Press [MENU] . Select an existing group name. 1. Press [MENU] . Select an existing group name. 2. Press 2. Press [MENU] then select “Rename”. 3. Input a new group name. 4. To save it, press [MENU] then select “Send Pix Msg.”. 3. Complete the “Message”, “Subject”, “CC”, “BCC”, “Priority” and “Insert Signature” fields. [OK]. SEND TEXT MSG. 1. Press [MENU] .
CDM-8940VW_EN_M_050106 2005.1.7 5:50 PM Page 50 PHONE BOOK RECENT CALLS To access Recent Calls from the idle mode, press [MENU] . ERASE MSG. GROUP 1. Press [MENU] . Select the group name to be deleted. ALL CALLS 2. To delete it, press [ERASE]. “Erase this message group?” will be displayed. Displays information about the 60 most recently dialed, missed and received numbers. Place a call to a selected number by simply pressing . 3. Press [OK]. “This message group erased” will be displayed.
CDM-8940VW_EN_M_050106 2005.1.7 5:50 PM Page 52 RECENT CALLS RECENT CALLS MISSED CALLS RECEIVED CALLS Displays information about the 20 most recently missed calls. Place a call to a missed call number by simply pressing . Displays information about the 20 most recently answered calls. Place a call to a received number by simply pressing . 1. To see a list of the 20 most recently missed calls, press [MENU] . If the number is already stored in your phone book, only the name appears.
CDM-8940VW_EN_M_050106 2005.1.7 5:50 PM Page 54 RECENT CALLS RECENT CALLS DIALED CALLS CALL TIMERS Displays information about the 20 most recently dialed calls. Place a call to a received number by simply pressing . Checks the usage time and manages your calls within the limit you set. The five timers include: LAST CALL 1. To see a list of the 20 most recently dialed calls, press [MENU] . If the number is already stored in your phone book, only the name appears.
CDM-8940VW_EN_M_050106 2005.1.7 5:50 PM Page 56 RECENT CALLS RECENT CALLS HOME CALLS CUMULATIVE CALLS Displays usage time of all calls made within Home area. Displays usage time of all incoming and outgoing calls, excluding web access calls. 1. Press [MENU] . 1. Press [MENU] . 2. The time of the following items is displayed: 2. The time of the following items is displayed: ● Voice Calls, Data Calls ● Voice Calls, Data Calls 3. To reset the timer, press [RESET].
CDM-8940VW_EN_M_050106 2005.1.7 5:51 PM Page 58 RECENT CALLS 1X PACKET COUNTER Checks the log of all kilobyte data transmissions. RECEIVED To show the received kilobyte usage on a user definable interval: 1. Press [MENU] Chapter 4 SETTINGS . 2. To reset the counter, press [RESET]. To return to the previous page, press [OK]. TRANSMITTED To show the transmitted kilobyte usage on a user definable interval: 1. Press [MENU] . 2. To reset the counter, press [RESET].
CDM-8940VW_EN_M_050106 2005.1.7 5:51 PM Page 60 SETTINGS SETTINGS SOUNDS VOLUME Sets Ringer Type, Volume, Alerts, Roam Ringer, Tone Length and Power On/Off. Controls the Ringer, Key Tone, Voice Call and Speaker Phone volume and alerts you to incoming calls in a variety of modes. RINGER TYPE To select a ringer type for incoming calls: RINGER 1. Press [MENU] RINGER Controls the Ringer volume and alerts you to incoming calls in the following modes. 1. Press [MENU] . . 2.
CDM-8940VW_EN_M_050106 2005.1.7 5:51 PM Page 62 SETTINGS VOICE CALL To adjust earpiece volume: 1. Press [MENU] SETTINGS ROAM Sounds an alert when leaving a service area, change System ID and entering a roaming service area. 1. Press [MENU] . . 2. Adjust the earpiece volume. ● Level1-5 (Min- , Max- 3. To save, press [OK]. 2. Select “Off” or “On” then press ) CONNECT Notifies you that a call has been successfully placed. 1. Press [MENU] . SPEAKER PHONE To adjust speaker volume: 1.
CDM-8940VW_EN_M_050106 2005.1.7 5:51 PM Page 64 SETTINGS SETTINGS ROAM RINGER DISPLAY Sounds a different ringer when you are in a roaming service area. This feature allows you to customize and personalize your phone display. 1. Press MENU STYLE [MENU] . 2. Select “Distinctive” or “Normal” then press to save it. [OK] To select a display menu style: 1. Press [MENU] . TONE LENGTH 2. Select “Grid” or “List” then press To adjust key tone length: 1. Press [MENU] [OK] to save it.
CDM-8940VW_EN_M_050106 2005.1.7 5:51 PM Page 66 SETTINGS DIALED 1. Press [MENU] . 2. Select “Default” with the Navigation Key. 3. To save it, press SETTINGS WALLPAPER 1. Press [MENU] 2. Select “Digital 1”, “Analog 1” or “Analog 2” with the Navigation Key. [OK]. 3. To save, press SCREEN SAVER Set the time of Screen Saver and select the images, the image will then be displayed on the LCD. 1. Press [MENU] . 2.
CDM-8940VW_EN_M_050106 2005.1.7 5:51 PM Page 68 SETTINGS SETTINGS BACKLIGHT DATA SVC. Backlights the display and key pad for easy viewing in dark places. Allows you to transfer data when your phone is connected to a PC. 1. Press CONNECTION [MENU] . 2. Select “LCD” or “Key Pad” then select one of the following options. ● LCD: 5 Secs/15 Secs/30 Secs/60 Secs/Always On. ● Key Pad: 5 Secs/15 Secs/30 Secs/60 Secs/Always On/ Always Off. Select a connection mode based on the handset usage. 1.
CDM-8940VW_EN_M_050106 2005.1.7 5:51 PM Page 70 SETTINGS SETTINGS SECURITY RESTRICT Prevents others from using the phone without permission and allows access to security features only after inputting a password. When you attempt to make a restricted call, “This phone is restricted” appears on the screen. PHONE LOCK Prevents others from using your phone without permission. When locked, calls cannot be made and the menu cannot be accessed without entering the password. 1.
CDM-8940VW_EN_M_050106 2005.1.7 5:51 PM Page 72 SETTINGS SETTINGS CAMERA Restricts access to camera mode. 1. Press [MENU] then enter “Password”. CHANGE CODE 2. Press 1. Press then select “Allow” or “Restrict”. ● Allow: Allows access to the camera. ● Restrict: Restricts access to the camera. Changes your 4-digit password. NOTE: 2. Press 3. To save, press [MENU] then enter “Password”. The default password is the last 4 digits of your phone number. . [OK]. 3.
CDM-8940VW_EN_M_050106 2005.1.7 5:51 PM Page 74 SETTINGS SETTINGS ERASE ALL RESET PHONE Clears all Phonebook entries, Downloads, Pix Gallery, Flix Gallery and SD Card entries. Resets phone to default settings. 1. Press 1. Press NOTE: 2. Press [MENU] then enter “Password”. The default password is the last 4 digits of your phone number. 2. Press then enter “Password”. The default password is the last 4 digits of your phone number. . . 3.
CDM-8940VW_EN_M_050106 2005.1.7 5:51 PM Page 76 SETTINGS SETTINGS SD CARD OTHERS FORMAT You can format a mini SD card, if you want to delete all information. 1. Press [MENU] then enter “Password”. ANSWER OPTIONS 2. Press CALL ANSWER To select an answer mode: 1. Press [MENU] . . 2. Select “Any Key” or “Send Key”. TRANSFER TO NEW PHONE With the mini SD card, you can move your saved information to a new phone. 1. Press [MENU] then enter “Password”.
CDM-8940VW_EN_M_050106 2005.1.7 5:51 PM Page 78 SETTINGS AUTO ANSWER Automatically answers a call after a preset number of rings. An ideal setting for the hands-free car kit. When Auto Answer is enabled, call is automatically answered even when ear-mic or car kit is not connected to CDM8940. 1. Press [MENU] . 2. Select “Handset”, “Headset”, or “Hands Free Kit”, then select one of the following options: SETTINGS LANGUAGE Selects the language in which letters are displayed on the screen. 1.
CDM-8940VW_EN_M_050106 2005.1.7 5:51 PM Page 80 SETTINGS SETTINGS TTY MODE LANTERN Your phone is able to operate with a TTY (Teletypewriter) device in both analog and digital modes. This feature is system dependent and may not be available in all areas. To use for easy viewing in dark places or emergency. 1. Press [MENU] . 2. Select one of the following options. ● TTY Off/TTY+TALK/TTY+HEAR/TTY Full 3. To save, press 1. Press [MENU] . 2.
CDM-8940VW_EN_M_050106 2005.1.7 5:51 PM Page 82 SETTINGS CHANGE NAM Changes the NAM used by the phone when you have multiple registrations. 1. Press [MENU] . SYSTEM SET MODE Selects the Preferred System. 1. Press [MENU] . 2. Select one of the following options: Automatic B, Automatic A, Home only. ● Automatic B: Scans the radio channels based on the Automatic B setting. ● Automatic A: Scans the radio channels based on the Automatic A setting.
CDM-8940VW_EN_M_050107 2005.1.7 8:49 PM Page 84 SETTINGS MEDIA GALLERY PHONE INFO PIX To display the version of your phone: This menu displays the list of Pix taken with the Camera. S/W VERSION 1. Press [MENU] 1. Press . [OK]. 2. Scroll through the downloaded images to display the image you want to send then press [SEND]. H/W VERSION 1. Press [MENU] . ● Press [MENU] to select 1. Edit Title, 2. Assign, 3. Erase, 4. Information.
CDM-8940VW_EN_M_050106 2005.1.7 5:51 PM Page 86 MEDIA GALLERY MEDIA GALLERY MUSIC TONES This menu needs to be supported by mini SD Card. It plays the music stored in the mini SD Card. Copy the downloaded music from PC to mini SD Card, and play the music stored in the mini SD Card through your mobile phone. This menu displays the list of downloaded ringtones or saved voice memos. 1. Press [MENU] . ● “mini SD Card” is connected to your phone, press [MENU] to select 1. Setting, 2.
CDM-8940VW_EN_M_050106 2005.1.7 5:51 PM Page 88 MEMO Chapter 5 SUPPLEMENTARY FUNCTIONS This chapter addresses supplemental functions including the voice tools, camera, schedule, memo pad, calculator, alarm, world clock and stop watch features.
CDM-8940VW_EN_M_050106 2005.1.7 5:51 PM Page 90 VOICE TOOLS Voice Recognition (VR) enables you to place calls using your voice and to record voice memos. VOICE DIALING VOICE TOOLS VOICE MEMO Voice Memo allows you to record a reminder message that can be up to 60 seconds. To record a memo: 1. Press and hold until your phone turns to Voice Recognition mode. 1. To start Tools menu, press 2. Say the indicator, such as a person’s name you saved for the number you are calling. 3. 1.1.
CDM-8940VW_EN_M_050106 2005.1.7 5:51 PM Page 92 VOICE TOOLS VOICE TOOLS VOICE DIAL TRAIN WORDS Voice Dial allows you to call a person by simply saying their name. To access Voice Dial: Train allows you to use Control words to make a call without using the key pad. 1. To start Tools menu, press YES 2. To enter a voice dial, press [MENU] . . 3. 1.1. To record a voice dial, press . The phone book list will be displayed alphabetically. Select a name then press [OK].
CDM-8940VW_EN_M_050106 2005.1.7 5:51 PM Page 94 VOICE TOOLS VOICE TOOLS WAKE-UP VOICE SETTING Use to train or untrain the Voice Recognition with the control word, “Wake-Up”. After turning on Set Active, open the flip to go on to VR mode. After turning on HFK mode, put Hands-free kit and say “wake up” to go on to VR mode. 1. Press [MENU] . SET ACTIVE 2. “Please hold phone to ear and follow instructions” will be displayed and you will hear “Now training control words.
CDM-8940VW_EN_M_050106 2005.1.7 5:51 PM Page 96 SCHEDULE Sets a scheduled plan and reminds you of that plan. ADD NEW PLAN 1. Press [MENU] 4. To save it, press to the calendar. [SAVE] or [CLR] to return 5. The date of the Schedule will be marked on your calendar. . 2. Move the Navigation Key left, right, up or down to choose a date in the calendar then press [OK]. 3. To select plan options, press the Navigation Key downwards. DATE Use the key pad to change or enter the date, then press [OK].
CDM-8940VW_EN_M_050106 2005.1.7 5:51 PM Page 98 ALARM ALARM You can set up to 3 alarms. 1. To display alarm entries, press [MENU] . 2. Select one of the entries using the Navigation Key. To set a new alarm, choose alarm 1, 2 or 3. To edit an existing alarm, select that alarm. Press [OK]. 3. To select alarm options, press the Navigation Key down. RINGER To set a “Ringer” press [MENU], then select “Default” or “Change” with Navigation Key. To save it press [OK].
CDM-8940VW_EN_M_050106 2005.1.7 5:51 PM Page 100 MEMO PAD Your phone includes an internal memo pad that can be used to compose and store reminders and notes. ADD MEMO MEMO PAD SETTINGS To select memo pad background image: 1. Press [MENU] . To compose a memo (there is an 80-letter limit): 1. Press [MENU] 2. Select “Drop”, “Sky”, “Snow”, “Candy”, or “Pattern”, then press [OK]. . 2. Input a new text memo. (Please refer to page 37 for more details on entering letters, numbers and symbols.) 3.
CDM-8940VW_EN_M_050106 2005.1.7 5:51 PM Page 102 CALCULATOR WORLD CLOCK To access the calculator: 1. Press [MENU] To display the time and date in pre-programmed cities: . 1. Press 2. Follow the instructions below to calculate 8*6/4-2.5 Input 8. Move the Navigation Key to the right. Input 6 then press the Navigation Key to the left. Input 4 then press the Navigation Key down. Input 2 then press to input dot (.). Press 5. Then press and you will see the answer. 3.
CDM-8940VW_EN_M_050106 2005.1.7 5:51 PM Page 104 STOP W ATCH Simultaneously times up to six different events. To operate the stop watch: 1. Press [MENU] . 2. To measure a time period: 1. To start the stop watch, press [START]. 2. To pause it, press [STOP]. 3. To resume it press [RESET], to return to the previous page, press [EXIT]. 3. To time up to six events at once: 1. To start, press [START]. 2. To stop a time period and continue measuring another one, press [CONT]. 3.
CDM-8940VW_EN_M_050106 2005.1.7 5:51 PM Page 106 CAMERA (USE CAMERA) CAMERA (USE CAMERA) TAKING A PICTURE FROM THE MENU TAKING A PICTURE IN IDLE MODE 1. Press [MENU] or press and hold the right side camera button, then press . 1. To activate Camera Mode, press the right side camera button. 2. Press [OK] or the right side camera button to take the picture. 2. To take the picture, press camera button. 3. To save the picture, press [SAVE]. To go back to idle mode without saving the picture, press .
CDM-8940VW_EN_M_050106 2005.1.7 5:51 PM Page 108 CAMERA (USE CAMERA) CAMERA MODE OPTIONS To access the camera mode options, press [MENU]. ● Self Portrait: Take a picture of yourself by checking the view on the Sub LCD. ● Flash: To activate the flash function. (Off/Auto Flash/Always On/On This Shot) ● Self Timer: To activate the camera’s timer function. (Off/5 Secs/10 Secs) ● Add Frames: Select your favorite fun picture frame to decorate your picture.
CDM-8940VW_EN_M_050106 2005.1.7 5:51 PM Page 110 CAMERA ( TAKE FLIX) CAMERA MODE OPTIONS To access the camera mode options, press [MENU]. ● Self Portrait: Take a video of yourself by checking the view on the Sub LCD. ● Movie Light: To activate the movie flash function. (Off/Always On) ● Self Timer: To activate the camera’s timer function. (Off/5 Secs/10 Secs) ● Brightness: Press (0~+2) or press (0~-2) to select brightness control. ● White Balance: To select a white tone balance.
CDM-8940VW_EN_M_050106 2005.1.7 5:51 PM Page 112 CAMERA ( FLIX GALLERY) 1. Press [MENU] or press and hold the right side camera button then press . CAMERA ( HELP) 1. Press [MENU] or press and hold the right side camera button then press . 2. In “Flix Gallery”, list you can view all the videos you have recorded. 3. Select record video with the Navigation Key then press [OK]. 4. To send flix message, press [SEND]. Please refer to page 119 for more details on “New Flix Msg”.
CDM-8940VW_EN_M_050106 2005.1.7 5:51 PM Page 114 MEMO Chapter 6 VOICE MAIL AND TXT, PIX, FLIX MESSAGES This chapter addresses checking voice mail messages, as well as sending and receiving TXT, Pix or Flix messages.
CDM-8940VW_EN_M_050106 2005.1.7 5:51 PM Page 116 WHEN A NEW MESSAGE ARRIVES NEW MSG TXT, PIX, FLIX MESSAGE NEW TXT MSG 1. The following display appears when a new message arrives. To send a new message: 1. Press 2. To display the message, press [READ]. [MENU] or press . 2. Under “Send To”, input the phone number and press [OK]. ● By pressing [MENU], the user can choose from the following: 1. Find: Allows the user to search the phone number which is stored in the phone book. 2.
CDM-8940VW_EN_M_050106 2005.1.7 5:51 PM Page 118 NEW MSG NEW MSG 5. Under “Priority”, select “Normal” or “Urgent”. NEW PIX MSG 6. Under “Insert Signature”, select “On” or “Off”. To send a new picture message: 7. To send the text message, press [MENU] and select the “Send”, then press [OK]. 1. Press To save the text message, press select “Save Msg”, then press [MENU], [OK]. [MENU] or press . 2. Under “Send To”, input the phone number and press [OK].
CDM-8940VW_EN_M_050106 2005.1.7 5:51 PM Page 120 NEW MSG 4. Under “Subject”, input a subject text and press [OK]. (Please refer to page 37 for more details on entering letters, numbers and symbols.) NEW MSG NEW FLIX MSG To send a new video message: 1. Press 5. To send a message to another person, select “CC” or “BCC”, input the phone numbers, then press [OK]. 6. Press the Navigation Key down for more fields. Under “Priority”, select “Normal” or “High”. 7.
CDM-8940VW_EN_M_050106 2005.1.7 5:51 PM Page 122 NEW MSG 4. Under “Subject”, input a subject text and press [OK]. (Please refer to page 37 for more details on entering letters, numbers and symbols.) 5. To send a message to another person, select “CC” or “BCC”, input the phone numbers, then press [OK]. 6. Press the Navigation Key down for more fields. Under “Priority”, select ‘“Normal” or “High”. INBOX The Inbox manages received messages. To access: 1. Press [MENU] or press . 2.
CDM-8940VW_EN_M_050106 2005.1.7 5:51 PM Page 124 INBOX INBOX REPLY WITH COPY SAVE TO CONTACT 1. To reply to a received message and include the received message into the message. 1. To save the number to contacts, select “Save to Contact”. 2. To send the text message, press [MENU], then select “Send” then press [OK]. SAVE TO Q.TEXT 3. To save the text message, press [MENU], then select “Save Msg” then press [OK]. FORWARD 1. To save received text msg to “Quick Text”, select “Save to Q.Text”.
CDM-8940VW_EN_M_050106 2005.1.7 5:51 PM Page 126 SENT SENT Manages sent text messages or messages waiting to be sent. 1. Press [MENU] or press 2.1. Select a message, then press The text message is displayed. 2.2. To Erase Message, press 3. Press . [OK]. LOCK & UNLOCK 1. Select “Lock” to lock the message or “Unlock” to unlock the message, then press [OK]. STATE 1. To display the status of a sent message. [ERASE]. [MENU]. PIX/FLIX INFO 1. To show pix or flix message information.
CDM-8940VW_EN_M_050106 2005.1.7 5:51 PM Page 128 WEB ALER TS DRAFT WEB ALERTS 1. Press [MENU] DRAFT or press 2. To select “GoTo”, press . To select “Erase Message”, press . . Draft Folder contains any draft messages or saved messages. If message composition is interrupted by a voice call or other interrupting event, the text of the current composition is automatically saved to the draft folder. 3. The text message will be displayed. V : Read Message. : Unread Message.
CDM-8940VW_EN_M_050106 2005.1.7 5:51 PM Page 130 QUICK TEXT ERASE ALL QUICK TEXT ERASE MESSAGES To view/edit the Quick Text messages: 1. Press 1. Press [MENU] or press . 2.1. Select a Quick Text message from the list. Press [MENU]. 2.2. To add a new Quick Text message, press [ADD NEW]. To edit the Quick Text message you have selected, press [EDIT]. [MENU] or press . 2.1. To erase all folder messages, press . 2.2. To erase all inbox messages, press .
CDM-8940VW_EN_M_050106 2005.1.7 5:51 PM Page 132 SETTINGS SETTINGS Manages messaging settings through various features. AUTO RECEIVE AUTO SAVE Select if you want to automatically retrieve a message as soon as you receive it. Select if you want to automatically save a message after sending it. 1. Press Press [MENU] or press “Auto Save”. 1. Press Press [MENU] or press “Auto Receive”. . . 2. Select “Automatic” or “Prompt” with the Navigation Key. 2.
CDM-8940VW_EN_M_050106 2005.1.7 5:51 PM Page 134 SETTINGS SETTINGS REMIND DIRECT VIEW When “Remind” is set, CDM8940 periodically alerts the user until all the received messages are checked by the user. If the Direct View is set to on, the user will be able to view the message by pressing the read key. If the Direct View is set to off, the user can view the message by entering SMS Menu-> Inbox. 1. Press Press [MENU] “Remind”. or press . 1. Press Press [MENU] or press “Direct View”. . 2.
CDM-8940VW_EN_M_050106 2005.1.7 5:51 PM Page 136 SETTINGS BLOCK OR UNBLOCK To block all incoming messages from the phone number or email address of the sender. 1. Press Press [MENU] or press “Block or Unblock”. . 2. Select “Block”, “Unblock”, or “View List of Blocked Addresses” with the Navigation Key. 3. Press Chapter 7 GET IT NOW & INTERNET [OK]. This chapter addresses using your handset to access the Wireless Internet.
CDM-8940VW_EN_M_050106 2005.1.7 5:51 PM Page 146 BROWSER MENU CLEAR MEMORY ◆ To clear browser memory, press then press . [MENU] SETTINGS ◆ To select “Settings”, press [MENU] then press .
CDM-8940VW_EN_M_050106 2005.1.7 5:51 PM Page 148 SAFETY INFORMATION FOR WIRELESS HANDHELD PHONES Read This Information Before Using Your Handheld Portable Cellular Telephone SAFETY INFORMATION FOR WIRELESS HANDHELD PHONES ANTENNA CARE EXPOSURE TO RADIO FREQUENCY SIGNALS Use only the supplied or an approved replacement antenna. Unauthorized antennas, modifications, or attachments could damage the phone and may violate FCC regulations.
CDM-8940VW_EN_M_050106 2005.1.7 5:51 PM Page 150 SAFETY INFORMATION FOR WIRELESS HANDHELD PHONES SAFETY INFORMATION FOR WIRELESS HANDHELD PHONES ELECTRONIC DEVICES ELECTRONIC DEVICES Most modern electronic equipment is shielded from RF energy. However, certain electronic equipment may not be shielded against the RF signals from your wireless phone.
CDM-8940VW_EN_M_050106 2005.1.7 5:51 PM Page 152 SAFETY INFORMATION FOR WIRELESS HANDHELD PHONES SAFETY INFORMATION FOR WIRELESS HANDHELD PHONES OTHER SAFETY GUIDELINES PRECAUTIONS AND WARNINGS Aircraft Please read and understand all of the Precautions and Warnings contained in this manual before attempting to operate your phone. FCC Regulations prohibit using your phone while in the air. Switch OFF your phone before boarding an aircraft. 1.
CDM-8940VW_EN_M_050106 2005.1.7 5:51 PM Page 154 SAFETY INFORMATION FOR WIRELESS HANDHELD PHONES OPERATING PROCEDURES Never violate any of the following Rules and Regulations of the FCC when using your phone. The following offenses are punishable by fine, imprisonment, or both: - Using obscene, indecent, or profane language. - Using the unit to give off false distress calls.
CDM-8940VW_EN_M_050106 2005.1.7 5:51 PM Page 156 SAR INFORMATION THIS MODEL PHONE MEETS THE GOVERNMENT’S REQUIREMENTS FOR EXPOSURE TO RADIO WAVES. Your wireless phone is a radio transmitter and receiver. It is designed and manufactured not to exceed the emission limits for exposure to radiofrequency (RF) energy set by the Federal Communications Commission of the U.S. Government. These limits are part of comprehensive guidelines and establish permitted levels of RF energy for the general population.
CDM-8940VW_EN_M_050106 2005.1.7 5:51 PM Page 158 U.S. Food and Drug Administration Center for Devices and Radiological Health Consumer Update on Mobile Phones 1. Do wireless phones pose a health hazard? The available scientific evidence does not show that any health problems are associated with using wireless phones. There is no proof, however, that wireless phones are absolutely safe. Wireless phones emit low levels of radiofrequency energy (RF) in the microwave range while being used.
CDM-8940VW_EN_M_050106 2005.1.7 5:51 PM Page 160 guidelines that were developed with the advice of FDA and other federal health and safety agencies. When the phone is located at greater distances from the user, the exposure to RF is drastically lower because a person’s RF exposure decreases rapidly with increasing distance from the source.
CDM-8940VW_EN_M_050106 2005.1.7 5:51 PM Page 162 The initial research will include both laboratory studies and studies of wireless phone users. The CRADA will also include a broad assessment of additional research needs in the context of the latest research developments around the world. 7.
CDM-8940VW_EN_M_050106 2005.1.7 5:51 PM Page 164 increasing the distance between the user and the RF source will reduce RF exposure. Some groups sponsored by other national governments have advised that children be discouraged from using wireless phones at all. For example, the government in the United Kingdom distributed leaflets containing such a recommendation in December 2000. They noted that no evidence exists that using a wireless phone causes brain tumors or other ill effects.
CDM-8940VW_EN_M_050106 2005.1.
CDM-8940VW_EN_M_050106 2005.1.7 5:51 PM Page 168 PROTECT YOUR W ARRANTY 12 MONTH LIMITED WARRANTY Read your Warranty carefully, with the special consideration to paragraph seven of the Limited Warranty for your unit.
CDM-8940VW_EN_M_050106 2005.1.7 5:51 PM Page 170 12 MONTH LIMITED WARRANTY 12 MONTH LIMITED WARRANTY (e) Defects in appearance, cosmetic, decorative or structural items such as framing and non-operative parts; WITHIN A PERIOD OF 18 MONTHS FROM DATE OF ORIGINAL PURCHASE. IN NO CASE SHALL THE COMPANY BE LIABLE FOR ANY SPECIAL CONSEQUENTIAL OR INCIDENTAL DAMAGES FOR BREACH OF THIS OR ANY OTHER WARRANTY, EXPRESS OR IMPLIED, WHATSOEVER.