Field Force Manager Device User Guide
Field Force Manager Device User Guide Table of Contents Preface....................................................................................................................................................................................................3 Field Force Manager Packages.................................................................................................................................................3 General Information.........................................................
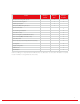
Preface Field Force Manager Packages Field Force Manager is a powerful Web-based application combined with a handset application that provides visibility and control for all of your mobile workers. This user guide will teach you the principles and procedures needed to use the Field Force Manager application. Your organization has the option to choose between three Field Force Manager packages that let you take advantage of the features that are right for your company.
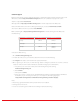
Field Force Manager Basic Field Force Manager Premium Scheduled and configurable reports x x Timecard and form integration x x Simplified job dispatch x Turn-by-turn (TBT) driving directions x Feature Field Force Manager Limited Supervisor timecards x Job scheduling and dispatch x Job location lookup x Enhanced navigation (audible TBT directions) x Points of interest (POIs) and address entry x Job monitor alerts x Premium reports (Job Summary, Worker Productivity) x Job integrati
General Information System Requirements Mobile phone: Verizon Wireless Field Force Manager-compatible mobile phone. For a listing of Field Force Manager mobile phones, go to http://support.fieldforcemanager.com and select Devices. Computer: Field Force Manager is a Web-based application and requires connectivity to the Internet. High-speed Internet access is recommended. The following are requirements for accessing the Field Force Manager Web portal: yy Microsoft® Internet Explorer® 6.0 or 7.
Customer Support Customer support for the Field Force Manager application is available through the Support and Training links on the Web portal, located at https://www.fieldforcemanager.com. Links are located at the top right of the screen. Telephone support: Call 1.800.922.0204. Web support: Go to http://support.fieldforcemanager.com or click the Support tab in the Web portal. Product information: Go to the Field Force Manager marketing site, located at: verizonwireless.com/ffm.
Mobile Phone Installation and Initial Setup You can find specific instructions for installing and setting up Field Force Manager on your device by visiting the Field Force Manager Web portal. 1. Go to fieldforcemanager.com and enter your username, password, and company ID. 2. Click Support in the upper right-hand corner. 3. Select the Devices tab, then select your specific device to get detailed instructions. In general, device setup includes the following steps: 1. Click Menu. 2. Select Get It Now. 3.
5. Select Business/Tools. 6. Scroll to Field Force Manager and click OK. 7. Select the option to download the application.
Launching Field Force Manager on Your Mobile Phone Field Force Manager is an application that runs on your Verizon Wireless mobile phone. To launch Field Force Manager on your mobile phone: 1. Click Menu. 2. Select Get It Now. 3. Select Get Going or Tools on the Go, depending on the mobile phone model. 4. Select Field Force Manager.
4. When Field Force Manager launches, click Agree to accept a warning that reminds mobile workers not to use Field Force Manager in an unsafe manner, such as during the operation of a vehicle. This is only required upon the first login at startup. 5. To give the application access to the location information on the device, you must enable the privacy settings. The privacy management setup wizard will automatically launch the first time you set up the Field Force Manager application. a.
Getting Started with Location-Based Services Verizon Wireless values your privacy. Because of this, the mobile phone defaults to acquiring your location only when you dial 911. To use location-based services (LBS) such as Field Force Manager, you must first enable LBS on your mobile phone. Setup steps vary by mobile phone. Consult your mobile phone’s user manual for specific steps. 1. Go to the mobile phone’s Home screen and press the Menu button. 2. Scroll to Settings and Tools and click OK. 3.
Navigating the Application Throughout Field Force Manager, you will see the commands listed at the bottom of the screens. These commands correspond to the soft keys directly below them on your mobile phone. To select a button, press the soft key below the name of the command you want. For example, in the image below, the Back button or the CLR button will return you to the previous screen. The OK button will bring you to the current selection.
Suspend Field Force Manager To make a call while you are using Field Force Manager, press the Red Phone button. This will temporarily suspend Field Force Manager while you place your call. Return to Field Force Manager after Your Call 1. Click Menu. 2. Select Get It Now. 3. Select Get Going/Tools on the Go. 4. Select Field Force Manager. Note: While you are on a voice call, Field Force Manager will not collect or send GPS points.
Field Force Manager Functions From the Field Force Manager menu, you can access all functions. yy To navigate to the Jobs screen, select Jobs. yy To navigate to the Forms screen, select Forms. yy To navigate to the Locations screen, select Locations. yy To navigate to the Messages screen, select Messages. yy To navigate to the Timesheet screen, select Timesheet. yy You can also simply press a category’s corresponding number to access it.
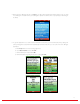
Jobs List screen. The Jobs List screen displays single-line summary information for each of the jobs that have been dispatched to you on your phone. To view detailed job information for a specific job: 1. Select it by pressing its number on your phone’s keypad, or scrolling to it and clicking OK. 2. Job titles will display only as many characters as can be displayed on screen horizontally. To view the entire job title, select the job from the list. Job Summary screen.
Job Details screen. The Job Details screen displays all of the information that has been dispatched to a mobile worker. This information includes the customer’s name, the estimated time of arrival, expected duration, and a comments field. Note: The Comments field is only available in the Field Force Manager Premium package. To return to the Job Summary screen, press the Back button. Job Status Reporting screen. The Job Status Reporting screen allows you to report a change in your status to your dispatcher.
Changing device settings. To change the volume of new item notification on the device: 1. Press * 9 from the application main menu. 2. Enter security code (default is 4321) and click OK. 3. Choose Volume and click OK. 4. Choose notification setting: High, Medium, Low, or Vibrate. Locations Field Force Manager lets you receive locations from your dispatcher and request turn-by-turn driving directions in both the Basic and Premium packages.
To delete a location from your mobile phone: 1. Select the location you want to delete. 2. Select Delete. Note: This will not delete the location from the Web portal. Driving directions screen. The Field Force Manager application provides driving directions based on your current location and the location of your job or other destination. The type of driving directions differs depending on which product package you are using: Basic: text-based driving directions.
1. Navigate to your job or location within the application. 2. Select the address from the job or location. The Driving Directions feature will start up and supply the desired route. Premium: audible driving directions. To access audible driving directions: 1. Navigate to your job or location within the application. 2. Select the address from the job or location. The Driving Directions feature will start up. 3. Press Talk to hear the directions spoken to you. 4.
Once navigating, you will be able to view a trip summary, each turn as it happens, or a map of the entire route. Once you are done navigating, press CLR to return to Field Force Manager. Messages The Field Force Manager application is able to receive messages that are sent by your dispatcher. These messages are displayed on your phone and, after being read, can be deleted or stored for viewing at a later time.
Message Detail screen. The Message Detail screen displays the contents of the message and details about the sender. To delete the message that you are currently viewing, press Delete.
Timesheets Field Force Manager lets you log your hours quickly and easily. Just select the appropriate timecard action from the list, and Field Force Manager will automatically log the time and send the data back to the Web portal. The administrator may also add a form to the timecard actions to collect data associated with your hours. To log your time: 1. Select Timesheet from the Field Force Manager main menu. 2. Select Start Shift when you want to punch in. 3.
Forms Field Force Manager allows you to complete your paperwork using forms on your mobile phone. Forms can be completed as a part of Timecards, Jobs, or Standard Forms. Standard forms are available from the Forms menu on the mobile phone. The administrator will create these forms from the customer Web portal and assign them to specific mobile workers. To complete a form: 1. Select Forms from the Field Force Manager menu. 2. Select the form you want to fill out. 3. Enter a value for each field. 4.
To set up a user as supervisor in the Web portal: 1. Go to Roles in the Administration tab. 2. Create a new role and call it Supervisor. a. Add permission for Supervisor under Mobile Device Permissions. b. Save the role. 3. Edit the user who you would like to be the supervisor by changing the user’s designated role to Supervisor. The supervisor will be able to manage workers for the group that the Supervisor is in. Supervisors can only be in one group.
Glossary Activity Events a mobile worker enters into a handheld mobile phone while logged in to Field Force Manager. Activities include starting and ending shifts, starting and ending breaks, logging in and out of Field Force Manager, and completing ad hoc forms. All activities are recorded on a worker’s activity log. Breadcrumb trail A visible collection of a worker’s GPS points over a specific time frame, represented by circular, blue icons on the map.
Jobs Activities that are assigned to mobile workers via the Field Force Manager Web portal. Jobs can be edited or reassigned as situations change. Field Force Manager features standard, default job types that are also configurable, so administrators and dispatchers can send workers precisely the information they need to complete the job. Field Force Manager then dispatches job information from the central office to workers in the field. Job information is displayed on workers’ handheld mobile phones.
Preferences Can be accessed from the blue hyperlink at the top of the Web portal screen. Both Administration and Operations users may adjust user preferences, which will only apply to a specific user. Administrators may also change company preferences, which affect all users in the company. Prohibited A location that has been designated as a forbidden location for a worker to visit during a shift.
Application Shortcuts All Handsets Server sync. yy From within Field Force Manager, enter * # to sync your device with the server. Reset Field Force Manager data. yy Press * 9 from the application main menu. yy Enter company security code (default is 4321). yy Select Clear Record Store. This will clear all Field Force Manager data on the device. Reset Field Force Manager activation. yy Press * 9 from the application main menu. yy Enter company security code (default is 4321). yy Select Clear Activation.
Phone Troubleshooting Warning or error code reads: Unable to contact server. y Attempt to activate or log in to the phone again. If the problem continues, contact your Verizon Wireless business specialist to ensure that the Field Force Manager feature has been added to your account. Phone number XXXXXXXXXX is already activated by another device. y Log in to the Web portal as an administrator. y From the Devices tab, check the box to the left of the device you are trying to activate.