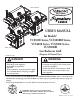
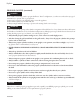
Model VCS5008 USER’S MANUAL for Models* VCS3008 Series, VCS3008BI Series, VCS4008 Series, VCS5008 Series, VCS5008BI Gas Barbecue Grill Model VCS4008 Model VCS3008 *Includes all colors. ���� ��������������������� ����� DANGER If you smell gas: 1. Shut off gas to the appliance. 2. Extinguish any open flame. 3. Open lid. 4. If odor continues, keep away from the appliance and immediately call your gas supplier or fire department. (Propane & Natural Gas) WARNING 1.
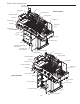
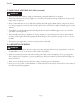
Parts Identification Grill Light (if equipped) Lid Cutting Board Model VCS5008 Cooking Grates Marinating Station Warming Rack Side Shelf Side Burner Condiment Tray Towel Bar Side Burner Cover Utensil Hooks Console Light Button Igniter Drawers Side Shelf Condiment Tray Skirt Rotisserie Control Knob (if equipped) LP Cylinder Tank Pull Out Drawer Burner Control Knobs Lid Cutting Board Warming Rack Marinating Station ���� ��������������������� Side Shelf ����� Condiment Tray Cooking Grates Side Bur
Warnings This Gas Barbecue Grill will provide you with many hours of pleasure and enjoyment, if it is used in accordance with the Warnings and Operating Instructions contained in this Manual. Always comply with all of the Warnings and Operating Instructions contained in this manual to prevent personal injury or property damage.
Warnings A. SAFE LOCATIONS FOR USE OF THIS OUTDOOR GRILL DANGER • Never install a free-standing outdoor propane Grill in an “island” configuration, (i.e. where it is enclosed in any type of construction), to prevent a fire or gas explosion. • Never use this outdoor Grill inside any building, garage, shed or breezeway, or inside any boat, trailer or recreational vehicle, to prevent a possible fire and to prevent the possibility of carbon monoxide poisoning or asphyxiation.
Warnings B. SAFE USE OF PROPANE (LP) GAS DANGER • Never install a propane cylinder that is more than 80 % full, as the contents may lack adequate room for expansion when exposed to heat. Propane vapor may then be vented through the pressure release valve, which could accumulate in a pool and later result in a fire or explosion. Always instruct your certified propane fuel supplier to confirm by weight that your cylinder is not more than 80 % full. An empty cylinder will weigh about 19 lbs.
Safety C. SAFE USE OF NATURAL (NG) GAS (continued) WARNING • Always promptly shut off the gas supply and immediately extinguish all flames if you smell gas. • Always seek assistance from your gas supplier or your local Fire Department if the gas smell persists, because of the danger of fire or explosion. • Always confirm that there are no gas leaks before lighting this Grill.
Safety E. ELECTRICAL SAFETY WARNING • Always confirm that this Grill has been grounded in accordance with applicable local Codes or, in the absence of local Codes, with the National Electrical Code, ANSI/NFPA No. 70 or the Canadian Electrical Code, CSA C22.1, when an external electrical source is being utilized for the Rotisserie Motor. 1. Never immerse the power cord or power plug in water, or in any other liquid to protect against electric shock; 2.
Table of Contents Safety Parts Identification ............................................................................ i Important Warnings ................................................................... i - vi Clearance Requirements .................................................................. ii Table of Contents ............................................................................1 Fuels .................................................................................................
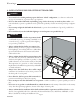
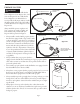
Safety PROPANE GAS FUEL WARNING Never use Natural Gas in a Grill that has been configured to burn Propane Gas, (and never use Propane Gas in a Grill that has been configured to use Natural Gas) to avoid possible bodily injury. Always consult the Rating Label on the back of the Grill to confirm that it has been configured to burn Propane Gas. Always install the pressure regulator and Type 1 propane gas supply coupling and hose that has been provided with your Propane Grill, as pictured in Figure 2.
Safety PROPANE GAS FUEL (continued) DANGER Never install a freestanding outdoor propane Grill in an “island” configuration, (i.e. where it is enclosed in any type of construction), to prevent a fire or gas explosion. a) Never store a spare LP - Gas Cylinder under or near this appliance b) Never fill the cylinder beyond 80% full; and c) Always comply with these warnings, to prevent a fire causing death or serious injury.
Gas Hookup Hooking Up to the Propane (LP) Gas Supply CONNECTING THE GRILL TO A PROPANE (LP) GAS CYLINDER 1. Always secure the propane tank in the tank locator hole in the bottom pan of the cylinder-compartment. (Portable gas grill only.) 2. Always confirm that all burner control knobs are in the OFF position before activating the gas supply. 3.
Gas Hookup Hooking Up the Grill to the Natural (NG) Gas Supply CONNECTING THE GRILL TO THE MAIN GAS SUPPLY TO CONNECT: 1. Retract the Sleeve on the Socket as shown in Figure 6a. 2. Insert Plug and release the Sleeve. (Fig. 6b) 3. Push the Plug until Sleeve snaps forward to lock the Plug in the Socket. TO DISCONNECT: 1. Push Sleeve back and pull the Plug out.
Operation Control Functions PROPANE TANK VALVE Always open the Propane Tank Valve immediately before lighting the Grill and always close it immediately after cooking has been completed. WARNING Never open the Propane Tank Valve unless the Grill is being prepared for use, to prevent the pooling of propane vapor. Always open the Valve immediately before lighting the Grill, and always close it immediately after cooking has been completed. BURNER CONTROL VALVES (Fig.
Operation Lighting the Main Burners WARNING Never stand directly over the Grill when lighting the main burners, to avoid exposure to possible flare-ups. NOTICE: When lighting the grill for the first time, burn with the main burners on HIGH for at least 30 minutes, to burn off any manufacturing residues. Figure 8 1. Always open the Hood completely and always inspect the Grill and burners before lighting the main burners. 2.
Operation Turning the Burners Off 1. Always turn the burner control knob(s) to the OFF position before turning off the main supply valve when cooking has been completed. 2. Promptly turn OFF the gas supply valve at the propane cylinder or at the main natural gas supply line. 3. Close the Hood of the Grill. FLARE-UPS “Flare-ups” sometimes occur when food drippings fall onto the hot sear plates or burners and ignite.
Operation Lighting the Rotisserie Burner (if applicable) The Rotisserie burner provides the steady, even heat required to cook poultry and roasts to self-basted perfection. WARNING Never stand directly over the Grill when lighting the main burners, to avoid exposure to possible flare-ups. TO START THE ROTISSERIE BURNER: 1. Always open the Hood completely before attempting to light the Grill. 2. Always confirm that all of the burner control knobs are in the OFF position before opening the gas supply. 3.
Operation Figure 12a Rotisserie Setup (if equipped) Rotisserie Motor Bracket Rotisserie Motor Bracket for BuiltIn Models NOTICE The rotisserie assembly includes a counterweight for large or irregular foods; using the counterweight reduces strain on the motor which is rated to turn a maximum of 12 lbs. 1. Attach the Rotisserie Motor Bracket to the left side of the base by aligning the holes and securing the pieces together using the B163 two (2) bolts and two (2) lock nuts provided. (Fig.
Operation Rotisserie Setup (continued) WARNING • Never attempt to use the rotisserie burner for any purpose other than rotisserie cooking. • Never use the main burners while using the Rotisserie burner, as that could result in igniting the drippings, or over• • • • heating your Grill. Never use the Rotisserie Motor in the rain, and never use it if it has become wet. Always use a grounded three-prong outlet and a three-prong extension cord to energize the Rotisserie Motor.
Cooking Methods of Cooking With its combination of burners and accessories your gas grill can provide for virtually every conceivable style of cooking. • The powerful Main burners deliver the middle and high range of temperatures desired for traditional barbecuing. This includes searing and finishing steaks, hamburgers, pork chops and the like, or grilling chicken parts, sausages, or kebabs with more moderate heat. (Fig.
Cooking One of the keys to extending your range of grilling capabilities is a fundamental understanding of the two common methods of cooking, Direct and Indirect cooking. In the Direct cooking method, food is placed directly above the heat source. This method is used in searing for example where you require high and immediate heat to quickly brown the outside layer of meats thereby sealing in their juices to enhance flavor.
Cooking Grilling Tips: A few helpful hints will ensure that your grilling results are perfect every time. • Apply a light coating of cooking oil to your cooking grids before grilling, to prevent foods from sticking. • Cook similar portion sizes together, so they all cook evenly. • Use tongs to turn foods on the Grill. • Never pierce foods while they are cooking on the Grill, as this will dry them out.
Cooking Time Chart Type of Food Beef Burgers Roasts Blade, Sirloin Tip Steaks Porterhouse, Rib, Ribeye, Sirloin, T-Bone Filet Mignon Poultry Chicken, Parts Chicken, Whole Chicken Breasts, Boneless Cornish Hens Duck Turkey Fish & Seafood Fish Fillets Steaks Whole Fish Seafood Lobster Shrimp 50004581 Weight/ Thickness Cooking Temperature Cooking Time 400–450° F. Rare: 4–7 min. Medium: 7–10 min. Well Done: 10–12 min. -- 350° Rare: 18–20 min./lb. Medium: 20–25 min./lb. Well Done: 25–30 min./lb.
Cooking Time Chart Type of Food Pork Chops Ham Steak Whole ham Ribs Back, Side Roasts Butt, Loin, Shoulder Tenderloin Sausage Lamb Chops Loin, Rib, Shoulder Roast Crown Roast Leg Weight/ Thickness Cooking Temperature Cooking Time 1 inch 400–450° F. 25–30 min. 1 inch 12–14 lb. Bone in 4–5 lb. Boneless 400–450° F. 325–350° F. 12–15 min. Medium: 20–25 min./lb. Well Done: 25–30 min./lb. 50–60 min. 5–6 lb. 325–350° F. 3–5 lb. 325–350° F. 325–350° F. Medium: 25–27 min./lb. Well Done: 27–30 min.
Cooking Time Chart Cooking Temperature Cooking Time Asparagus 325–350° F. 6–8 min. Cut off ends of stems. Lay across the grills. Beans 325–350° F. 30–35 min. Wrap in foil with butter or margarine. Turn over once. Carrots 325–350° F. 20–30 min. Cook directly on the grill. Corn on the Cob 325–350° F. 25–35 min. Soak in cold water for 15 minutes. Cook with husk on. Eggplant 325–350° F. 6–8 min./side Mushrooms 325–350° F. 6–8 min. Onions 325–350° F. 40–45 min. Wrap in foil.
Care & Maintenance Care & Cleaning WARNING Always perform the following periodic inspections and preventive maintenance procedures to prevent flashback fires from occurring and to assure that your Grill will operate properly: 1. Always allow sufficient time for the Grill to cool to a safe temperature before handling or cleaning any of its components. 2. Always inspect all of the burners frequently, and clean them as often as is necessary. 3.
Care & Maintenance Figure 16 WARNING An impairment of flow through the venturi tube could cause a fire to occur beneath the Grill, due to a flashback of gas. Always keep all ports on the sides of the burner open (Fig. 16) by periodically cleaning them with a wire brush or toothpick. Figure 17 B135 • Rotisserie Burner (if applicable) ���� Inspect the Rotisserie burner monthly, if it is used fre����������� quently. Remove the rear panel (seven screws) to access ���� the burner.
Care & Maintenance DRIP TRAY The drip tray and grease cup, located under the burner pan in the bottom Figure 19 of the Grill body are provided to catch excess cooking fats and juices. The drip tray is accessible from the rear of the Grill. It is necessary to lift up the pan slightly while pulling it out. (Fig. 19) Always confirm that the grill has cooled to a safe temperature before removing the drip tray and grease cup.
Care & Maintenance Maintenance Figure 20 BURNER ADJUSTMENT NOTICE It may be necessary to adjust the burners periodically, to compensate for variables in gas characteristics. If you notice the burner flame pattern is irregular (Refer to Figures 9a, 9b & 9c), it may be necessary to adjust the air shutter opening at the front of the venturi tubes. • The shutters are accessible under the control panel at the front of the Grill. (Fig. 20) • Use a screwdriver to loosen the locking screws.
Troubleshooting Guide PROBLEM Burner will not light POTENTIAL CAUSE ACTION REQUIRED Gas supply turned off Turn on fuel supply and retry. Out of propane Confirm the flow of gas by smell or by listening for the hiss of gas being emitted. Allow gas to clear before attempting to relight. Weigh your propane cylinder. A standard 20 lb. cylinder will weigh about 19 lbs. when it is empty and 39 lbs. when it is 80% full. WARNING Never take a propane cylinder indoors for any purpose.
Troubleshooting Guide PROBLEM Uneven burn pattern or Flashback fire POTENTIAL CAUSE Blockage in the burner or gas system ACTION REQUIRED Confirm that the venturi tubes are not blocked by insects or other debris. Use a special venturi brush to clean. (Fig. 15) Use a wire brush or toothpick to probe the orifice in the gas valve. Never enlarge the orifice. Use a small nail or toothpick to clean the burner ports. (Fig.
◆ Limited Lifetime Warranty • Rust through on all Exterior Stainless Steel Components • All Cast Iron End Caps ◆ 10 Year Warranty • Porcelain Coated Firebox and Rear Lid Assembly • All Burners except Side Burner • Stainless Steel Cabinetry & Lid ◆ 5 Year Warranty • Cast Iron Cooking Grates • Side Burner • All Remaining Parts ◆ 1 Year Warranty • Grill Lights & Rotisserie - electrical and mechanical parts (if applicable) • All Painted Parts • The warranty is nontransferable.