Winter Warm® Small Insert Homeowner’s Installation and Operating Manual For Use in North America 0888 WinterWarm Small Insert cover 4/01 Safety Notice: If this appliance is not properly installed, operated and maintained, a house fire may result. To reduce the risk of fire, follow the installation instructions. Failure to follow instructions may result in property damage, bodily injury or even death. Contact local building officials about restrictions and installation inspection requirements in your area.
WinterWarm® Small Insert Introduction Thank you for purchasing a Vermont Castings WinterWarm Small Insert, an efficient fireplace carefully engineered to bring you the latest in wood combustion principles and modern foundry technology. While it can be used to transform a traditional masonry fireplace into a powerful heater, it is also designed to be installed into a listed factory-built fireplace where no masonry fireplace and chimney exists.
WinterWarm® Small Insert Specifications WinterWarm Small Insert EPA Emissions Rating........................g/hr, catalytic 2.1* Range of heat output*................ 8,700 - 31,100 BTU/hr Maximum heat output**...........................30,000 BTU/hr Area heated***............................................. 1,000 sq. ft. Size of wood splits..................................... 18” (460mm) Fuel Capacity......................................... 30lbs. (13.5kg) Loading.......................................
WinterWarm® Small Insert Installation Installing the WinterWarm Small Insert into an existing masonry or factory-built fireplace is an effective way to add an efficient heater to your home. The existing fireplace and chimney must meet certain requirements. Requirements for Existing Fireplaces The WinterWarm Small Insert is listed for installation within a properly built masonry or heat circulating, masonry-type fireplace that is constructed in accordance with the requirements of recognized building codes.
WinterWarm® Small Insert When the insert is installed in a factory-built fireplace: • The factory-built chimney must meet type HT requirements of UL 103, ULC S629M or UL 1271988, or be re-lined from the insert to the chimney top. General Considerations / U.S. • While not required in most jurisdictions in the • • U.S., MHSC strongly recommends a full stainless steel chimney liner be installed for the insert to the chimney top to increase overall performance and reduce yearly maintenance.
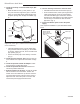
WinterWarm® Small Insert A B D,J E B C Measure side trim clearance from here A,I Fireplace Minimums A. Width at Face 26¹⁄₂” (673 mm) B. Width at 9” depth 26¹⁄₂” (673 mm) C. Depth1 14¹⁄₂” (370 mm) D. Height at Face 21¹⁄₂” (540 mm) E. Height at 15¹⁄₂” depth 21¹⁄₂” (540 mm) D,J X H C Fireplace Maximums H. Lintel depth 9¹⁄₂” (240 mm) I. Width2 44¹⁄₂” (1130 mm) J. Height2 31” (770 mm) E FP1084 1.
WinterWarm® Small Insert That is, when using brick for the hearth extension, the brick must be a minimum of 2.6” (65mm) thick. Once you know the K factor of a given material, you can use this same formula to calculate its required thickness for approved hearth protection. The WinterWarm Small Insert has two leveling screws at the front to accomodate hearth irregularities. Optional Surround Packages B Custom-made surround panels may be made from any noncombustible material.
WinterWarm® Small Insert 3. Install the Chimney Connector Starter Pipe. (Not supplied) • Mark and drill two 5/16”, (8 mm) holes 1⁵⁄₈” (41 mm) from the lower edge of the pipe. Locate the holes on an axis that will be perpendicular to the fireplace opening when the pipe is installed. (Fig. 6) 1 6 " (35mm) 8. Join the Chimney Connector to the Flue Collar. • Assemble the draw-down hook and bar (D,E,F).
WinterWarm® Small Insert Operation Your WinterWarm Insert’s Controls and What They Do Primary Air Control Lever All WinterWarm Small Insert controls are conveniently located on the front. (Fig. 8) 2:00 High 3:00 Medium Three controls regulate the performance of your WinterWarm Small Insert: 4:00 4:30 Low The primary air control supplies oxygen for the fire. The damper directs air flow within the fireplace. The variable-speed fan control, or rheostat, regulates the warm air flow into the room.
WinterWarm® Small Insert The Fans Two fans deliver a steady stream of warm air into the room. Use the fall-away handle, (used to operate the damper), to control fan settings. (Fig. 11) The fan speed should be set at “low” when operating at low to medium burn rates. The fan speed may be set anywhere between “low” and “high” when operating at high burn rates. The control setting also depends on your particular installation’s “draft,” or the force that moves air from the stove up through the chimney.
WinterWarm® Small Insert How To Build and Sustain a Wood Fire A WinterWarm Small Insert leaves the factory with the combustor installed. In the United States, it is against the law to operate this wood heater in a manner inconsistent with operating instructions in this manual, or if the catalytic combustor is deactivated or removed.
WinterWarm® Small Insert Follow these guidelines as you start and maintain the fire, and remove the ashes. 1. Open the stove damper, and open the primary air control fully. 2. Lay some crumpled newspapers on the bottom grate. Place on the paper six or eight pieces of dry, finely-split kindling. On the kindling lay two or three larger sticks of split dry wood approximately 1-2” (25-50 mm). Do not use chemicals or fluids to start the fire.
WinterWarm® Small Insert In Fireplace Insert installations, over-sized chimneys can produce less effective results than those that are properly sized, and interior chimneys usually perform better than those located outside the house. Different results may be experienced even in the same installation if you switch from burning good, dry wood to wood that is partially rotted or inadequately seasoned.
WinterWarm® Small Insert Maintenance Keep Your WinterWarm Small Insert Looking New and Working Its Best Care of the Cast Iron Surface An occasional dusting with a dry rag will keep the painted cast iron of your WinterWarm Small Insert looking new. If the paint needs retouching, first allow the surface to cool completely. Mask glass, trim parts and enamelled areas. Wire-brush those areas needing to be painted. Touch-up with high temperature stove paint available from your local dealer.
WinterWarm® Small Insert IMPORTANT NOTES Adjust the Damper as Needed • Do not operate the WinterWarm Small Insert if Examine your WinterWarm Small Insert’s damper after the first 50 hours of use and adjust it if necessary. Thereafter, check the damper at least once a year and adjust as needed. the glass is damaged or broken. • The glass used in your WinterWarm Small Insert To inspect how well the damper seals, first make sure the fire is out and the WinterWarm Small Insert is cool.
WinterWarm® Small Insert How to Replace Gaskets Replacing the Damper Gasket Your WinterWarm Small Insert uses rope-type fiberglass gaskets to make a tight seal between some parts. With use, particularly on those parts that move, gaskets can become brittle and compressed and can begin to lose their effectiveness. These will need periodic replacement. • Lift and remove the left and right burn plates. • Two wedges hold the fireback in place. Using a All of the gaskets used are made of fiberglass.
WinterWarm® Small Insert Care of the Catalytic Combustor Your wood heater contains a catalytic combustor which should be inspected regularly and replaced periodically to ensure proper operation. It is illegal in the United States to operate this wood heater in a manner inconsistent with operating instructions in this manual, or if the catalytic element is deactivated or removed.
WinterWarm® Small Insert If replacement of the refractory package is required, proceed to #10. 10. Remove 1/4-20 x 1/2” hex head screw from the damper tab holding the damper link to the damper and let the link drop down. 11. Remove the two (2) 1/4-20 x 1Z\x” hex head screws and washers holding the damper housing to the stove back and drop the damper housing out of the stove.
WinterWarm® Small Insert • Disconnect the flue liner or vent connector from the flue collar of the stove. • Slide the firechamber forward until you have access to the fireplace opening. • Inspect the flue. You can now inspect the smoke shelf area and the chimney. Before replacing the WinterWarm Small Insert, this area should be inspected for signs of deterioration and cleaned thoroughly with a chimney brush. Clean the chimney using a specially designed brush the same size and shape as the flue liner.
WinterWarm® Small Insert Appendix: Catalytic Combustor In any chemical reaction, including the combustion process, there are certain conditions which must be met before the reaction can take place. For example, a reaction may require a certain temperature, or a certain concentration of the reactants (the combustion gases and oxygen), or a certain amount of time. Catalysts, though not changed themselves during the reaction, have the ability to act at a molecular level to change these requirements.
WinterWarm® Small Insert 23 26 47 24 9 30 55 41 6 43 54 42 10 56 61 13 11 14 15 57 29 44 45 31 28 7 17 14 12 32 16 27 18 17a 39 33 62 5 25 26 8 49 21 1 36 18a 35 4 52 58 19 37 38 24 59 22 20 40 48 53 60 50 51 34 3 Draw-down Kit MHSC reserves the right to make changes in design, materials, specifications, prices and discontinue colors and products at any time, without notice. WinterWarm Small Insert Model 2080 Item Description Part Number 1. 2. 3. 4. 5. 6.
WinterWarm® Small Insert WinterWarm Small Insert 5 Model 2080 (continued) 25. 26. 27. 28. 29. 30. 31. 32. 33. 34. 35. 36. 37. 38. 39. 40. 41. 42. 43. 44. 45. 46. 47. 48. 49. 50. 51. 52. 53. 54. 55. 56. 57. 58. 59. 60. 61. 62. Item Description Part Number Coil & Shaft, Thermostat Assy. 5003733 Side Trim Panel See Chart Pg.
WinterWarm® Small Insert Warranty Limited 3 Year Warranty MHSC warrants that this woodburning stove will be free of defects in material and workmanship for a period of three years from the date you receive it, except that the catalyst, thermostat assembly, handles, glass door panels, cement, and gasketing shall be warranted as described below. MHSC will repair or replace, at its option, any part found to be defective upon inspection by a Vermont Castings, Authorized Dealer.
MHSC 149 Cleveland Drive • Paris, Kentucky 40361 www.mhsc.