
Operating instructions


10002789/0 -31- DBT33/DBT36/DBT39
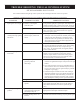
CERAMIC REFRACTORY KITS
Ceramic refractory panels are available in kit form for the
DBT series appliances.
Appliance Model Kit Name
DBT33 33BDVTCR
DBT36 36BDVCR
DBT39 39BDVCR
Take care when handling the refractory panels
as they are fragile until held in place and sup-
ported.
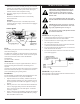
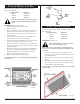
Installation, refer to Figs. 52 & 53
1. Remove the front frame/glass assembly.
2. Remove the logs.
3. Place the lower supports for the side refractory panels on
the base of the rebox. Place each support so that the
slotted hole ts over the forward screw head along the
edge of the base.
4. Lay the angular base panels in place on the oor of the
rebox on either side of the burner housing
5. Loosely attach the top adjustable tabs to the studs located
in the top of the rebox toward the front corners.
6. Place the rear refractory panel in place. Locate the lower
edge of the panel in the ledge formed by the top of the rear
log support bracket.
7. Slide the side refractory panels into place to hold the rear
panel secure. Adjust the top adjustable tabs to hold the
side panel against the rebox wall and secure the tab.
Repeat the procedure on the other side.
8. Replace the logs and frame/glass assembly.
For esthetic purposes we recommend lining up the horizontal
mortar lines.
Fig. 52
Fig. 53
FRONT WINDOW SCREEN
An optional front window screen is available for the DBT
series appliances
Appliance Model Kit Name
DBT33 33BDVTKS
DBT36 36BDVTKS
DBT39 39BDVTKS
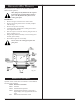
Installation, refer Fig. 54
DO NOT ATTEMPT to install or remove the
screen while the appliance is hot.
Either remove the top and bottom brass window trims or
take care not to scratch them during the installation of the
screen kit.
1. Slide the tabs on the top edge of the window screen
assembly up into the slots in the underside of the top rail
of the window frame.
2. With the tabs in the slots place the screen down against
the glass.
3. Slide the screen down the glass until the bottom edge of
the screen sits in the gap between the bottom rail of the
window frame and the window glass.
To remove the screen for glass cleaning reverse the installa-
tion procedure.
Fig. 54