
Assembly Instructions


11
91D0004
VCS300SSBI/500SSBI Series Assembly
CAUTION: Some parts may have sharp edges; to avoid injury, wearing gloves during assembly, lifting or
moving the grill is recommended.
B258
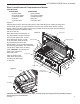
inside components
12/07
Figure 5
Cooking Grates
Finger Hole
Sear Plates
Warming Rack
Finger Hole
Control Knob
(indicator faces up)
B334
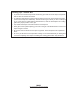
Smoker Box
B33
"
SMOKERBOX
Sear Plate
‘Z’ End
Figure 6
Step 6: Install Internal Components and Knobs
Parts Required:
VCS300SSBI VCS500SSBI
(3) Sear Plates (5) Sear Plates
() Cooking Grates (4) Cooking Grates
(1) Warming Rack (1) Warming Rack
(4) Knobs (6) Knobs
(1) Smoker Box (1) Smoker Box
Figure 5
Carefully place each of the sear plates side by side inside the grill by making sure the semi-
circular finger groove is facing toward the front of the grill. Do the same with the cooking
grates, making sure the finger groove is facing toward the front of the grill. Set the warming
rack into the supports located on either
side of the rear lid.
Place the smoker box assembly on
any sear plate by laying the bracket
over the sear plate so the ‘z’ ends
of the bracket fit into the ‘z’ slots
of the sear plate. Slide the smok-
er box assembly back into the
locked position. (Fig. 6) Continue placing
the remaining sear plates. The smoker box
may be left in place when not being
used. CAUTION: Only add wood
chips to the smoker box
when grill is cool.
Align the knobs on the
valve stems and push in
until the knob sits snugly
on the stem.