Vernier LabPro User’s Manual Vernier Software & Technology 13979 SW Millikan Way Beaverton, Oregon 97005-2886 (503) 277-2299 Toll Free (888) 837- 6437 FAX (503) 277-2440 www.vernier.com info@vernier.
Vernier LabPro User’s Manual Copyright 2008, 2013 by Vernier Software & Technology. All rights reserved. You are entitled to reproduce parts of this manual for use in your school only. No part of this manual may be used or reproduced in any other manner without written permission of Vernier Software & Technology, except in the case of brief quotations embodied in critical articles or reviews.
Table of Contents Introduction ........................................................................................................... 4 LabPro Components ............................................................................................. 4 Buttons ............................................................................................................... 2 Lights ................................................................................................................. 2 Beeps ......
Introduction The Vernier LabPro is a versatile data-collection interface that can be used to collect data in a variety of ways in the classroom or in the field. It can be used with a computer, TI graphing calculator, or as a standalone data logger. More than 60 Vernier sensors are available for use with LabPro. By following this guidebook, you will learn to Set up and collect data with a Macintosh® or Windows® computer. Set up and collect data with a Texas Instruments graphing calculator.
Buttons The three buttons on the top of LabPro are used for the following purposes: TRANSFER begins transfer of calculator programs or applications (apps) between LabPro and an attached TI graphing calculator. QUICK SET-UP clears data stored in LabPro’s memory, then polls all channels for auto-ID sensors and sets them up to collect data. QUICK SET-UP is used when neither a computer nor a calculator is attached to LabPro and works only with auto-ID sensors. START/STOP begins sampling for Quick Set-Up.
Using LabPro with a Computer This section provides the basics for collecting data with LabPro on a Macintosh or Windows computer. All you have to do is connect LabPro, install the software, attach one or more sensors, start the Logger Pro software, and you are ready to collect data. Computer and Software Requirements To use LabPro on a computer, you will need Logger Pro software running on a Macintosh or Windows computer. Check the Logger Pro software for system requirements.
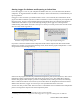
Starting Logger Pro Software and Preparing to Collect Data Locate the Logger Pro icon on your computer and double-click on it, or use the Start menu (Windows computers). An important feature of LabPro is its ability to detect auto-ID sensors, and automatically set up an experiment.2 If Logger Pro does not detect your LabPro and/or a sensor is not connected, the Collect button will be greyed out. Make certain that you have a LabPro connected to a serial or USB port of your computer and that it has power.
Where to Go Next Since you may want experiments for a particular course, or detailed information on LabPro or Logger Pro, the following books and manuals provide additional help. They are described in Appendix C. The Logger Pro tutorials are a great way to get acquainted with LabPro.
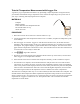
Tutorial: Temperature Measurement with Logger Pro A good way to get acquainted with LabPro is by performing a simple experiment. Using this tutorial, you will take measurements using a temperature sensor. Follow the simple steps, and you are well on your way to collecting and analyzing data with a computer. MATERIALS Computer LabPro interface Vernier Stainless Steel Temperature Probe One 250 mL beaker or cup 100 mL hot water PROCEDURE 1. Place about 100 mL of hot water into a 250 mL beaker or a cup. 2.
Using LabPro with a Calculator This section provides the basic steps for collecting data with LabPro and a Texas Instruments graphing calculator. All you have to do is connect the hardware pieces to the calculator, attach one or more sensors, start the calculator program, and you are ready to collect data.4 Note: LabPro cannot be used with TI-Nspire or TI-Nspire CAS handhelds or computer software. There are two software options for collecting data with a calculator: DataMate or EasyData.
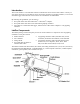
2. 3. 4. 5. Insert the upper end of the calculator into the cradle. Press down on the lower end of the calculator until it snaps into place. Slide the bottom of the cradle onto the top of LabPro until it clicks in place. Plug one end of the LabPro-to-calculator cable into the I/O port of the calculator. Plug the other end into the bottom end of the LabPro. Calculator Program Installation When it is time to collect data, you will run a program called DataMate on the calculator.
Starting the DataMate Program and Preparing to Collect Data Use the following steps to start the DataMate program on your calculator: TI-82 and TI-83 Calculators: Press PRGM , then press the calculator key for the number that precedes DATAMATE (usually 1 ). Press ENTER . An introductory screen will appear, followed by the main screen. TI-73 and TI-73 Explorer Calculators: Press APPS , then press the calculator key for the number that precedes DATAMATE. Press ENTER .
Using EasyData Connecting the Equipment EasyData comes loaded on TI-84 Plus, TI-84 Plus Silver Edition, TI-83 Plus graphing calculators and TI-84 Plus C. There are several data-collection devices that can be used with EasyData. These devices include the CBL 2™, LabPro®, CBR™, CBR 2, Go!®Motion, and the Vernier EasyTemp and Vernier EasyLink. For more information on connecting data-collection devices other than LabPro, please refer to the device’s user guide.
Where to Go Next Since you may want experiments for a particular course, or detailed information on LabPro or calculator programs, the following lab books and manuals provide additional help. They are described in Appendix C. Logger Pro tutorials are a great way to get acquainted with LabPro.
Tutorial: Temperature Measurement with DataMate A good way to get acquainted with LabPro is by performing a simple experiment. Using this tutorial, you will take measurements using a Temperature Probe. Just follow the simple steps, and you are well on your way to collecting and analyzing data with a calculator. MATERIALS TI graphing calculator LabPro interface Vernier Stainless Steel Temperature Probe One 250 mL beaker or cup 100 mL hot water PROCEDURE 1.
Tutorial: Temperature Measurement with EasyData A good way to get acquainted with LabPro is by performing a simple experiment. Using this tutorial, you will take measurements using a Temperature Probe. Just follow the simple steps, and you are well on your way to collecting and analyzing data with a calculator. MATERIALS TI graphing calculator LabPro interface Vernier Stainless Steel Temperature Probe One 250 mL beaker or cup 100 mL hot water PROCEDURE 1.
Using LabPro Remotely Having a computer or calculator attached to LabPro during data collection is preferable, because it provides much more flexibility in your data collection and provides a screen for immediate feedback of your results. There are times, however, when disconnecting LabPro from the computer or calculator to collect data is useful. For example, remote data collection is perfect for gathering acceleration data on a roller coaster.
1. Set up LabPro for remote data collection. a. Put fresh batteries in the LabPro. b. Set up the sensors, LabPro, and Logger Pro just as you normally would to collect data in Time Based mode. c. Instead of clicking the button, choose Remote Remote Setup from the Experiment menu.10 A summary of your setup will be displayed. d. Click to prepare the LabPro. e. Disconnect the LabPro from the computer. f.
3. Retrieve the data. a. Start Logger Pro if it is not already running. Choose Continue Without Interface in the Connect LabPro dialog and click . b. Open the experiment file used to set up LabPro. c. Attach LabPro to the computer. d. If a Remote Data Available window appears, click the YES button. Click ,which accepts the default to retrieve remote data into the current file.
b. Press to select MODE and press ENTER . c. Select TIME GRAPH from the SELECT MODE menu. d. Select CHANGE TIME SETTINGS from the TIME GRAPH SETTINGS menu to set the data collection rate. e. Enter the time between samples in seconds (remember to finish your entry with ENTER ). f. Enter the number of samples. 3. Set up the interface for manual triggering. a. b. c. d. Select ADVANCED from TIME GRAPH SETTINGS. Select CHANGE TRIGGERING from ADV. TIME GRAPH SETTINGS. Select MANUAL from SELECT TRIGGERING.
7. The updated Time Graph Settings are displayed. Select 8. EasyData is now set for triggering. When set trigger value is met. to return to the main screen. is selected, data collection will not begin until the Manual Triggering In manual triggering, data collection starts when the Start/Stop or Trigger button on the data-collection device (LabPro, CBL 2, CBR, or CBR 2) is pressed. Follow these steps to set up for manual triggering. 1. From the EasyData main screen, select , and then select Time Graph..
Sensor Warm-Up Times Some sensors require a certain warm-up period before an accurate measurement can be taken. LabPro handles this automatically in remote modes by warming up each sensor for the appropriate amount of time. The Turbidity Sensor, for example, requires a 2-second warm-up period. The table below lists all sensors with warm-up times of 2 seconds or longer. If a sensor is not on this list, its warm-up time is negligible.
Appendix A: Troubleshooting Tips Refer to http://www.vernier.com/til/1613/ for additional troubleshooting tips. Problem When LabPro is used with the computer the Logger Pro 3 Collect button is faded (or the Logger Pro 2 Collect button does not appear). Cause/Solution The Collect button does not appear because the computer could not communicate with the interface. Check each of the following: Make sure the cables are firmly attached. Make sure LabPro is connected to the correct port on the computer.
Appendix B: Beep Sequences LabPro makes four kinds of sounds or “beeps.” A “good” beep is a medium tone followed by a high tone. A “caution” beep is a medium tone followed by another medium tone. A “bad” beep is two high tones. A “tick” sound is made when a key is pressed.
Appendix C: Support Materials for LabPro Sensors Sensor 3-Axis Accelerometer 25-g Accelerometer Low-g Accelerometer Anemometer Barometer Blood Pressure Sensor Calculator-Based Ranger 2 Charge Sensor CO2 Gas Sensor Colorimeter Conductivity Probe Constant Current System Current Probe High Current Sensor Diffraction Apparatus Digital Control Unit Dissolved Oxygen Probe Vernier Optical DO Probe Drop Counter Dual-Range Force Sensor EKG Sensor Electrode Amplifier Ethanol Sensor Exercise Heart Rate Monitor Flow Ra
pH Sensor Tris-Compatible Flat pH Sensor Photogate Polarimeter (Chemical) Power Amplifier Vernier Projectile Launcher Pyranometer Digital Radiation Monitor Vernier Radiation Monitor Relative Humidity Sensor Respiration Monitor Belt (requires GPS-BTA) Rotary Motion Sensor Salinity Sensor Soil Moisture Sensor Sound Level Meter Spirometer Direct-Connect Temperature Probe Extra Long Temperature Probe Stainless Steel Temperature Probe Surface Temperature Sensor Wide-Range Temperature Probe Thermocouple TI Light
Additional Manuals There are a number of additional manuals that can help you use LabPro with a computer or calculator. LabPro Technical Reference – The reference provides detailed information on the LabPro hardware and the software command structure. This manual is available free from our web site, www.vernier.com. Logger Pro Tutorials – This manual provides an excellent introduction to the Logger Pro software. The tutorials show you how to collect data with a Temperature Probe and a Motion Detector.
Chemistry with Vernier........................................ CWV Some of the experiments include Vapor Pressure of Liquids Hess’s Law Determining the Concentration of a Solution Conductivity of Saltwater Acid-Base Titration Pressure-Temperature Relationship in Gases Advanced Chemistry with Vernier .......................
Earth Science with Vernier.................................. ESV Some of the experiments include The Greenhouse Effect Solar Homes Soil pH Water Treatment UV Light and Clothing Wind Power Real-World Math with Vernier ............................ RWV Some of the experiments include Interpreting Graphs Periodic Phenomena Straight Line Distance Graphs Exponential pH Change How Objects Cool The Inverse Relationship Water Quality with Vernier .................................
Investigating Environmental Science through Inquiry ..... ESI Some of the experiments include Seasons and Angle of Insolation Long Term Water Monitoring Acid Deposition and Its Effect on Aquatic Ecosystems A Pollution Study Water Treatment Biodiversity in Ecosystems Agricultural Science with Vernier .......................
Appendix D: Updates to the LabPro Operating System Since LabPro has Flash memory, you can update your interface with the most recent operating system, also called firmware. There are two methods of updating the Flash on your interface. You can use either the LabPro serial or USB cable or a TI-GRAPH LINK™ cable to upgrade the operating system. In either case, the files you need and the instructions for the update can be downloaded from the Vernier web site (www.vernier.com/calc/flash.html).